

3D to 2D imaging - brain
Logo

3D to 2D spatial workflow for tissue analysis

A unified spatial biology workflow enables whole‑organ 3D imaging and high‑plex molecular analysis from the same sample, helping researchers move from broad tissue context to a precisely selected 2D section of interest. By combining light sheet fluorescence microscopy with the UltraMicroscope Blaze™ and multiplexed cyclic immunofluorescence on the MACSima® Platform, the workflow supports a targeted yet unbiased approach to identifying the most representative region for downstream analysis.

This 3D to 2D strategy helps maximize efficiency by reducing guesswork in section selection. Volumetric imaging of optically cleared samples enables researchers to survey the full tissue architecture first, identify biologically relevant regions of interest, and then proceed to single-cell-level multiplexed multiomic profiling with high spatial accuracy. By preserving tissue morphology and epitope integrity throughout 3D immunolabeling, optical clearing, sectioning, and multiplex staining, the workflow enables reliable coregistration between macroscopic structures and molecular features, supporting confident, representative, and data-driven analysis of complex tissue microenvironments.

Dive deeper into the 3D to 2D workflow

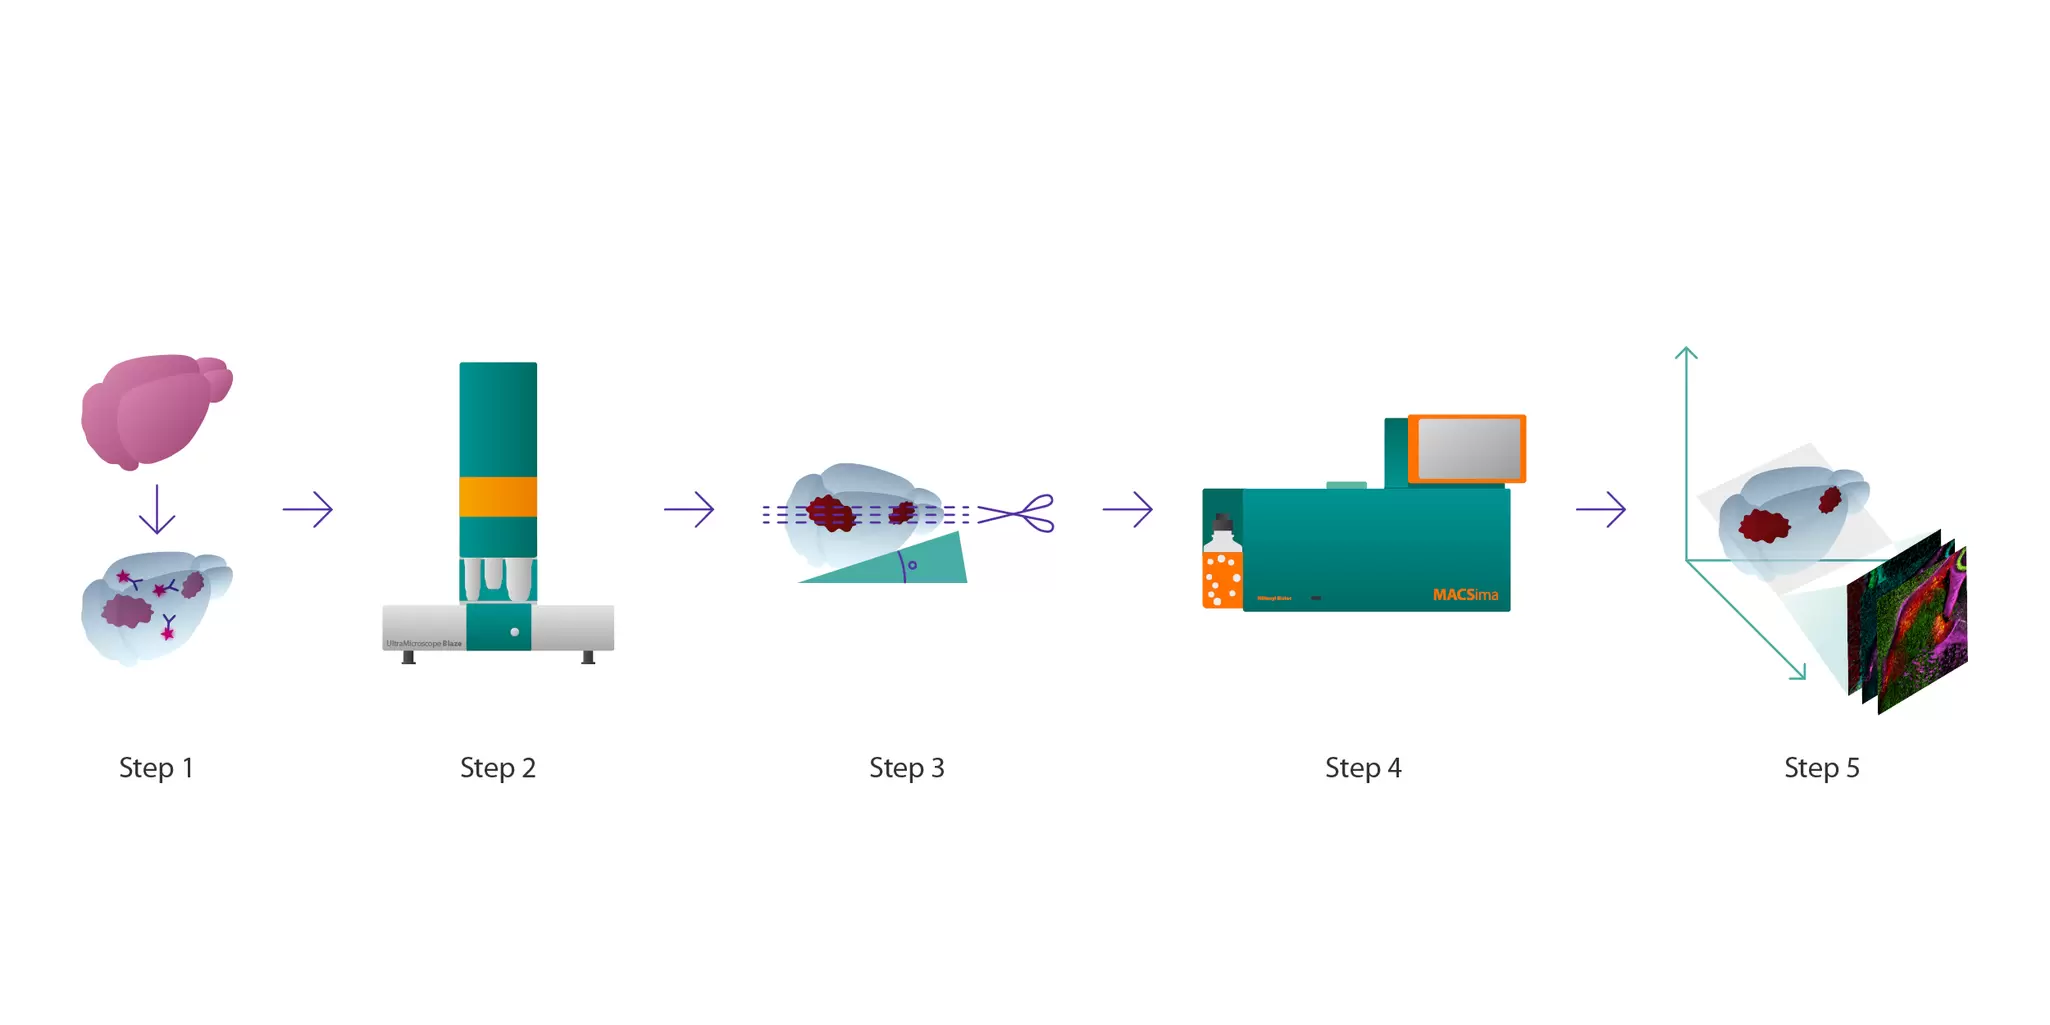
Step 1: Sample collection, fixation, and antibody staining

In most cases, specimens, such as mice, undergo transcardial perfusion using PBS/EDTA and PFA buffer. Afterwards, the 3D sample of interest, such as mouse brain hemispheres, is extracted and fixed in a 4% PFA/PBS solution for 2.5 hours at 2–8 °C, followed by washing in PBS. After fixation, the samples are incubated in the Permeabilization Solution of the MACS® Deep Clearing Kit for 24 hours on a MACSmix™ Tube Rotator.

Sample preparation for 3D imaging

After fixation, samples are prepared for 3D imaging as follows:

  • Permeabilization: Fixed samples are incubated in the Permeabilization Solution of the MACS Deep Clearing Kit for 24 hours on a MACSmix Tube Rotator.
  • Antibody staining: Following this step, antibodies suitable for 3D samples are used for immunostaining (e.g., anti-GFP-Alexa Fluor® 647 Nanobody). The 3D immunofluorescence (3D-IF) antibody is diluted in the Antibody Staining Solution of the MACS Deep Clearing Kit, and samples are incubated for 7 days at 37 °C with gentle shaking. Note that prolonging the incubation time may improve staining results.
  • Dehydration: After antibody incubation, samples are washed with Antibody Staining Solution and dehydrated through a series of ascending ethanol (EtOH) dilutions in PBS with 2% Tween® 20 (v/v). This dehydration is performed under continuous agitation at 28 °C, starting from 30% up to 100% EtOH.
  • Tissue clearing: Samples are optically cleared by incubation in the Clearing Solution of the MACS Deep Clearing Kit for at least 24 hours at room temperature under slow rotation on a MACSmix Tube Rotator.

Step 2: 3D imaging with the UltraMicroscope Blaze

Next, 3D imaging of optically cleared samples is performed using the UltraMicroscope Blaze in combination with MACS Imaging Solution. An initial overview is captured with the 1.1×/0.1 MI Plan objective to identify regions of interest. For detailed imaging, the 12×/0.53 MI Plan objective is used to generate a high-resolution 3D map. From this 3D map, a region of interest (ROI) is identified and specifically sectioned from the specimen.

3D visualization of mouse glioblastoma architecture

This video shows a whole mouse brain with glioblastoma that was optically cleared and stained using anti-GFP Alexa Fluor 647 Nanobody from Chromotek and the Antibody Staining Solution of the MACS Deep Clearing Kit. The brain was then imaged using the UltraMicroscope Blaze. The 3D rendering and reconstruction were performed with Imaris v10.2.0 (Oxford Instruments).

Step 3: Precise sectioning of the 3D sample

High-resolution 3D imaging of optically cleared samples provides a detailed view of tissue architecture, enabling precise identification of the ROI and its orientation within the specimen. This spatial information makes it possible to define the exact cutting plane for downstream analysis. To achieve this, the angle between the ROI and sample surface is measured, and a custom agarose embedding approach corrects any deviation, aligning the ROI parallel to the cryostat cutting plane. This preparation ensures accurate cryosectioning while preserving structural integrity for subsequent molecular analyses with MACSima Imaging Cyclic Staining (MICS).

Before sectioning, the sample undergoes a series of preparation steps to ensure correct alignment and structural preservation:

Rehydration: The sample transitions through descending ethanol concentrations in PBS with 2% Tween 20 (v/v): 100% (8 h), 90% (overnight), 70% (4 h), 50% (4 h), and 30% (overnight), followed by PBS steps (8 h and overnight) at 28 °C with gentle shaking at 400 rpm.

Cryoprotection: Specimens are incubated in 30% sucrose (w/v) in PBS at 2–4 °C until full sedimentation, typically within 24–72 h.

Angle determination and correction for cryosectioning: 3D imaging data guide sectioning alignment. ROI and tissue surfaces are generated in Imaris (v9.9.1), and the cutting-plane tool defines the correct orientation. Angle measurements in ImageJ provide embedding guidance.

Embedding and freezing: Tissues acclimate in embedding matrix for at least 30 min at room temperature in the dark. An agarose block is trimmed to match the measured angle using a printed guide and confirmed with a protractor. The sample is positioned in an embedding mold with matrix and snap-frozen in precooled isopentane for 30–60 s.

Cryosectioning: The angle-corrected sample is cut into 10 µm sections at –20 °C and mounted on adhesion slides. Sections are verified against simulated planes from the 3D-IF dataset using fluorescence microscopy, then stored at –80 °C for long-term preservation.

Step 4: High-plex imaging with the MACSima Platform

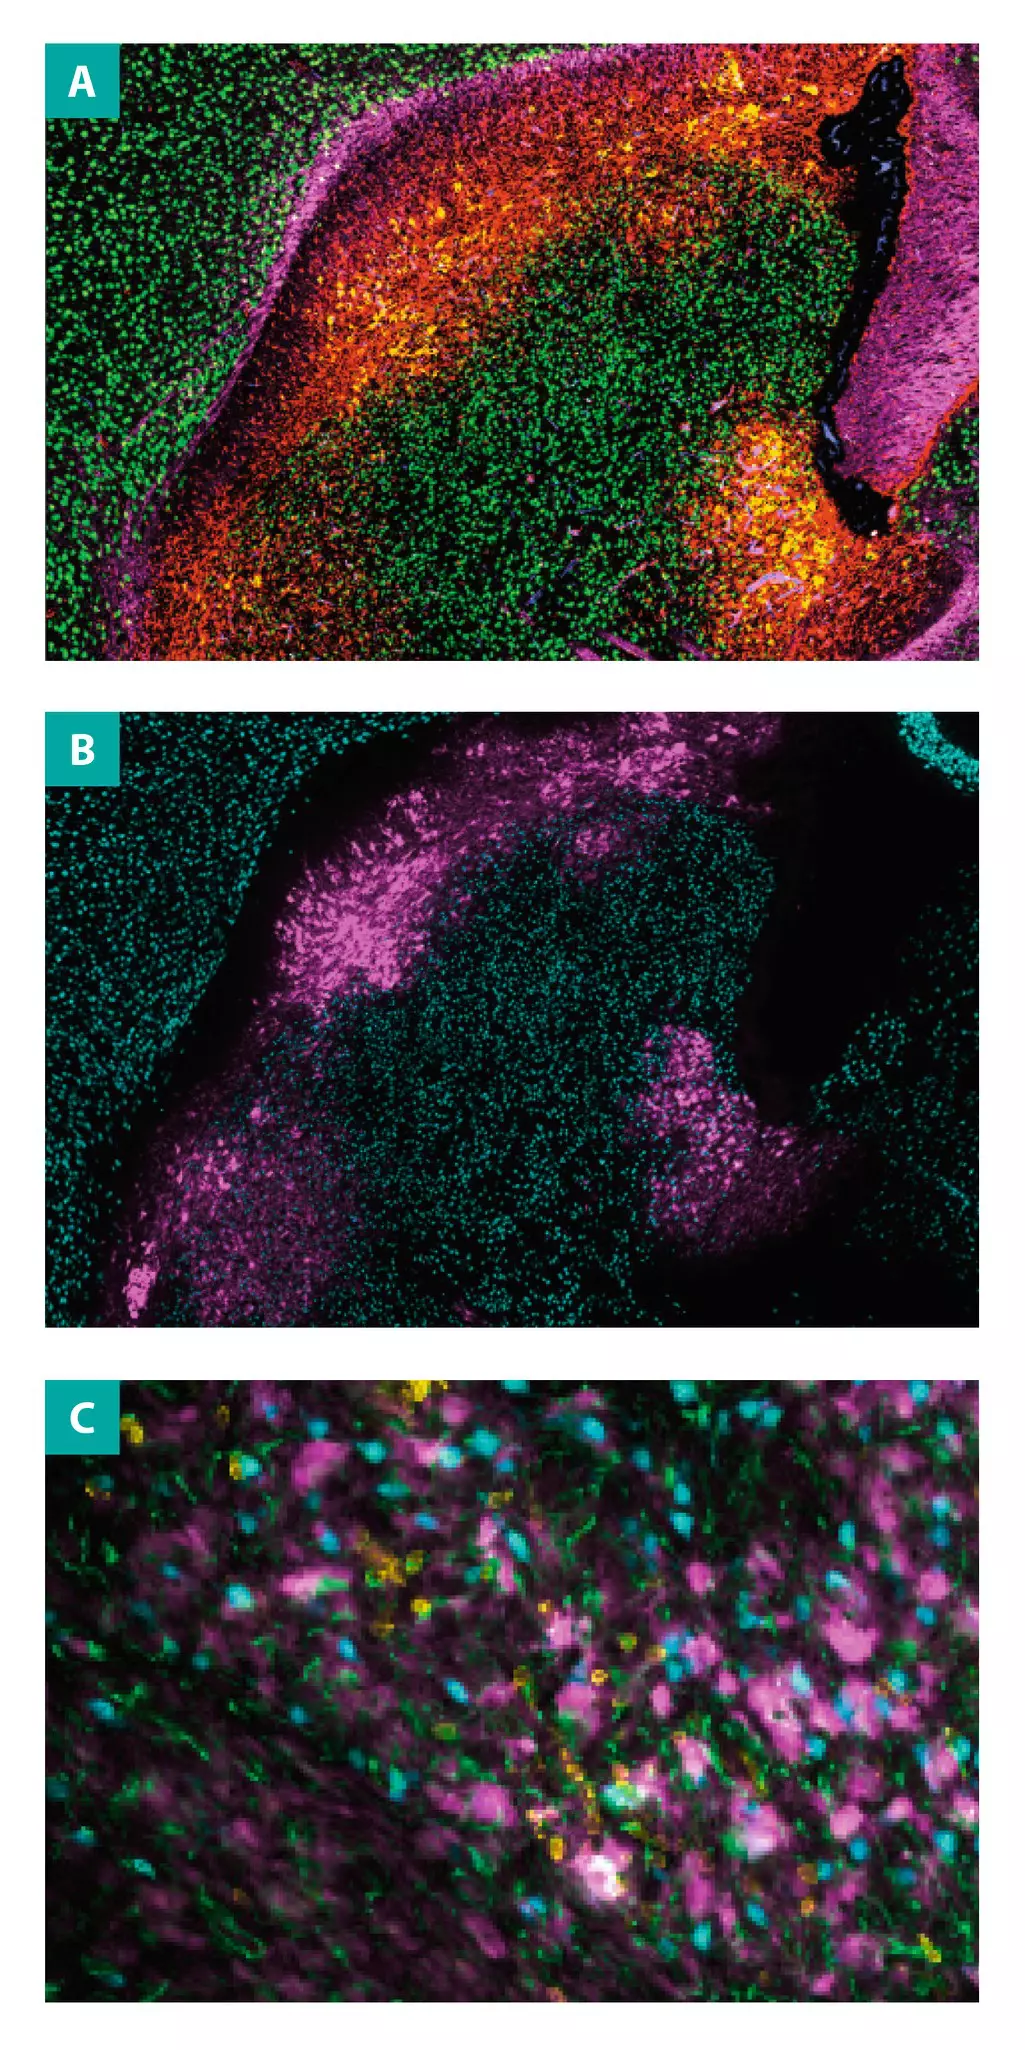
Result images from mouse brain, imaged in 3D and sectioned on the most interesting planes.

Once sectioned, the 10-µm tissue slice is analyzed on the MACSima Platform for deep multiplexed profiling. Using fully automated MICS technology, the system performs iterative cycles of staining, imaging, and signal removal, enabling hundreds of markers to be detected on the same section without compromising tissue integrity. This approach allows researchers to design custom antibody panels aligned with specific research questions and obtain highly resolved molecular insight from a single region of interest.

Feasibility study

To demonstrate the scalability of this workflow, a single region of interest was analyzed with sequential staining of 108 fluorochrome-conjugated antibodies plus DAPI nuclear counterstain. Raw image data were processed for registration and background correction, then imported into MACS iQ View – Spatial Biology analysis software for visualization and multi-marker analysis. Importantly, the 3D-IF antibody signal was captured before autofluorescence bleaching, ensuring accurate alignment between 3D and 2D datasets.

The resulting dataset delivered a highly detailed spatial profile of tissue composition. The same section successfully hosted 108 individual markers, including conjugates such as FITC, PE, and Vio® 780. Target proteins included neural and tumor-associated markers such as nestin, CD271 (REA648), CD146, NeuN, neurofilament, CD45 (REA737), GFAP (REA335), and EGFR (REA939). This study confirms the feasibility of combining 3D-guided ROI selection with high-plex molecular imaging on a single tissue section, providing powerful multi-scale insight.

Step 5: From 3D imaging to 2D insight

The workflow connects volumetric 3D imaging with multiplexed immunostaining, creating a continuous view from tissue architecture to single-cell resolution.

Starting with 3D imaging ensures regions of interest are identified in full spatial context before moving to deep multiplex analysis of hundreds of markers. This approach preserves tissue morphology, supports accurate section selection, and maintains spatial relationships throughout the workflow.

Designed for translational and preclinical research, this integrated method accelerates biomarker discovery, informs targeted therapy development, and provides new insight into complex tumor environments such as glioblastoma. Its flexibility also makes it suitable for studying other diseases that require highly resolved spatial biology, including neurodegeneration and immune-related disorders.

Related publications

Protocol for 3D-guided sectioning and deep cell phenotyping via light sheet imaging and 2D spatial multiplexing
Bigott, K. et al. (2026) STAR Protoc. 7(1): 104296 | Read the article

Integrated 3D light-sheet and 2D multiplex imaging for deep histological profiling of a somatic mouse glioblastoma model
Tiveron, M. C. et al. (2025) bioRxiv. doi: 10.1101/2025.10.31.685751 | Read the article