- For detailed information how to use ImSpector, refer to the respective user manual.
Set-up of Experiment Manager in ImSpector 7.7 or higher when using MACS® UltraMount multi-sample holders
This application protocol describes step-by-step how you can save, load, or configure predefined measurement templates and set up experiments with the Experiment Manager in the UltraMicroscope Blaze™ ImSpector 7.7 or higher. In combination with the MACS UltraMount multi-sample holders repeatable high-throughput experiments are possible. A general introduction video can be watched in the Miltenyi University.
Protocol
 View details
Before starting the experiment
- Make sure the MACS UltraMount sample arm is mounted on the UltraMicroscope Blaze Imaging System.
- Slide the sample holder in the dovetail junction of the sample arm. The tapered end shows the insertion direction. Push the sample holder until the mechanical stop is reached to obtain a reproducible position across measurements.
▲ Note: Due to the design of the holder, acquisition is possible with one-sided illumination only. These settings are automatically selected when using the preconfigured measurement template (e.g., “MACS_UltraMount48_default”) for this type of sample holder.
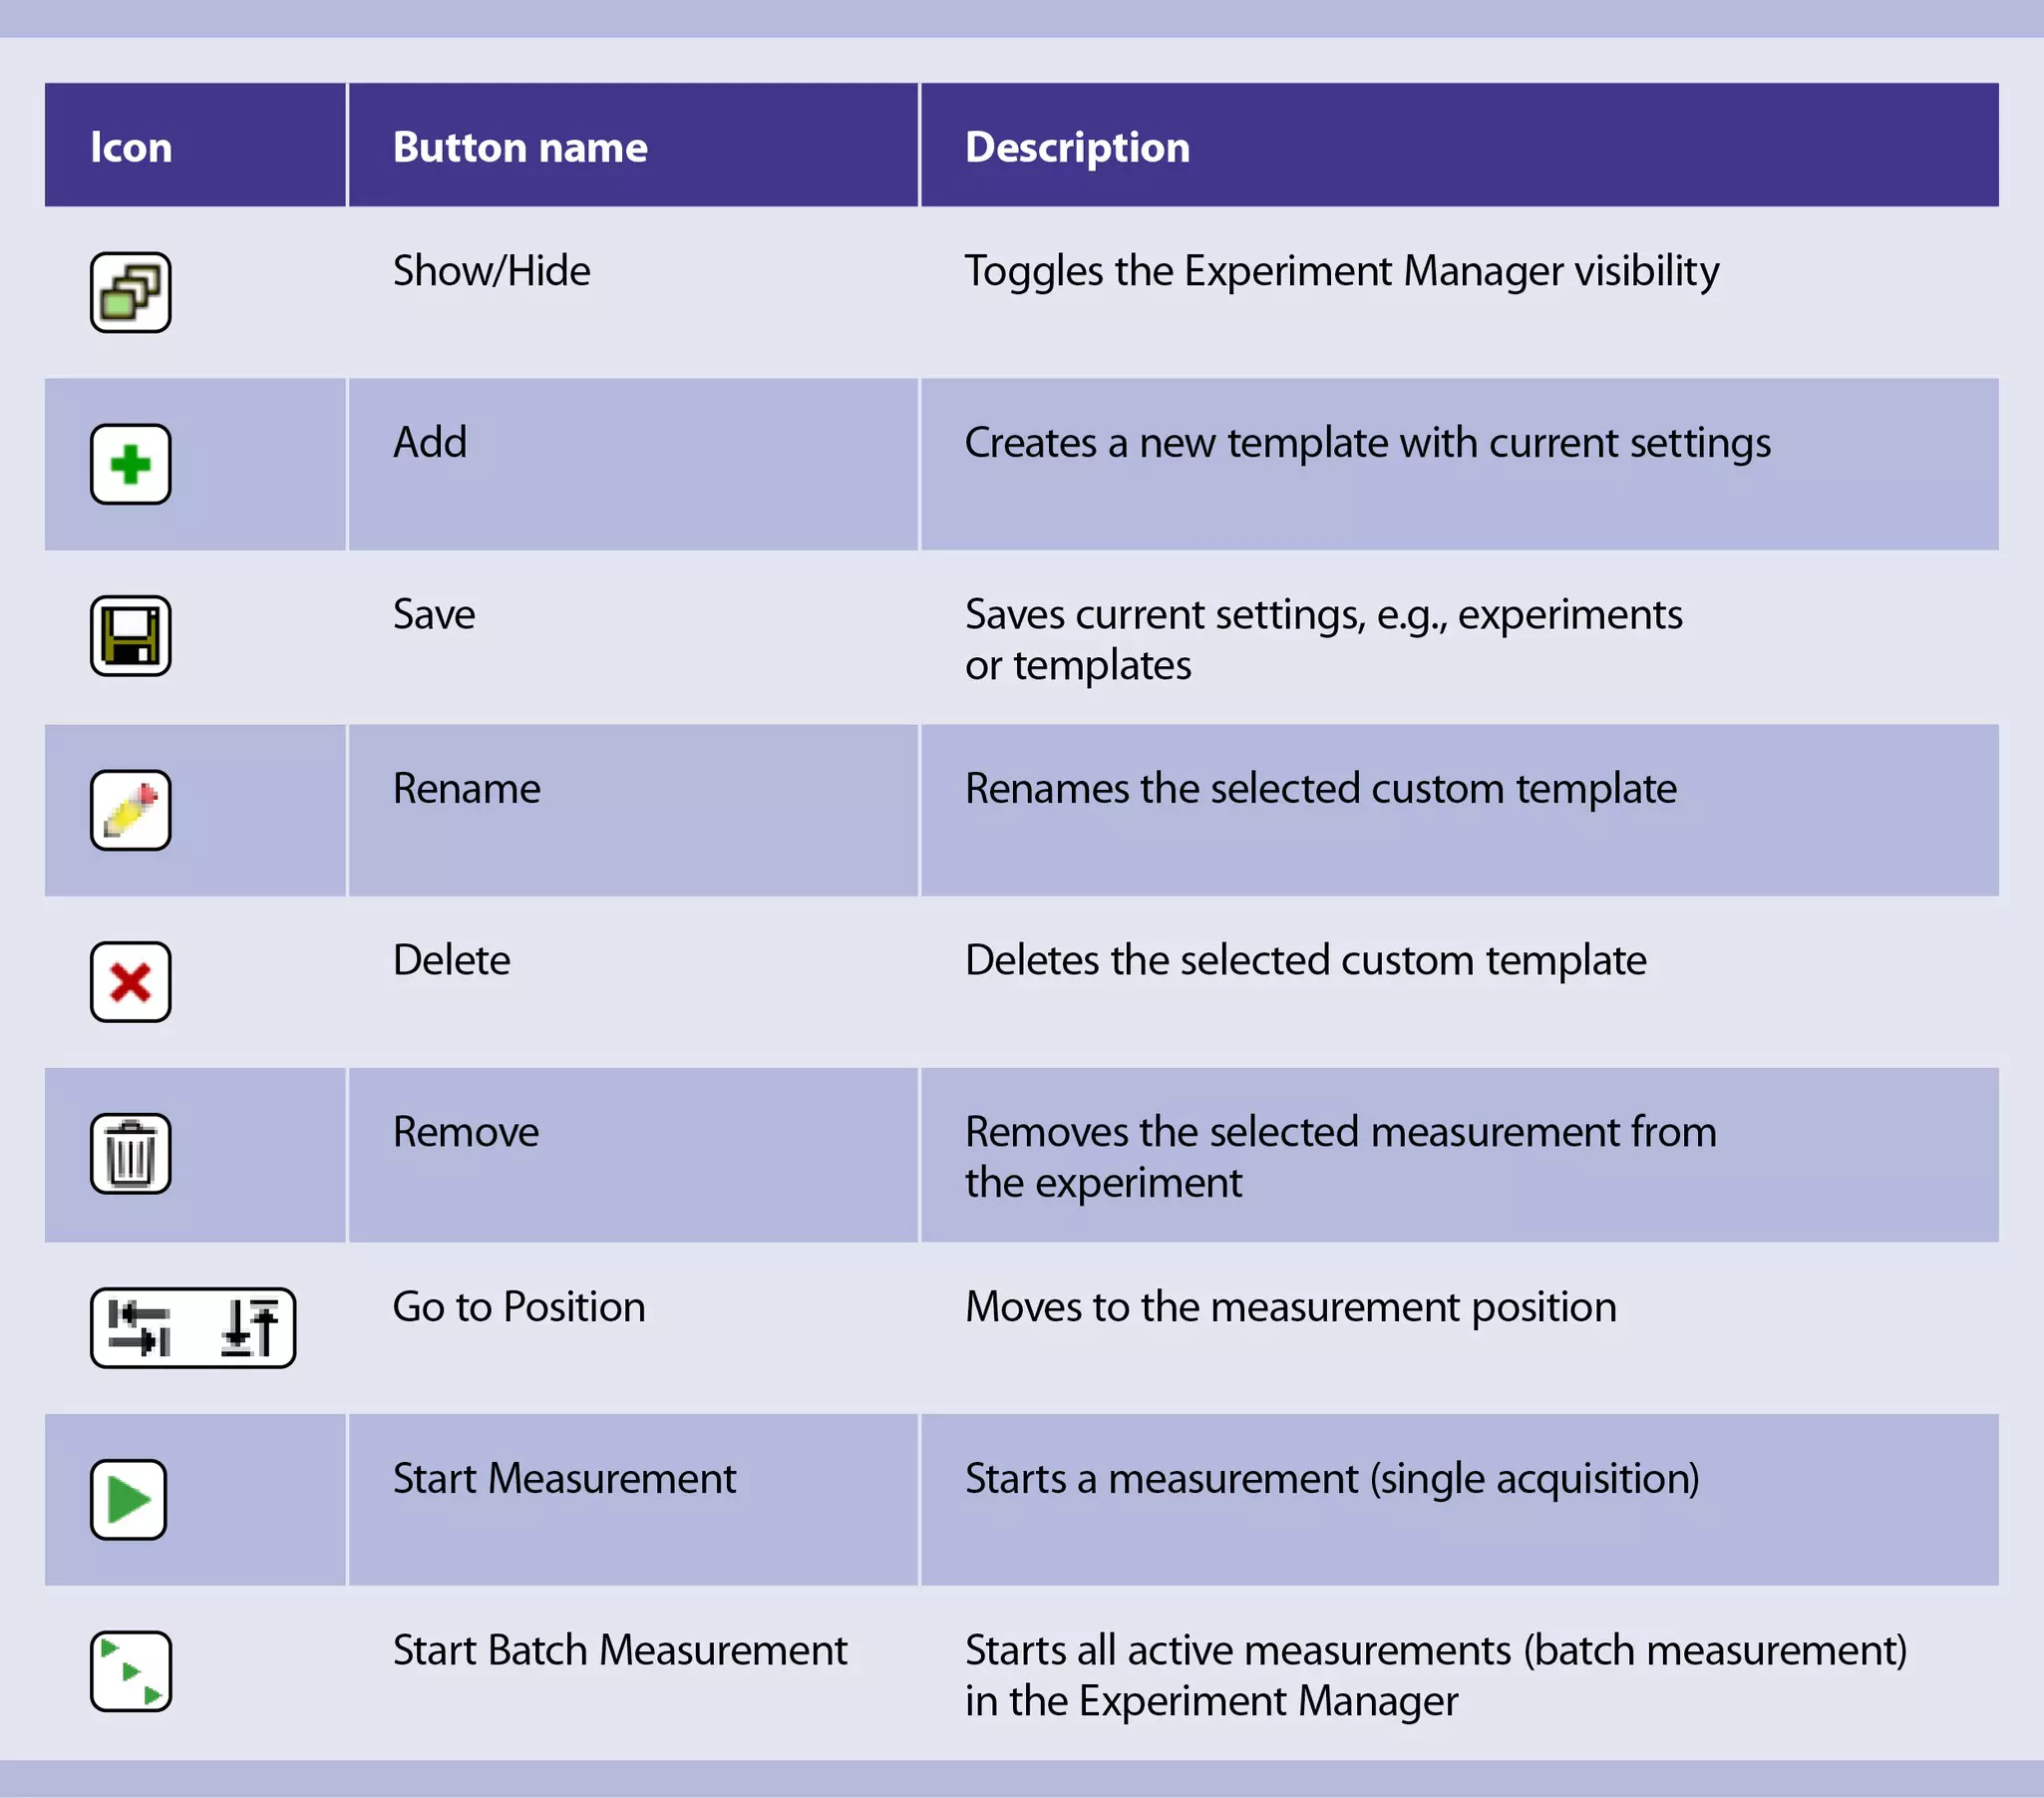
The Experiment Manager (figure 2) should be visible by default on the far right of the ImSpector window. If not, deactivate hiding it under Window > Hide Experiment Manager or toggle it with the Show/Hide button in the tool bar.
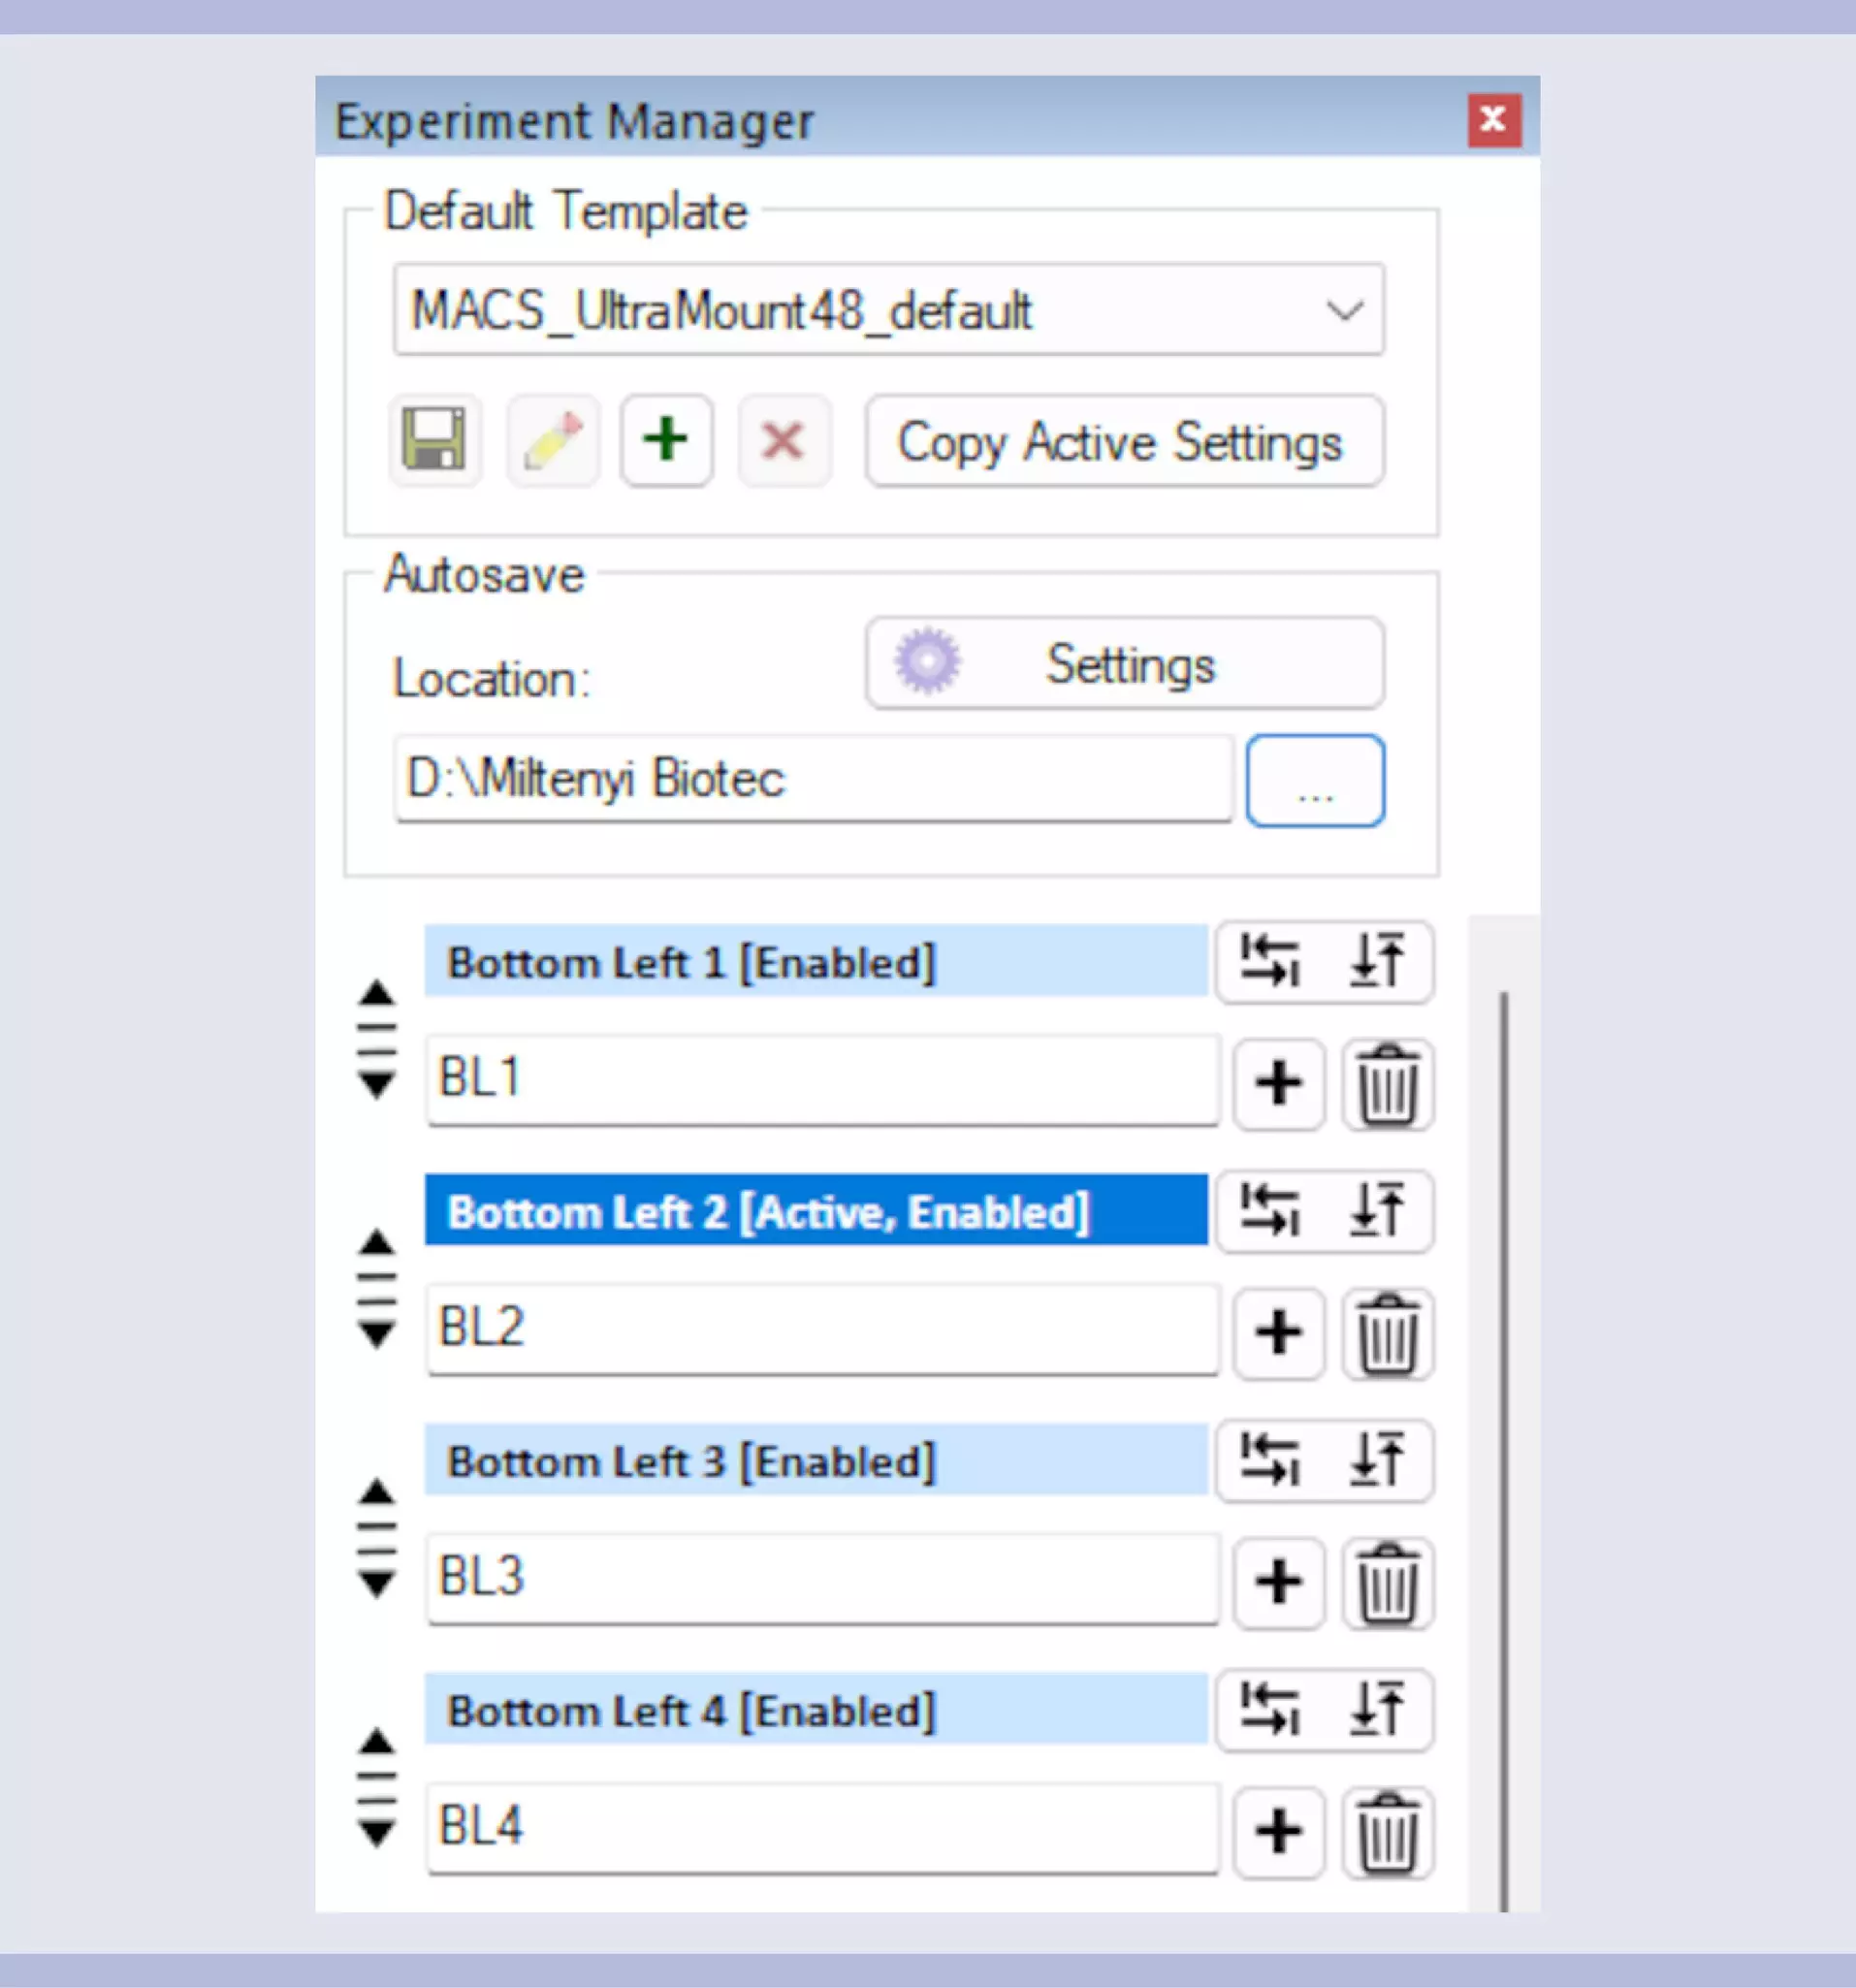
Select a template from the dropdown list. Default templates are provided by Miltenyi Biotec. These are specialized templates for the use in combination with the MACS UltraMounts.
In the Experiment Manager, individual templates can be added, saved, renamed, or deleted. An overview of icons can be found in figure 1. Within a template, all listed measurements are stored as a batch measurement. Single measurements, e.g., reflecting different samples and positions, can be activated or deactivated by right-clicking them and selecting the option in the menu, thus including or excluding them from the batch. A template with just one measurement can also be created for repetitive measurement of the same single sample and/or position across trials.
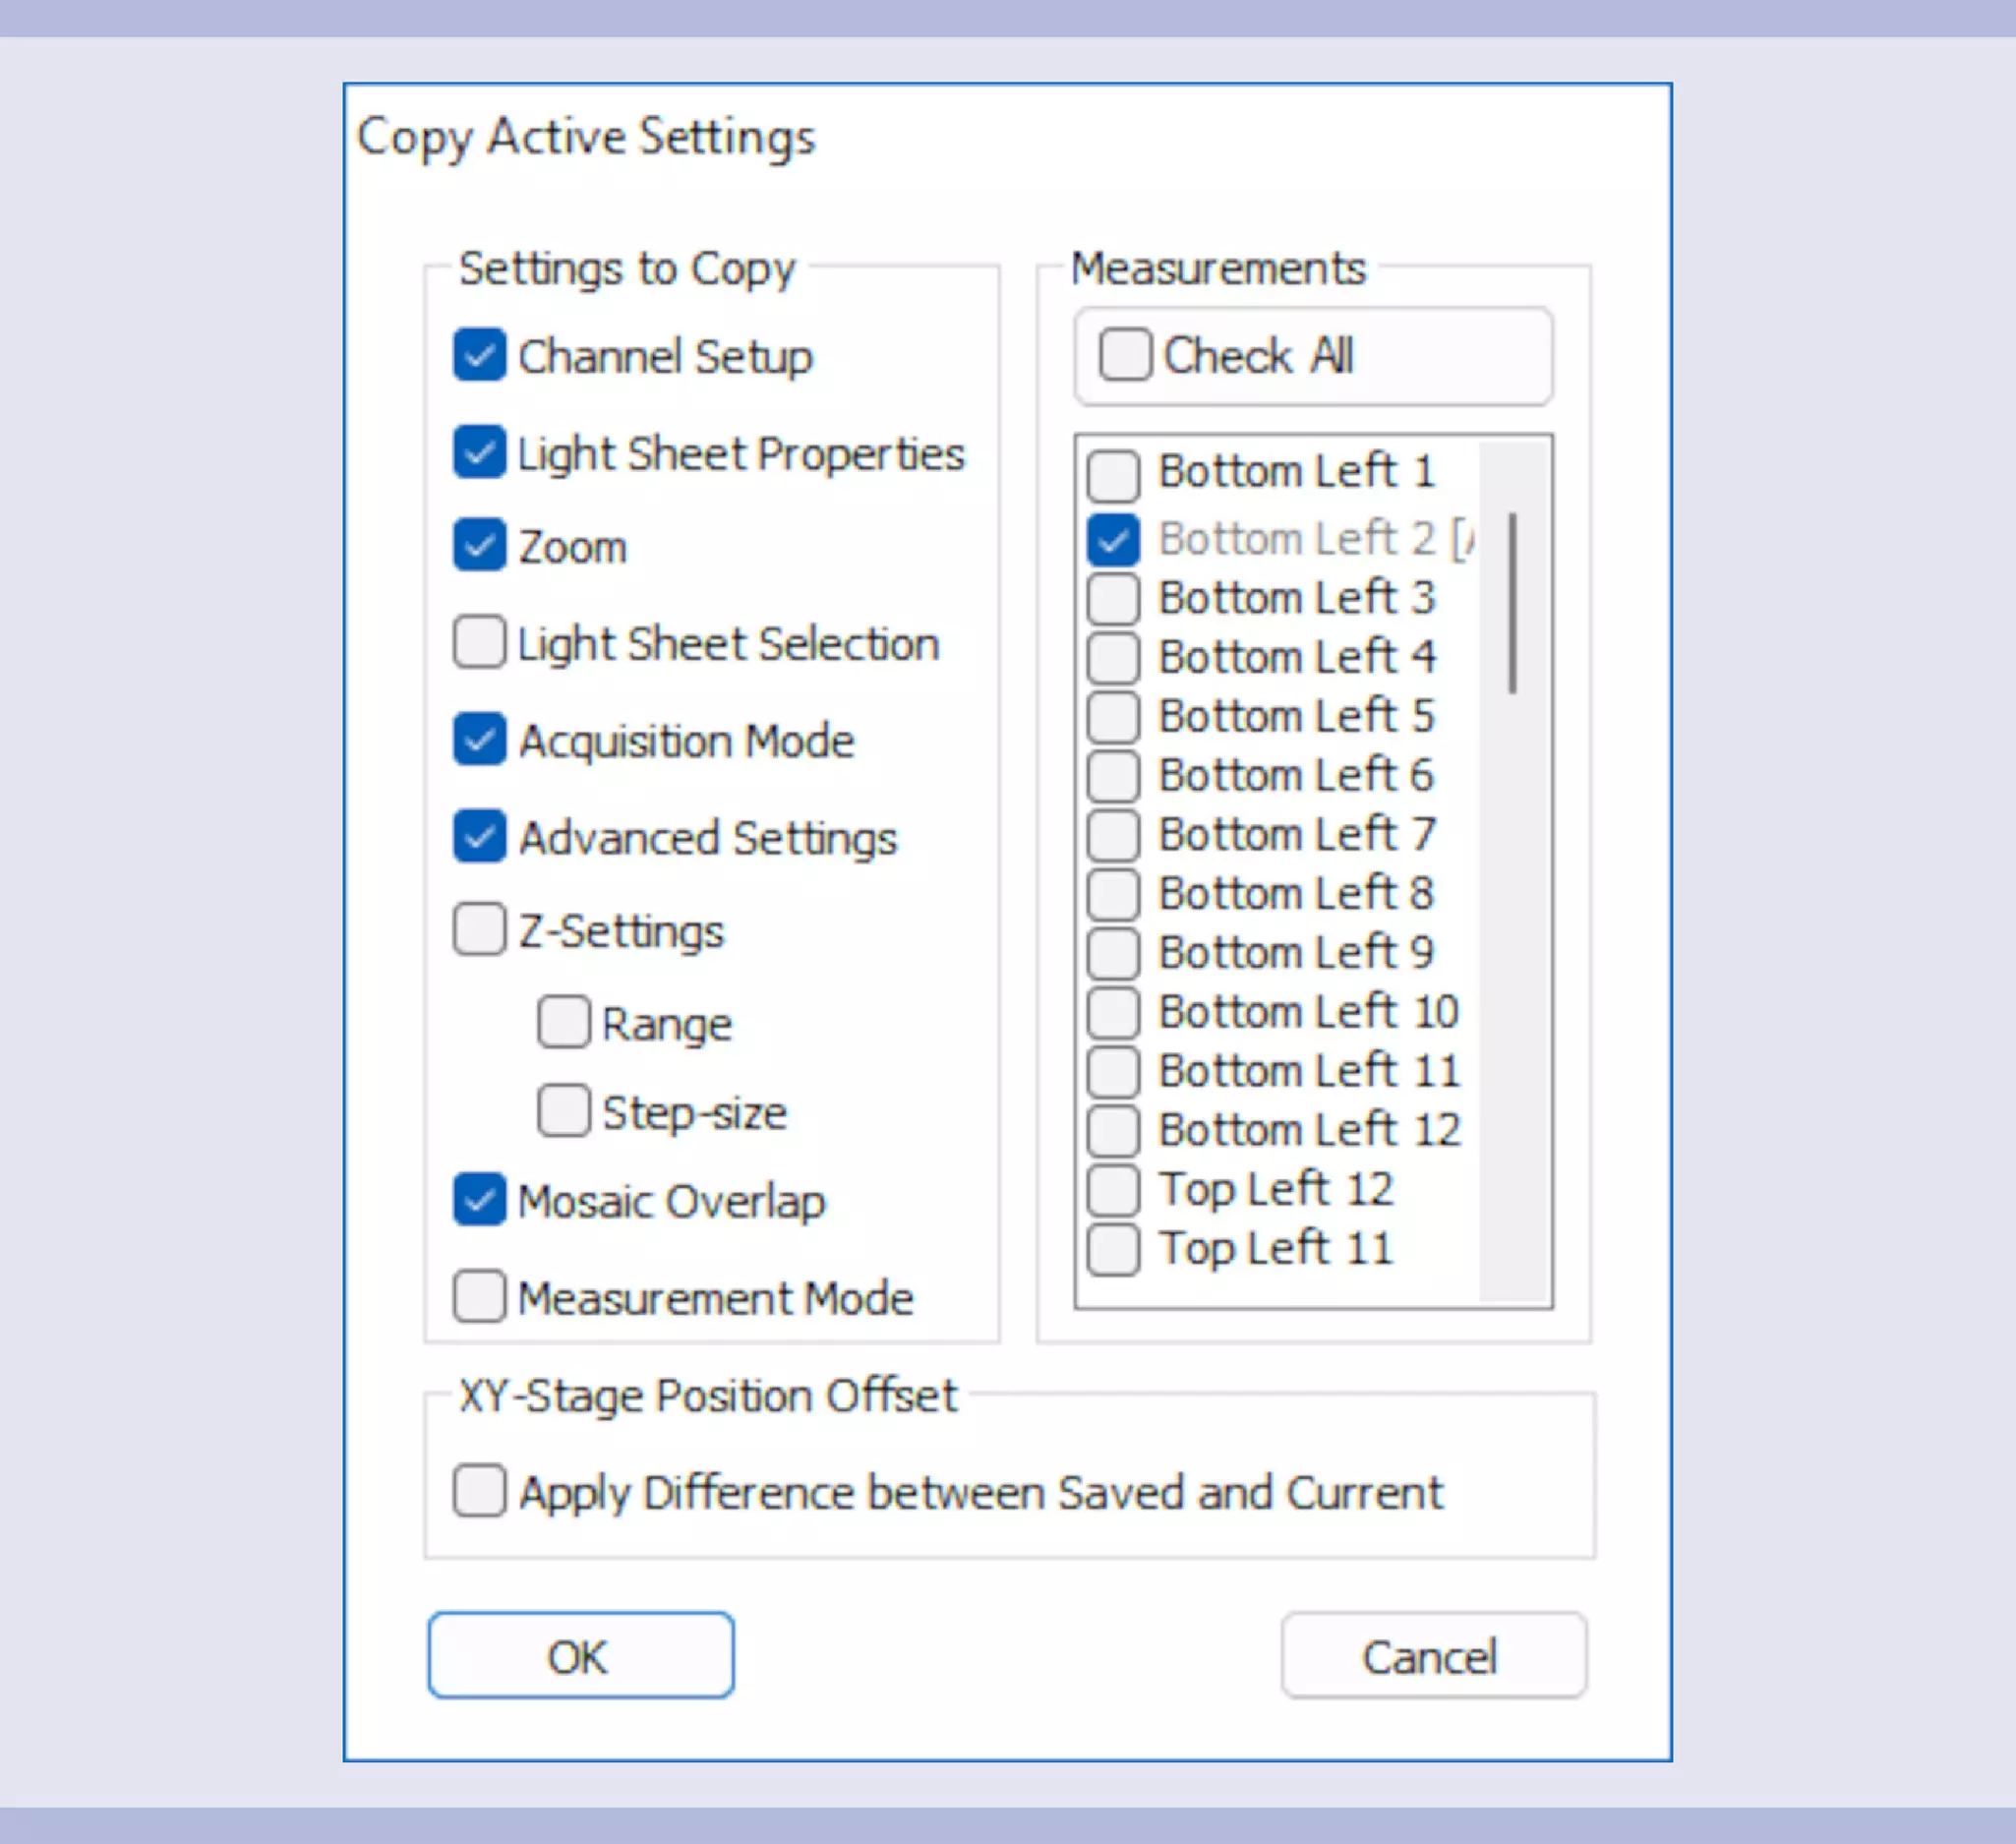
It is possible to copy settings from the active measurement by clicking Copy Active Settings. Some setting types are selected by default. You can select the settings you would like to copy to other measurements on the left and select the measurements which those settings should be applied to on the right. Use Check All to select all available measurements.
▲Note: The active measurement is always the source of the settings to be copied and is therefore always selected in the Copy Active Settings window (figure 3).
Autosave options
An autosave function is fully embedded into the Experiment Manager (figure 2). Enter directly the autosave location or browse a location (“…”). A Settings button provides more advanced options to modify the data output format.
Measurements
In the Experiment Manager, you can add new measurements to your existing batch or delete unnecessary ones. A measurement can have a specific name in the top bar, e.g., specifying the measurement position. Below, you have to add an individual autosave prefix, which serves as the folder/file name. Activate a measurement by double clicking on the top bar to, e.g., check the individual settings that are then displayed in ImSpector. Activate and physically move to the defined measurement position by clicking on the Go to button. Right-clicking on the top bar provides the options: activate measurement, enable/disable measurement, and rename measurement.
Definitions
Color code indicating measurement status:
- Dark blue: Active, Enabled
- Light blue: Inactive, Enabled
- Yellow: Active, Disabled
- Grey: Inactive, Disabled
- Red: Active, Enabled current xyz
Active measurements
There can only be one active measurement at a time. An active measurement has its settings loaded into the dialogs shown in the ImSpector Settings tabs. When starting a single acquisition (Start Measurement button), only the settings of the active measurement are taken.
Enabling/Disabling measurements
This either includes or skips the measurement during a batch measurement.
Starting your acquisition
When starting an acquisition using the Start Measurement button, the active measurement is started, no matter if the measurement is enabled or disabled. Data will be stored in the selected location with the given prefix.
When starting an acquisition using the Start Batch Measurement button, the whole list of active measurements in the Experiment Manager is performed, one after the other (top to bottom), omitting disabled measurements. The order of measurements can be changed dragging the arrows on the left side of each measurement. Data is stored in the selected location within a batch folder. Here, each measurement is saved with the given prefix in a new folder. If the Batch Measurement button is not visible, activate it under Settings > Measurement > Show “Batch Measurement” button.
The default template needs to be adapted to the system characteristics of the UltraMicroscope Blaze Imaging System as well as the specific experiment settings required.
Adaptation to system characteristics (required only once per UltraMount holder)
- Start the UltraMicroscope Blaze using ImSpector 7.7.
- Mount the dedicated sample arm and place the sample holder.
- Select the objective and move the detection unit into measurement position.
- Select the desired MACS UltraMount template (e.g., “MACS_UltraMount48_default”) in the Experiment Manager. Click the Go to Position button next to the first measurement to activate and move to its position. Make sure that the first measurement, the one you are moving to, is in an easily recognizable position (e.g., the upper left corner).
▲Note: If applicable, a live preview must be stopped. - Start the live preview and navigate to your sample. Verify that it is in the right corner. For example, for the MACS UltraMount 48, using the 4x objective with 1.66x post-magnification allows you to have one well in one field of view (FOV).
- Check the objective lens focus position in all channels to be used in the experiment.
- Correct and adapt the XY position(s) if needed:
• There will be an offset between the default template position of the corner and the actual position.
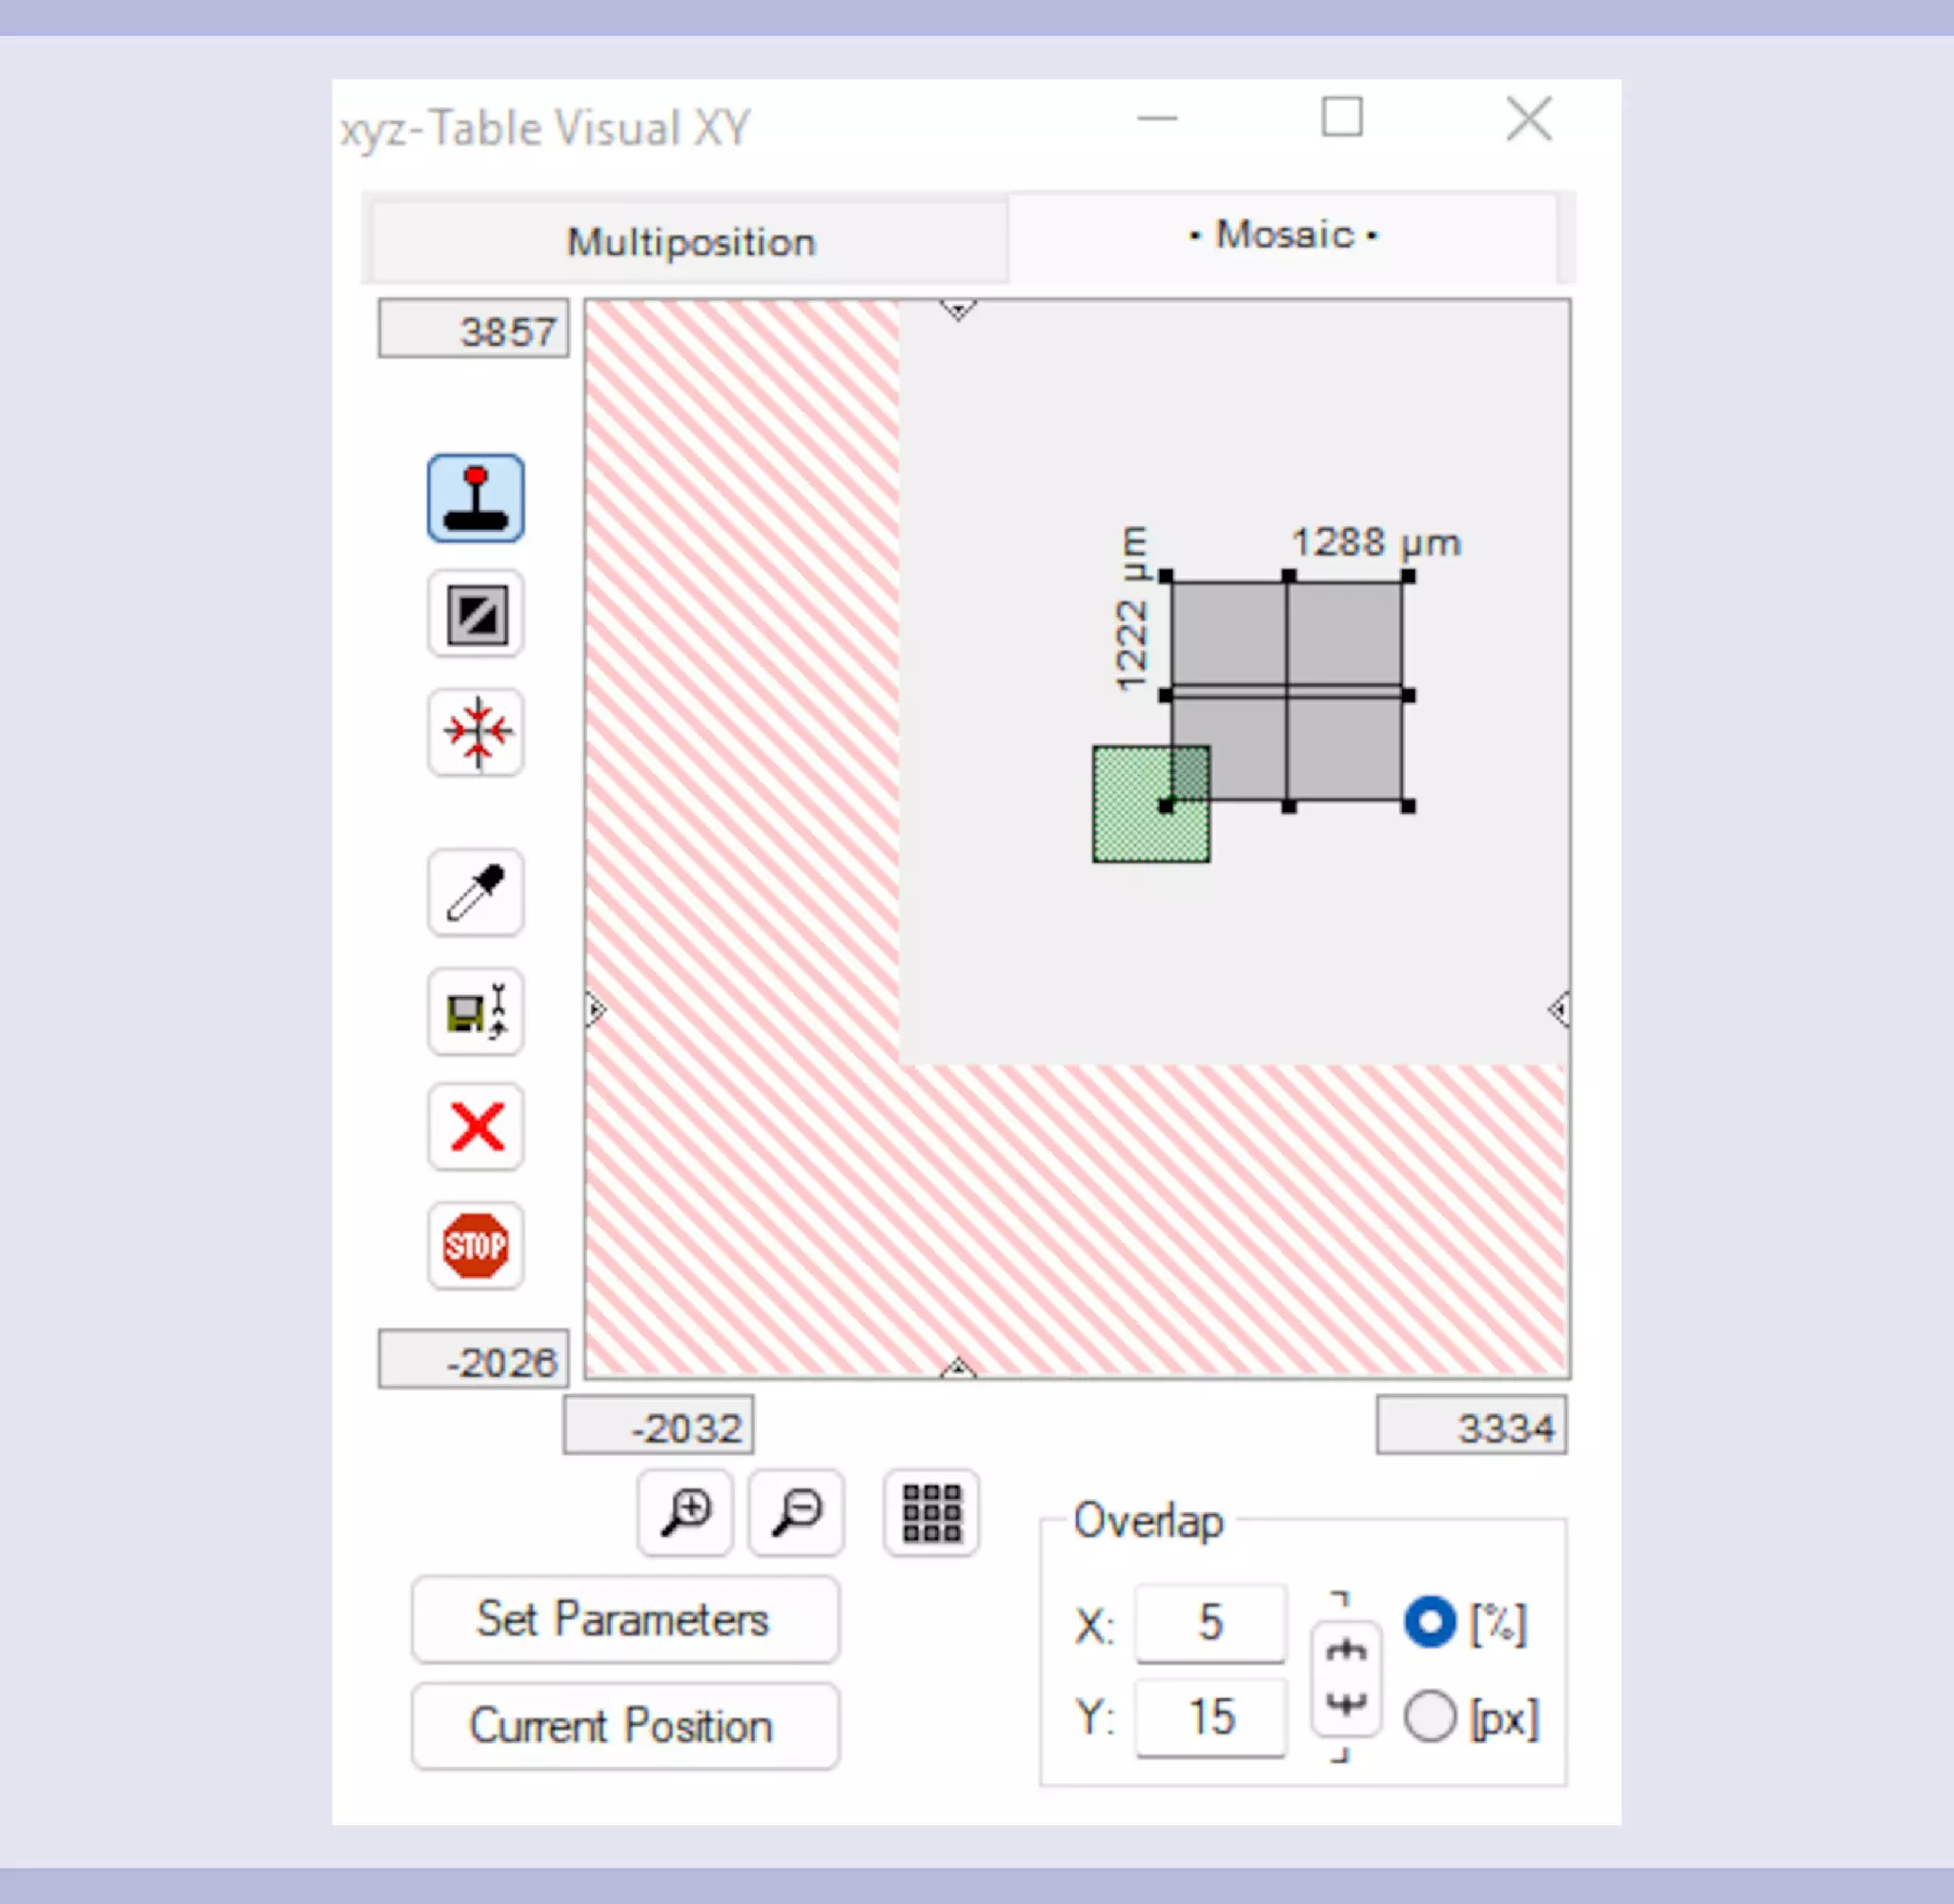
• To correct that, either move the mosaic (grey area) in XY direction by dragging it to the current FOV (green/red area) or delete the current mosaic completely by clicking the Delete button and define the new position by double-clicking the current FOV.
• Click Copy Active Settings, select Apply Difference between Saved and Current, and check all measurements.
• Click OK to apply the XY offset to all measurements. - Adapt the Z-positions of the template:
• Select a measurement position at the bottom (e.g., Bottom Left 1) by clicking the Go to Position button.
• Start a live preview.
• Adjust the start point and end point of the Z-range for the Bottom measurements, from the top of the agarose to the bottom of the holder.
• Stop the live preview.
• Click on Copy Active Settings to apply the Z-settings (range and step-size) and check all Bottom measurements.
• Click OK to apply the Z-range to all Bottom measurements.
• Select a measurement position at the top, e.g. click Top Left 1 using the Go to Position button.
• Start a live preview.
• Adjust the start point and end point of the Z-range for the Top measurements, also from the top of the agarose to the bottom of the top-row well.
• Stop the live preview.
• Click on Copy Active Settings to apply the Z-settings (range and step-size) and check all Top measurements.
• Click OK to apply the Z-range to all Top measurements.
• Verify the correct shift by activating a different measurement in the batch and clicking the Go to Position button. - Save the adapted template using the Add button.
- This process has to be applied the first time you adapt a default template to the UltraMicroscope Blaze Imaging System, but also quickly correct all positions in a batch if you experience a shift of samples/holders.
Template adaptation to your experiment
- Select the template adapted to the imaging system.
- Select and move to the first measurement position using the Go to Position button.
- Adapt the experiment:
• Magnification selection
• Measurement mode
• Channel selection
• Collective or individual exposure time
• Exposure time
• Laser power
• Light sheet settings
• NA and horizontal focus position
• Sheet width
• Check the predefined z-range and optimize if needed (Individually for all measurement positions. Do not use Range in the list of settings to copy).
• Enter a step-size under Z-Settings (approximately ½ of sheet thickness).
Transfer settings to all measurements
- Click Copy Active Settings.
- In the Settings to Copy list (left side), select all the parameters to be copied.
- In the Measurements list (right side), select all the target measurements.
- Click OK.
Adaption of mosaic and Z-range per position
Although it is possible to measure with the adapted template right away (described under section “Adapt the Z-positions of the template”), it is highly recommend to adjust the mosaic and Z-range for each single measurement to match the respective sample. Not adjusting the mosaic and Z-range results in longer measurement times and generation of more data than required for analysis, not containing any samples. A lower magnification to make sample identification and mosaic definition easier can be used. After all positions are adapted, switch to any objective/post-magnification, and transfer your selected “Zoom” under Optical Setup (checkbox in Copy Active Settings dialog, see figure 3) to all measurements in the batch.
Save your experiment
It is not possible to overwrite Default templates. An experiment needs to be saved as a new custom template by using the Add button. If you already have your own template, you can just update it by using the Save button.
New experiment
For new experiments with the sample holder, the adaptation to the system can be skipped, but might be useful if holder/samples moved. The new experiment settings can then be configured according to section “Template adaptation to your experiment”, and then applied to all positions and saved under a different name for possible future use. If you run the same experiment again, you only need to check the objective focus and horizontal focus positions once. The only parameters to be always adapted are mosaic position and Z-range per measurement.
▲Note: Importantly, an experiment may also consist of only one measurement, generating a general template for a single specific sample and/or position. The Experiment Manager is not strictly dependent on the Batch Measurement feature. This can be used to have default settings stored to start from.