RNAsky® User Guide: RNA detection on the MACSima™ System


This protocol describes step-by-step the molecular preparation of mounted samples before an RNAsky Assay. The RNAsky assay enables sensitive and specific detection of RNA targets in their spatial context using the MACSima System. The MACSima System is a fully automated instrument capable of same-section high-plex protein and RNA detection using the MACSima Imaging Cyclic Staining (MICS) technology.

Protocol

Day 1: Probe hybridization for RNAsky Design (custom RNAsky panels)

Preparation of buffers and reagents

  • Prepare 1× PBST (0.05% v/v TWEEN® 20), e.g., by adding 90 mL nuclease-free water and 50 μL TWEEN® 20 to 10 mL of 10× PBS, pH 7.4. Store at room temperature during the duration of the protocol. Prepare fresh for every new preparation. Avoid adding air bubbles to the sample.
  • Thaw Buffer A. Make sure that there is no precipitate. If a precipitate is present, vortex the tube until dissolved.
  • Incubate Buffer B at +60 ⁰C for 10 minutes before use. Vortex a few times during incubation. Cool down to room temperature.
    ▲ Note: Buffer B can re-crystalize with temperature changes. If precipitates are still present, reheat the tube at +60 ⁰C for an additional 10 minutes and mix until completely dissolved.
  • Once thawed, Buffer A and Buffer B can remain at room temperature during the remainder of the protocol. If samples are not prepared within one week, store Buffer A and Buffer B at -20 °C long term.

RNAsky Design Probe Mix resuspension

  • Wear fresh gloves while handling the tube to avoid nucleases.
  • Lyophilized contents may appear as either film or a white powder. This variance does not affect the quality of the probes.

  • Before opening the vial, briefly spin it down to ensure any dried DNA is at the bottom of the tube. Some of the product may have been dislodged during shipping.
  • Add 500 µL of Resuspension buffer into the tube (5× concentration)
  • After suspension, shake the content for 1–2 hours or allow content to resuspend overnight.
  • Store at -20 °C after use.

Preparation of the probe hybridization mix

  • Immediately before making the hybridization mixture, take the Blocking Reagent and Stability Enzyme from -20 °C and place them on ice.
    ▲ Note: Blocking Reagent and Stability Enzyme should be kept on ice during use. Store the blocking reagent and stability enzyme at -20 °C immediately after use.
  • Prepare the appropriate volume of probe hybridization mix at room temperature in a 1.5 mL DNA low-binding tube according to table 5. Mix by gently pipetting up and down at least ten times.
  • Take the sample(s) assembled with the MACSwell Imaging Frame and prepared according to RNAsky™ FFPE Sample Preparation Guide: RNA detection on the MACSima™ System.
  • Completely remove 1× PBST from the sample(s).
  • Add 250 µL (MACSwell Four Imaging Frames) or 500 µL (MACSwell One Small Imaging Frame) of probe hybridization mix to the sample well(s).
  • Place the sample (with the MACSwell lid on) on top of the humidified chamber grid. Close the chamber and seal it with parafilm.
    ▲ Note: To set up the humidified chamber, briefly remove the grid from a T100 BIOTUBE™ Storage Box (or equivalent), add 50 mL of RNase-free water, and place the grid back. Ensure sufficient water is present throughout all incubation steps.
  • Incubate at +45 °C overnight (minimum of 16 hours. Users should proceed to the following steps on the next working day).
  • End of day 1. Immediately proceed to day 2.

The required control probes are already included in the RNAsky Design Probe Mix.

Table 5: Volumes for preparation of 1× probe hybridization mix for one well of MACSwell Four or one well of MACSwell One Small Imaging Frames. Use the 1× volumes of the table to calculate the volumes required for multiple preparations.

Probe hybridization mixVolume required for one well of a MACSwell Four Imaging FrameVolume required for one well of a MACSwell One Small Imaging Frame
RNAse-free water41 µL82 µL
Buffer A75 µL150 µL
Buffer B75 µL150 µL
RNAsky Design Probe Mix50 µL100 µL
Blocking Reagent2.5 µL5 µL
Stability Enzyme6.5 µL13 µL
Total volume250 µL500 µL

Day 1: Probe hybridization for IO Explore Panel, human

Preparation of buffers and reagents

  • Prepare 1× PBST (0.05% v/v TWEEN® 20), e.g., by adding 90 mL nuclease-free water and 50 µL TWEEN® 20 to 10 mL of 10× PBS, pH 7.4. Store at room temperature during the duration of the protocol. Prepare fresh for every new preparation. Avoid adding air bubbles to the sample.
  • Thaw IO Explore Probe Mix, human, and Control Probe Mix, human at room temperature. After thawing, vortex, centrifuge briefly, and place on ice.
  • Thaw Buffer A. Make sure that there is no precipitate. If a precipitate is present, vortex the tube until dissolved.
  • Incubate Buffer B at +60 ⁰C for 10 minutes before use. Vortex a few times during incubation. Cool down to room temperature.
    ▲ Note: Buffer B can re-crystalize with temperature changes. If precipitates are still present, reheat the tube at +60 ⁰C for an additional 10 minutes and mix until completely dissolved.
  • Once thawed, Buffer A and Buffer B can remain at room temperature during the remainder of the protocol. If samples are not prepared within one week, store Buffer A and Buffer B at -20 °C long term.

Preparation of the probe hybridization mix

  • Immediately before making the hybridization mixture, take the Blocking Reagent and Stability Enzyme from -20 °C and place them on ice.
    ▲ Note: Blocking Reagent and Stability Enzyme should be kept on ice during use.
  • Prepare the appropriate volume of probe hybridization mix at room temperature in a 1.5 mL DNA low-binding tube according to table 6. Mix by gently pipetting up and down at least ten times.
    ▲ Note: Wear fresh gloves while handling the tube to avoid nucleases.
  • Take the sample(s) assembled with the MACSwell Imaging Frame and prepared according to RNAsky™ FFPE Sample Preparation Guide: RNA detection on the MACSima™ System.
  • Completely remove 1× PBST from the sample(s).
  • Add 250 µL (MACSwell Four Imaging Frames) or 500 µL (MACSwell One Small Imaging Frame) of probe hybridization mix to the sample well(s).
  • Place the sample (with the MACSwell lid on) on top of the humidified chamber grid. Close the chamber and seal it with parafilm.
    ▲ Note: To set up the humidified chamber, briefly remove the grid from a T100 BIOTUBE™ Storage Box (or equivalent), add 50 mL of RNase-free water, and place the grid back. Ensure sufficient water is present throughout all incubation steps.
  • Incubate at +45 °C overnight (minimum of 16 hours. Users should proceed to the following steps during the next working day).
  • End of day 1. Immediately proceed to day 2.

Table 6: Volumes for preparation of 1× probe hybridization mix for one well of MACSwell Four or one well of MACSwell One Small Imaging Frames. Use the 1× volumes of the table to calculate the volumes required for multiple preparations.

Probe hybridization mixVolume required for one well of a MACSwell Four Imaging FrameVolume required for one well of a MACSwell One Small Imaging Frame
RNAse-free water41 µL82 µL
Buffer A75 µL150 µL
Buffer B75 µL150 µL
IO Explore Probe Mix, human25 µL50 µL
Control Probe Mix, human25 µL50 µL
Blocking Reagent2.5 µL5 µL
Stability Enzyme6.5 µL13 µL
Total volume250 µL500 µL

Day 2: Ligation

Post-hybridization wash

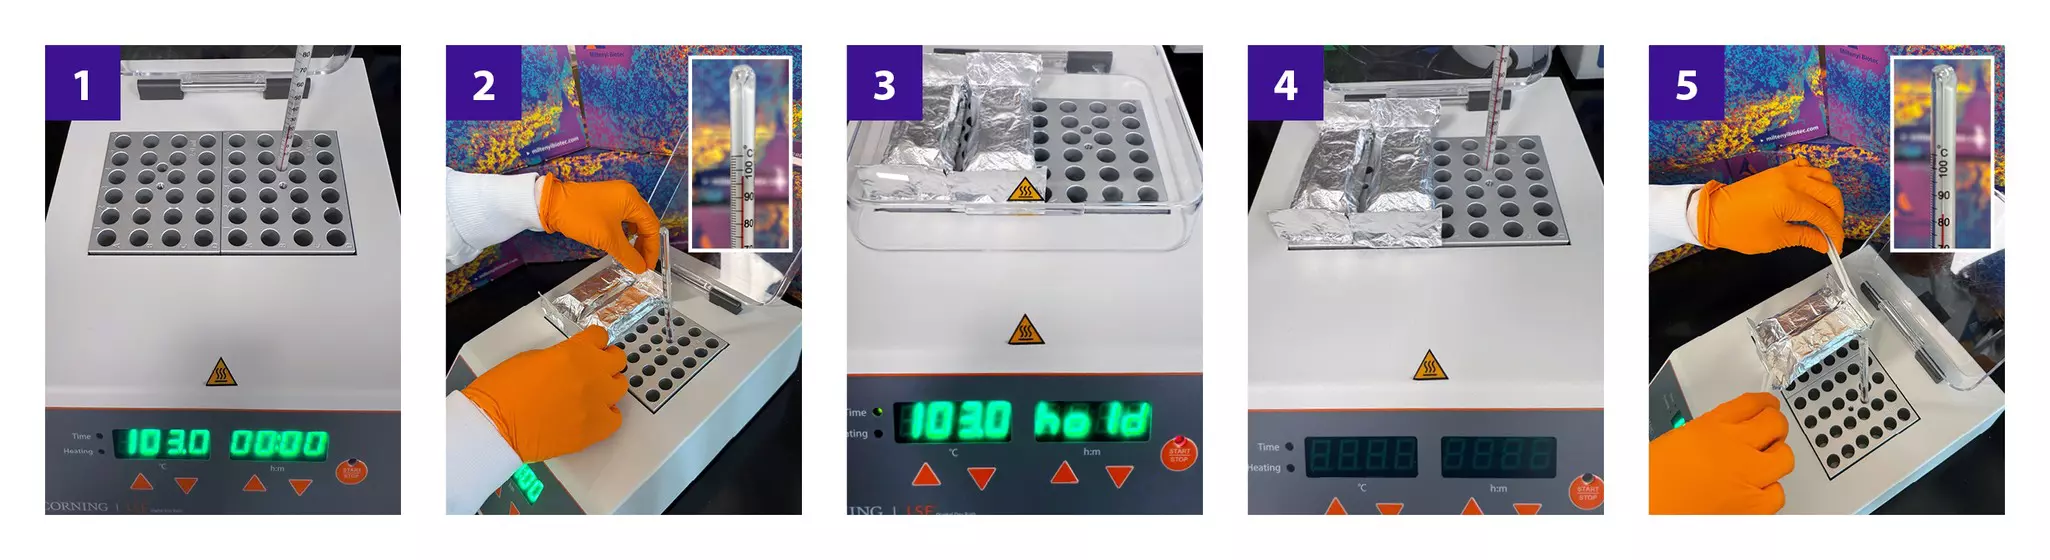
  • The temperature of the post-hybridization washes is critical for optimal results. It is recommended to use a thermometer to check the correct temperature of the heat block or incubator before proceeding with this step.

  • Check Buffer B: If a precipitate is present, heat at +37 °C using a heat block for at least 10 minutes, then vortex.
  • Prepare post-hybridization wash buffer in a 15 mL conical tube according to table 7.
  • Pre-heat post-hybridization wash buffer to +37 °C by incubating on a heat block or incubator for at least 20 minutes. While post-hybridization wash buffer is preheating, leave the sample(s) in the +45 °C incubator.
  • Remove sample(s) from the +45 °C incubator, immediately prior to washing.
  • Set the incubator to +37 ºC in preparation for the next section.
  • Remove the whole volume of probe hybridization mix from the sample(s). Add post-hybridization wash buffer to the sample(s). For MACSwell Four Imaging Frames, add 500 µL per well, for MACSwell One Small Imaging Frames, add 1 mL per well.
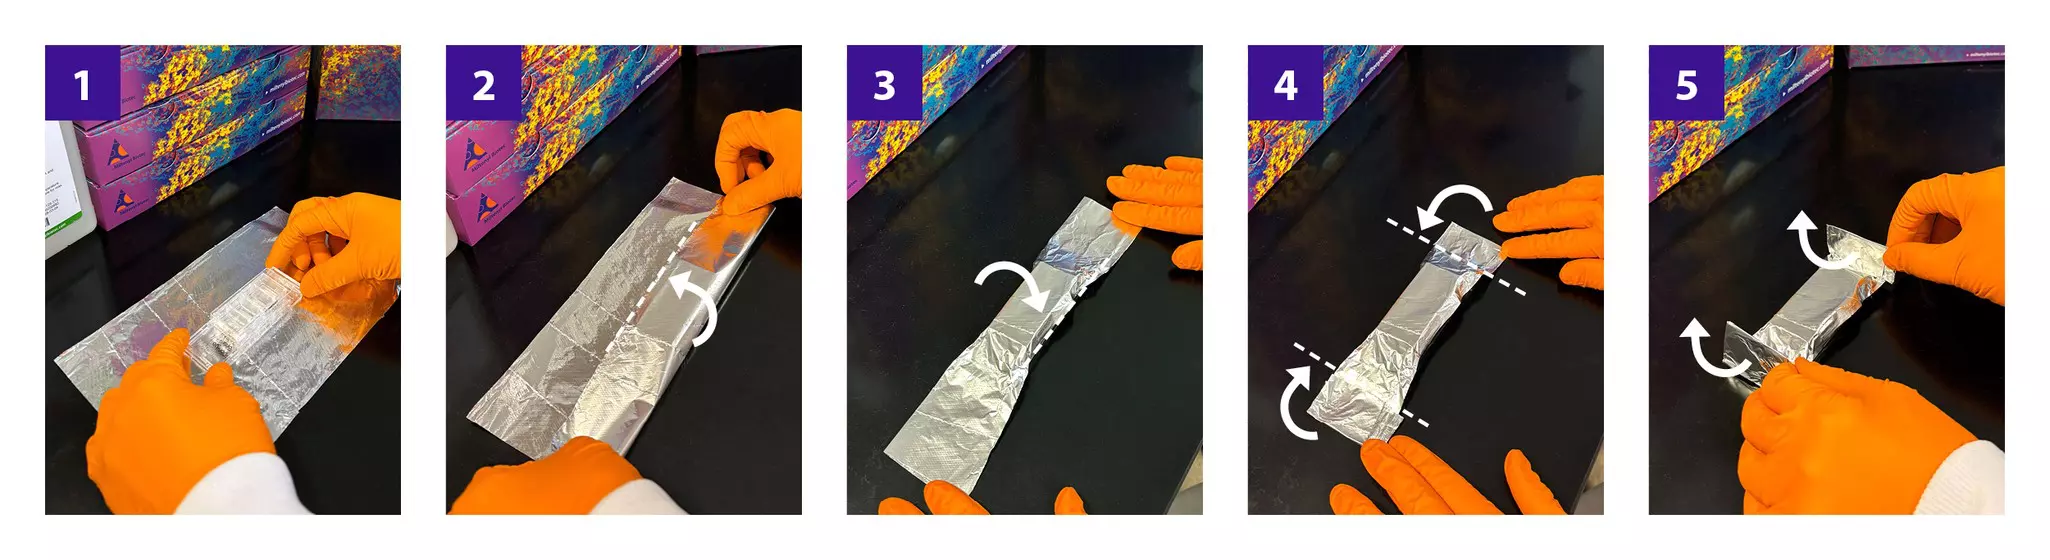
  • Wash three times with post-hybridization wash buffer for 10 minutes each by placing the sample(s) directly onto a heat block set to +37 °C. To maintain temperature, gently cover the MACSwell with aluminum foil during incubations. During incubations, place the empty humidified chamber into the +37 °C incubator to maintain temperature.
  • Remove samples from the heat block and perform additional washes on the bench.
  • Wash an additional three times in 1× PBST at room temperature for 5 min each. For MACSwell Four Imaging Frames, add 500 µL per well, for MACSwell One Small Imaging Frames, add 1 mL per well.
  • Immediately proceed to the next step.

Table 7: Volumes for preparation of 1× post-hybridization wash buffer for one well of MACSwell Four or one well of MACSwell One Small Imaging Frames.

Post-hybridization wash bufferVolume required for one well of a MACSwell Four Imaging FrameVolume required for one well of a MACSwell One Small Imaging Frame Frame
RNAse-free water450 µL900 µL
Buffer A150 µL300 µL
Buffer B900 µL1800 µL
Total volume1500 µL3000 µL

Preparation of Ligation Buffer

  • Thaw Ligation Buffer at room temperature.
    ▲ Note: After thawing, check the buffer for precipitation. If precipitation occurs, vortex until it is completely dissolved.
  • After thawing, vortex, centrifuge briefly, and place on ice.

Preparation of ligation mix

  • Moments before preparing the ligation mixture, take out the Blocking Reagent, Stability Enzyme, and Ligation Enzyme from -20 °C and place them on ice.
    ▲ Note: The Ligation Enzyme is temperature-sensitive. Always keep the enzyme at -20 °C. Do not vortex.
  • Prepare ligation mix on ice in a 1.5 mL DNA low-binding tube according to table 8.
    ▲ Note: After the use, store all enzymes at -20 °C immediately.

Table 8: Volumes for preparation of ligation mix for one well of MACSwell Four and MACSwell One Small Imaging Frames.

Ligation mixtureVolume required for one well of a MACSwell Four Imaging FrameVolume required for one well of a MACSwell One Small Imaging Frame
RNase-free water211 µL422 µL
Ligation Buffer25 µL50 µL
Blocking Reagent2.5 µL5 µL
Stability Enzyme6.5 µL13 µL
Ligation Enzyme5 µL10 µL
Total volume250 µL500 µL

Ligation

  • Gently remove 1× PBST at once with a p1000 pipette.
  • Add the ligation mix to the well.
  • Place sample(s) into pre-warmed humidified chamber and seal with parafilm.
  • Incubate at +37 °C for a minimum of 16 hours. Users should proceed to the following steps during the next working day.
  • End of day 2. Immediately proceed to day 3.

Day 3: Amplification

Post-ligation wash

  • Remove sample(s) from the +37 °C incubator, immediately before washing.
  • Set the incubator to +30 ºC in preparation for the next section.
  • Remove the whole volume of ligation mix from the sample(s).
  • Wash the sample(s) three times for 2 min each in 1× PBST, at room temperature. For MACSwell Four Imaging Frames, add 500 µL per well, for MACSwell One Small Imaging Frames, add 1 mL per well. During incubations, place the empty humidified chamber back into the +30 °C incubator to maintain the temperature. Leave PBST on the sample(s) after the last wash.
  • Immediately proceed to the next step.

Preparation of amplification primer mix

  • Thaw Amplification Primer at room temperature.
  • After thawing, vortex, centrifuge briefly, and place on ice.
  • Prepare the amplification primer mix on ice in a 1.5 mL DNA low-binding tube according to table 9.

Table 9: Volumes for preparation of amplification primer mix for one well of MACSwell Four and MACSwell One Small Imaging Frames.

Amplification primer mixVolume required for one well of a MACSwell Four Imaging FrameVolume required for one well of a MACSwell One Small Imaging Frame
RNase-free water197.5 µL395 µL
Buffer A50 µL100 µL
Amplification Primer2.5 µL5 µL
Total volume250 µL500 µL

Amplification Primer hybridization

  • Gently remove 1× PBST from the sample(s).
  • Add amplification primer mix to the well.
  • Heat the sample(s) by placing them directly onto a heat block set to +37 °C for 30 minutes. To maintain temperature, gently cover the MACSwell with aluminum foil during amplification primer hybridization.
  • Remove the samples from heat block and perform additional washes on the bench.
  • Wash the sample(s) three times with 1× PBST for 2 minutes each, at room temperature. For MACSwell Four Imaging Frames, add 500 µL per well, for MACSwell One Small Imaging Frames, add 1 mL per well. Leave 1× PBST on the sample(s) after the final wash.

Preparation of amplification mix

  • Thaw Amplification Buffer at room temperature.
  • After thawing, vortex, centrifuge briefly, and place on ice.
  • Moments before preparing the amplification mixture, take the Amplification Enzyme from -20 °C and place it on the ice.
  • Prepare amplification mix on in 1.5 mL DNA low-binding tube according to table 10.
    ▲ Note: After the use, store all enzymes at -20 °C immediately.
    ▲ Note: Amplification Enzyme is temperature-sensitive. Always keep the enzyme at -20 °C. Do not vortex.

Table 10: Volumes for preparation of amplification mix for one well of MACSwell Four and MACSwell One Small Imaging Frames.

Amplification mixVolume required for one well of a MACSwell Four Imaging FrameVolume required for one well of a MACSwell One Small Imaging Frame
Amplification Buffer237.5 µL475 µL
Amplification Enzyme12.5 µL25 µL
Total volume250 µL500 µL

Amplification

  • Gently remove 1× PBST from the sample(s).
  • Add amplification mix to the well.
  • Place sample(s) into a humidified chamber and seal with parafilm.
  • Incubate at +30 °C for a minimum of 16 hours. Users should proceed to the following steps during the next working day.
  • End of day 3. Immediately proceed to day 4.

Day 4: Fixation and Imaging

Preparation of Fixation Reagent

  • Thaw Fixation Reagent at room temperature.
  • Vortex and centrifuge briefly.

Preparation of fixation reagent working solution

  • Dilute Fixation Reagent 1:1000 according to table 11.
    ▲ Note: After the use, store the Fixation Reagent at -20 °C immediately.

Table 11: Preparation of fixation reagent working solution.

ReagentVolume (μL)
Fixation Reagent2
1× PBS1998
Total volume2000

Preparation of fixation mix

  • Prepare fixation mix according to table 12.

Table 12: Preparation of fixation mix for one well of MACSwell Four and MACSwell One Small Imaging Frames.

Fixation mixVolume required for one well of a MACSwell Four Imaging FrameVolume required for one well of a MACSwell One Small Imaging Frame
Nuclease-free water180 µL360 µL
10× PBS25 µL50 µL
1:1000- diluted Fixation Reagent45 µL90 µL
Total volume250 µL500 µL

Fixation

  • Remove the sample(s) from the +30 ºC incubator.
  • Gently remove amplification mix from the sample(s).
  • Wash the sample(s) one time for 5 min with 1× PBST at room temperature. For MACSwell Four Imaging Frames, add 500 µL per well, for MACSwell One Small Imaging Frames, add 1 mL.
    ▲ Note: Be very gentle with pipetting before fixation.
  • Gently remove 1x PBST from the sample(s).
  • Gently add fixation mix to the well.
  • Incubate the sample(s) for 1 hour at room temperature.
  • Remove fixation mix from the sample(s).
  • Wash sample(s) three times for 2 min with 1× PBST at room temperature. For MACSwell Four Imaging Frames, add 500 µL per well, for MACSwell One Small Imaging Frames, add 1 mL.
    ▲ Note: After fixation, sample(s) can be stored for a maximum of 5 days at +4 °C before proceeding with the MACSima Experiment. To store sample(s), add sufficient 1× PBST to the well(s) and close the MACSwell Imaging Frame with the lid. Place the sample(s) in the humidified chamber and seal them with parafilm.
  • Proceed to the MACSima Experiment.

Preparation of the MACSima Experiment

Preparation of RNAsky Detection Plate and RNAsky Release Reagent

  • Thaw the RNAsky Detection Plate and the RNAsky Release Reagent for at least 30 minutes at room temperature protected from light.
  • After thawing, vortex the RNAsky Detection Plate until no precipitate is present at the bottom of the plate.
    ▲ Note: There must be no precipitation present at the bottom of the plate before loading it onto the instrument.

Pre-staining of nuclei using DAPI

  • Prior to the initiation of MACSima Experiment, perform a DAPI pre-staining.
    ▲ Note: perform DAPI pre-staining using the DAPI Staining Solution vial included in the RNAsky Support kit (# 130-134-684).
  • Prepare DAPI pre-staining solution according to table 13.
    ▲ Note: The optimal dilution factor of DAPI Staining Solution may vary depending on the sample type and might need to be adapted.
  • Remove 1× PBST from the sample(s) by pipetting.
  • Add DAPI pre-staining solution and incubate for 10 minutes in the dark at room temperature.
  • Remove DAPI pre-staining solution.
  • Gently wash the sample(s) three times with MACSima Running Buffer. For MACSwell Four Imaging Frames, add 475 µL per well, for MACSwell One Small Imaging Frames, add 950 µL per well.
  • Remove MACSima Running Buffer.
  • Add MACSima Running Buffer to each well depending on the used MACSwell Imaging Frame. For MACSwell Four Imaging Frames, add 475 µL per well, for MACSwell One Small Imaging Frames, add 950 µL.
    ▲ Note: Make sure that the initial sample volume is correct before loading the sample into the MACSima System.
  • Immediately proceed to the next step.

Table 13: Preparation of DAPI pre-staining solution for one well of MACSwell Four and MACSwell One Small Imaging Frames.

DAPI pre-staining solutionVolume required for one well of a MACSwell Four Imaging FrameVolume required for one well of a MACSwell One Small Imaging Frame
DAPI Staining Solution50 µL100 µL
MACSima Running Buffer200 µL400 µL
Total volume250 µL500 µL

Loading the MACSima System

  • Refer to the MACSima System user manual for detailed information on how to use the instrument.

  • Start the MACSima System and software.
  • Refer to the user manual and follow the instructions of the MACSima Software.
  • Load the respective experiment configuration.
  • Unpack the RNAsky Detection Plate from the pouch.
    ▲ Note: Do not remove the sealing or add buffer to the RNAsky Detection Plate. The MACSima System will automatically handle the content.
    ▲ Note: Only 6 wells contain reagents. The remaining wells are empty. This detection plate is compatible with both 12-plex and 24-plex RNAsky panels.
  • Load the Detection Plate, the components of the RNAsky Support Kit, and the MACSwell Imaging Frame(s) containing the prepared sample(s) without the lid into the instrument as instructed by the MACSima Software.
    ▲ Note: Ensure to load the plate in the correct orientation.
    ▲ Note: Load the same DAPI Staining solution vial used for the pre-staining in the previous section.
    ▲ Note: Remove the lids of the reagent vials and ensure that the MACSima Mixing Vials are open and empty before placing them into the instrument.
  • Start the experiment by following the instructions of the MACSima Software. For RNAsky Run setup, click on Refine Autofocus and choose Image Contrast Detection from the drop-down menu for each individual ROI that has been selected. Adjust exposure time as needed.
  • After the experiment has finished, follow the instructions of the MACSima Software. Discard the Detection Plate and the reagent vials.
  • Once the RNAsky experiment on the MACSima platform is complete, store the samples at +4 °C overnight (for up to a maximum of 24 hours) before proceeding with the subsequent step.

Recommendation before protein staining process

After completion of the RNAsky experiment, the RNA detection workflow is complete. Samples may proceed directly to the MICS protein detection experiment. For optimal protein detection performance, a second antigen retrieval step is strongly recommended prior to the initiation of protein staining process. Instructions for the second antigen retrieval procedure are provided in section 4, Second antigen retrieval – Post‑RNAsky assay.