
- Always prepare reagents freshly.
Multicolor flow cytometric analysis of macrophages from mouse spleen
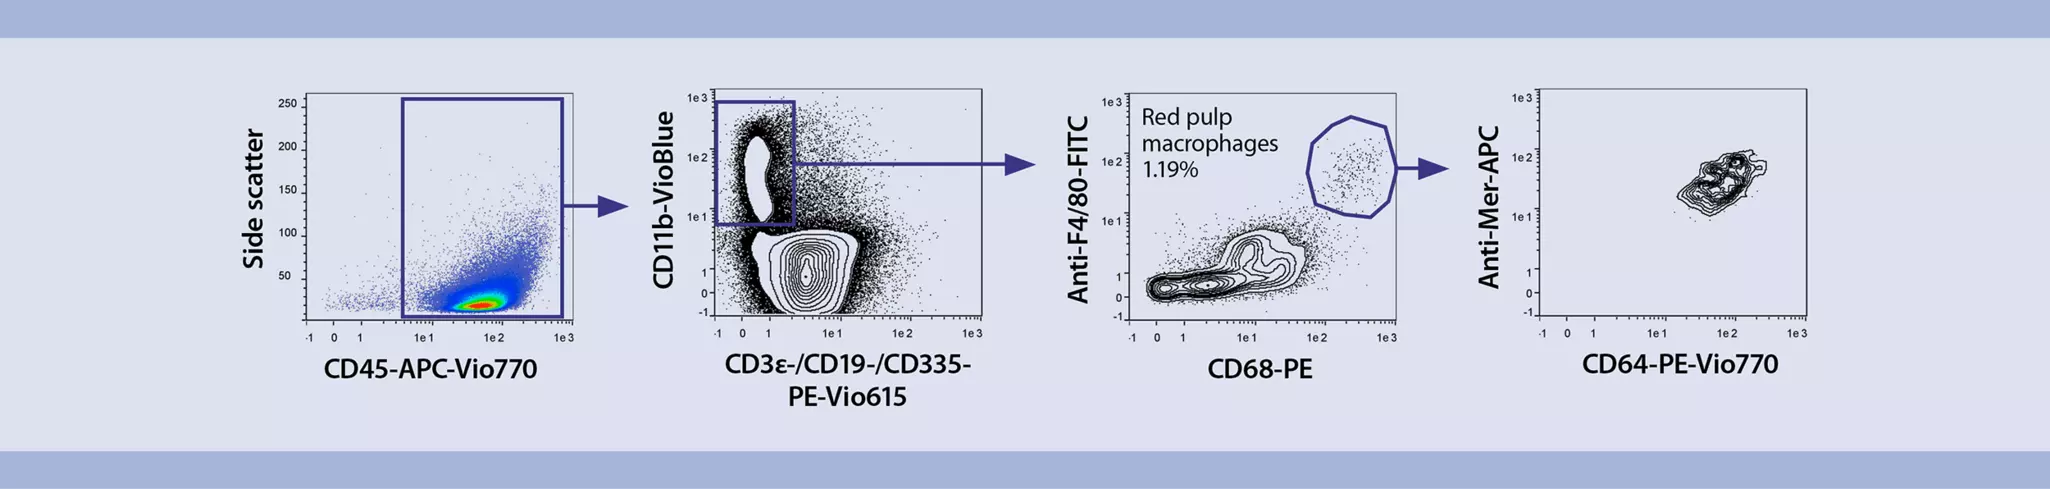
This application protocol describes the flow cytometric analysis of macrophages after spleen dissociation from healthy C57BL/6 mice. Viable single cells from mouse spleens are easily obtained using the gentleMACS® Technology. For downstream flow cytometric analysis of macrophages, a validated multicolor flow cytometry panel was designed using REAfinity™ Recombinant Antibodies and Viobility™ Fixable Dyes. In addition, an optimized gating strategy is provided for the analysis of macrophages from mouse spleen.
Protocol
Multicolor flow cytometric analysis of macrophages from mouse spleen
15 min
Dissociation of mouse spleen
90 min
Staining of macrophages
Flow cytometric analysis
Protocol
This protocol includes detailed instructions for preparing necessary reagents and materials and then carrying out each step.
Preparation of PEB buffer
PEB buffer: Prepare a solution containing phosphate-buffered saline (PBS), pH 7.2, 0.5% bovine serum albumin (BSA), and 2 mM EDTA by diluting MACS® BSA Stock Solution (# 130-091-376) 1:20 with autoMACS® Rinsing Solution (# 130-091-222). Keep buffer cold (2–8 °C). Always use freshly prepared buffer. Do not use autoMACS Running Buffer or MACSQuant® Running Buffer as they contain a small amount of sodium azide that could affect the results.
- For details on the use of gentleMACS Dissociators, refer to the gentleMACS Dissociator user manuals.
- For information about buffer preparation and enzyme reconstitution refer to the data sheet of the Spleen Dissociation Kit.
- To obtain the results shown in this protocol one spleen per C Tube has been dissociated.
- Prepare the enzyme mix of the Spleen Dissociation Kit by adding 2.4 mL of 1× Buffer S, 50 µL of Enzyme D, and 15 µL of Enzyme A into a gentleMACS C Tube.
- Transfer one mouse spleen into the gentleMACS C Tube containing the enzyme mix
- Tightly close the C Tube and attach it upside down onto the sleeve of the gentleMACS Dissociator.
▲ Note: Close the C Tube tightly beyond the first resistance.
▲ Note: Ensure that the sample material is located in the area of the rotor/stator. - Run the gentleMACS Program m_spleen_02. If using the heating function of the gentleMACS Octo Dissociator with Heaters, run program 37C_m_SDK_1 and continue with step 9.
- After termination of the program, detach the C Tube from the gentleMACS Dissociator.
▲ Note: The spleen will not be completely dissociated after this step. In the unexpected event that the spleen is not dissociated at all, repeat steps 4 and 5. - Incubate sample for 15 minutes at 37 °C under slow continuous rotation using the MACSmix™ Tube Rotator.
- Attach the C Tube upside down onto the sleeve of the gentleMACS Dissociator.
▲ Note: Ensure that the sample material is located in the area of the rotor/stator. - Run the gentleMACS Program m_spleen_03.
- After termination of the program, detach the C Tube from the gentleMACS Dissociator.
- (Optional) Perform a short centrifugation step to collect the sample material at the bottom of the tube.
- Resuspend sample and apply the cell suspension onto a MACS SmartStrainer (70 μm) placed on a 15 mL tube.
▲ Note: Moisten the MACS SmartStrainer with 2 mL buffer before use. - Wash the filter with 2.5 mL of 1× Buffer S.
- Discard the filter and centrifuge cell suspension at 300×g for 10 minutes at room temperature. Aspirate supernatant completely.
- Resuspend cells in PEB buffer to the required volume for staining for flow cytometry.
Table 1: Configuration of the panel
| Laser | Antibody specificity | Fluorochrome | LaserClone |
| Violet | CD11b | VioBlue® | REA582 |
| Viobility 405/520 Fixable Dye | |||
| Blue | F4/80 | FITC | REA126 |
| CD68 | PE | REA835 | |
| CD3ε* | PE-Vio® 615 | REA606 | |
| CD19* | PE-Vio 615 | REA747 | |
| CD335 (NKp46)* | PE-Vio 615 | REA815 | |
| CD64 | PE-Vio 770 | REA286 | |
| Red | CD45 | APC-Vio 770 | REA737 |
| Mer | APC | REA477 |
* Exclusion channel containing lineage markers to exclude T cells (CD3ε), B cells (CD19), and NK cells (CD335 (NKp46)) from the analysis.
Labeling of cells with Viobility 405/520 Fixable Dye
- Volumes given below are for up to 107 nucleated cells. When working with fewer than 107 cells, use the same volumes as indicated. When working with higher cell numbers, scale up all reagent volumes and total volumes accordingly (e.g. for 2×10⁷ nucleated cells, use twice the volume of all indicated reagent volumes and total volumes).
- Determine cell number.
- Wash cells in 1 mL of 1× PBS and centrifuge at 300×g for 10 minutes. Aspirate supernatant completely.
- Resuspend cells in 100 μL of 1× PBS.
- Add 1 µL of Viobility 405/520 Fixable Dye.
- Mix well and incubate for 15 minutes in the dark at room temperature.
▲ Note: Higher temperatures and/or longer incubation times may lead to non-specific cell labeling. Working on ice requires increased incubation times. - Wash cells by adding 1 mL PEB buffer and centrifuge at 300×g for 10 minutes. Aspirate supernatant completely.
- (Optional) Repeat step 6.
- Resuspend cells in an appropriate volume of PEB buffer and proceed with surface and intracellular stainin
Surface staining
- To obtain the results shown in this protocol, a total of 1×10⁶ splenocytes has been stained in a total volume of 100 µL.
- Determine cell number.
- Centrifuge cell suspension at 300×g for 10 minutes. Aspirate supernatant completely.
- Prepare a staining cocktail with all fluorochrome-conjugated antibodies, except CD68-PE, according to the respective antibody data sheets.
▲ Note: CD68 is an intracellular marker and it will be detected after fixation and permeabilization of cells. - Add the staining cocktail to the cells.
- Mix well and incubate for 10 minutes in the dark in the refrigerator (2−8 °C).
▲ Note: Higher temperatures and/or longer incubation times may lead to non-specific cell labeling. Working on ice requires increased incubation times. - Wash cells by adding 1 mL of PBE buffer per 1×10⁶ cells and centrifuge at 300×g for 10 minutes. Aspirate supernatant completely.
- Resuspend cells in 250 µL of PEB buffer.
- Proceed with intracellular staining.
Intracellular staining using CD68-PE antibodies and the Inside Stain Kit
- Add 250 µL of Inside Fix (Inside Stain Kit).
- Mix well and incubate for 20 minutes in the dark at room temperature.
- Centrifuge at 300×g for 5 minutes. Aspirate supernatant carefully.
- Wash cells by adding 1 mL of PEB buffer and centrifuge at 300×g for 5 minutes. Aspirate supernatant carefully.
▲ Note: Fixed cells may be stored in azide-containing buffer at 2–8 °C for up to one week. - Wash cells by adding 1 mL of Inside Perm (Inside Stain Kit) and centrifuge at 300×g for 5 minutes. Aspirate supernatant carefully.
- Dilute CD68-PE in Inside Perm solution from the Inside Stain Kit according to the antibody data sheet to a final volume of 100 µL and resuspend cell pellet in diluted staining antibody.
- Mix well and incubate for 10 minutes at room temperature.
- Wash cells by adding 1 mL of Inside Perm and centrifuge cells at 300×g for 5 minutes. Aspirate supernatant carefully.
- Resuspend cells in an appropriate volume of PEB buffer.
- Proceed to flow cytometric analysis.
- Prior to acquisition of samples in a flow cytometer, e.g., the MACSQuant® Analyzer, make sure lasers are properly calibrated and compensation of the spillover of fluorochrome emissions has been established in advance using cells or the MACS Comp Bead Kit, anti-REA. Prior to acquisition adjust also forward scatter (FSC)/side scatter (SSC) parameters to properly locate all leukocyte populations in the plots.
- Exclude doublets by using FSC-H/FSC-A parameters.
- Use gated single cells to exclude erythrocytes and debris using SSC/FSC parameters.
- Use the SSC/FSC gate to exclude dead cells from the analysis using the Viobility 405/520 Fixable Dye/FSC.
- Use gated Viobility 405/520 Fixable Dye–negative (viable) cells to identify macrophages.
 View details