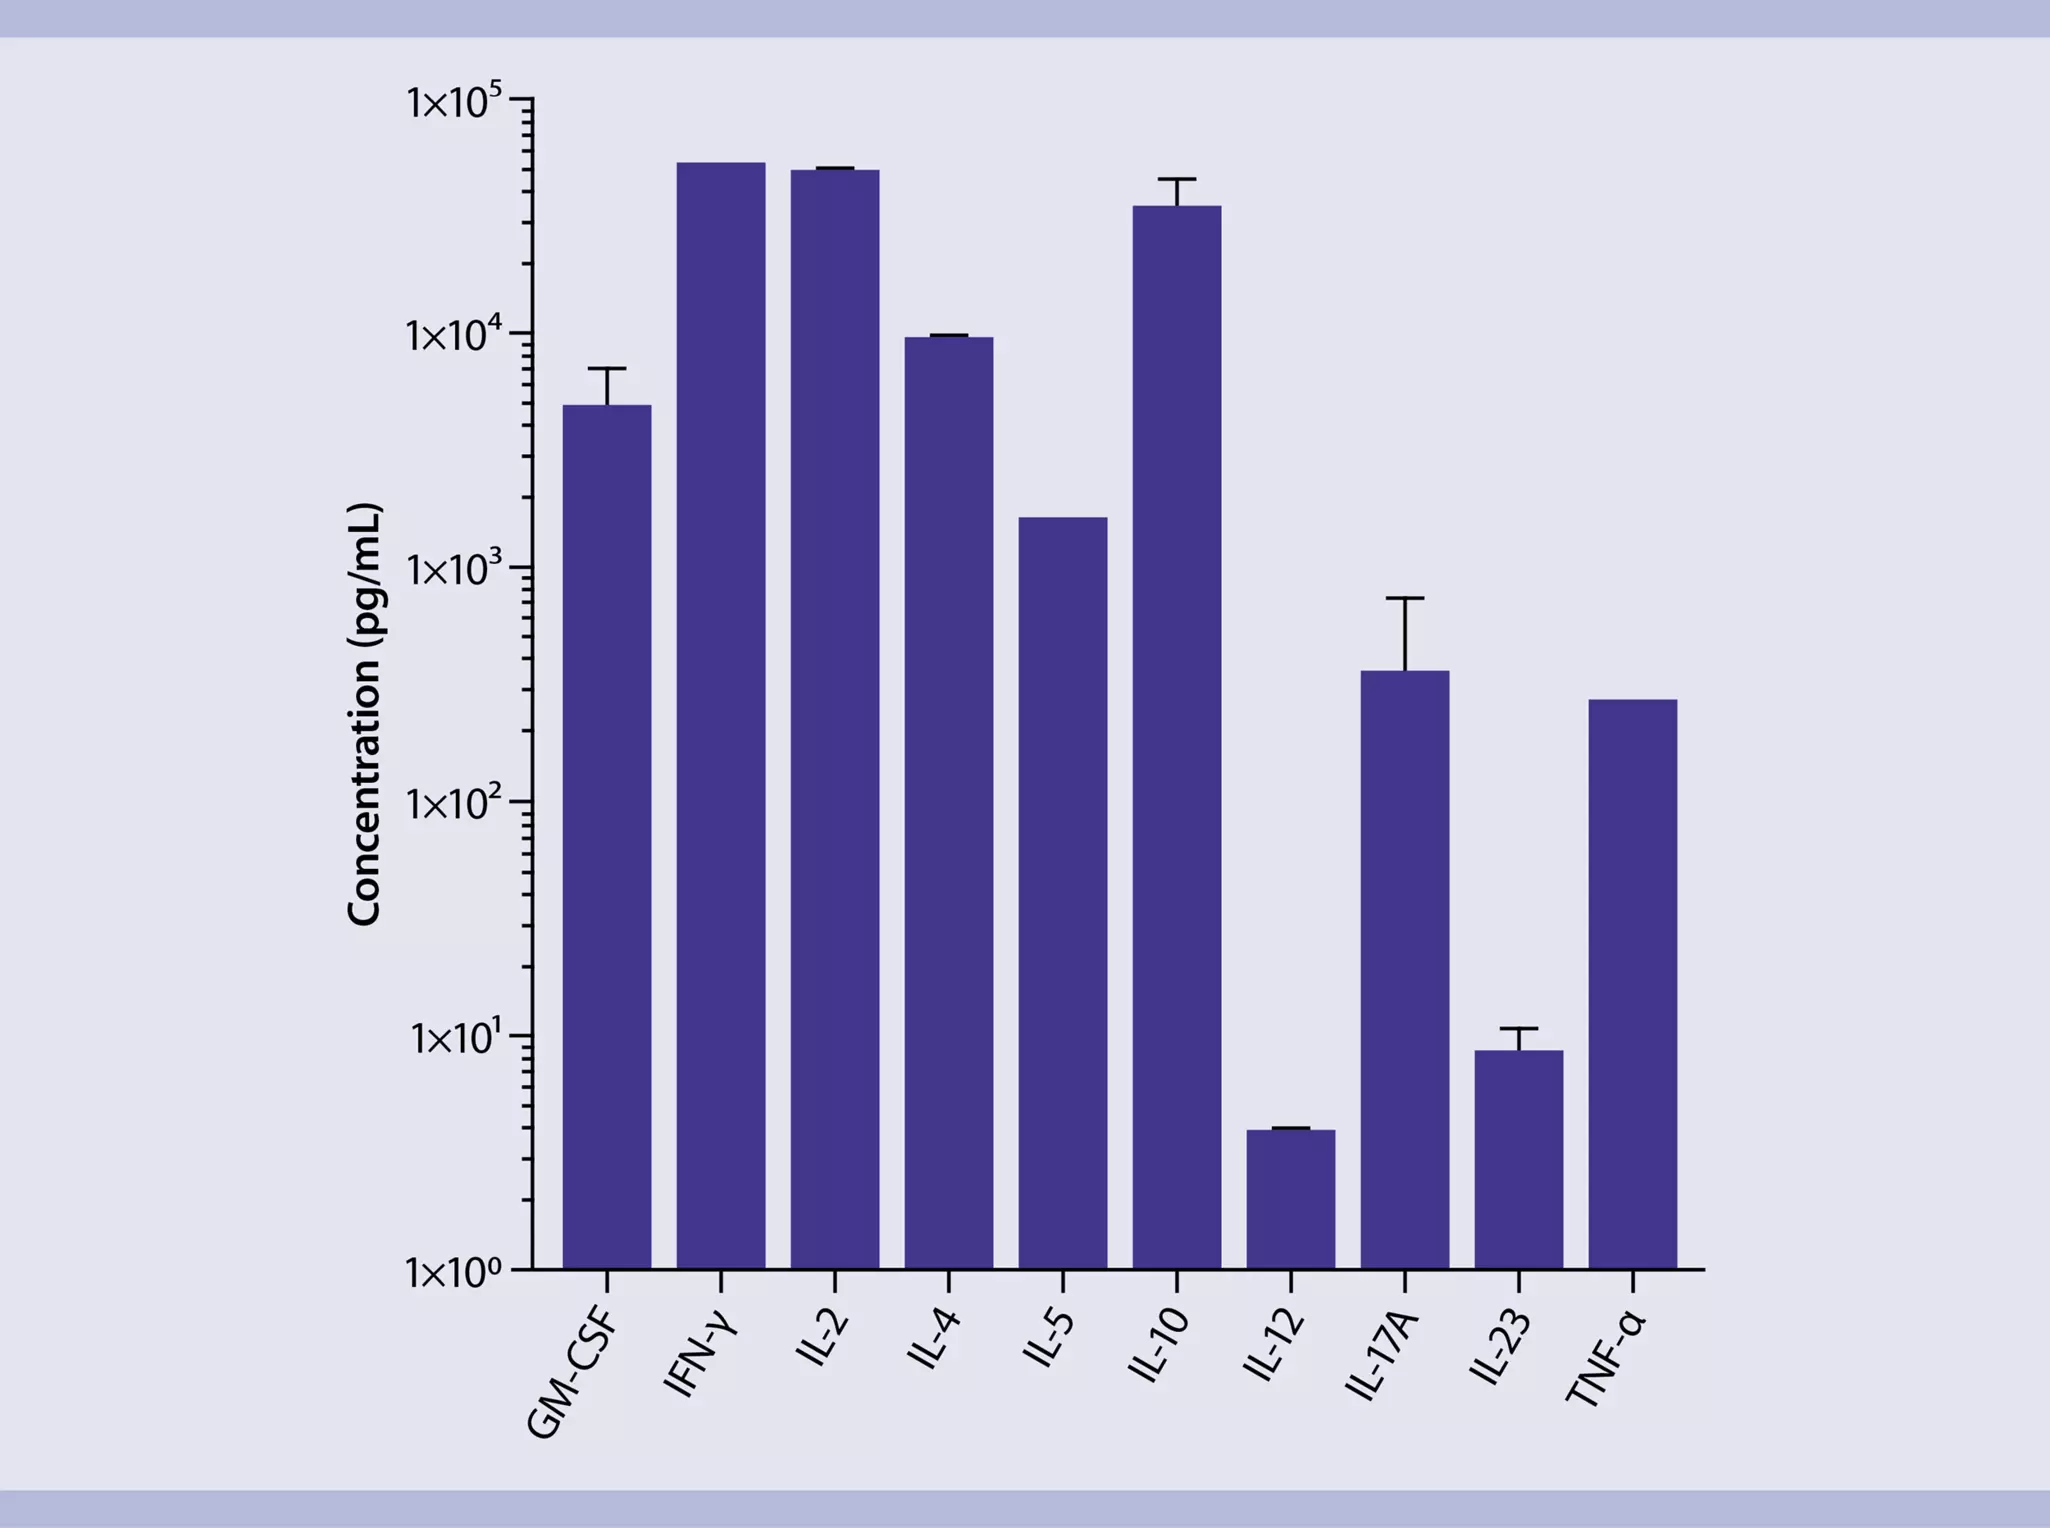
In vitro expansion of mouse CD4+ T cells
Direct ex vivo isolation, cultivation and expansion of CD4+ T cells from mouse spleen
This application protocol describes a workflow for the isolation and cultivation of CD4+ T cells directly from mouse spleen that is fully compatible with downstream applications. Mouse spleens are dissociated into single-cell suspensions using the gentleMACS® Dissociator. Then, CD4+ T cells are magnetically enriched with the CD4+ T cell Isolation Kit, mouse and subsequently activated and expanded with CD3 and CD28 antibody-loaded MACSiBeads™ (T Cell Activation/Expansion Kit, mouse). Proliferation, phenotyping, and expression of activation markers are assessed by flow cytometry at different time points. On day 7 after activation, cells are examined for cytokine expression. Therefore, cells are restimulated with ionomycin and PMA, treated with Brefeldin A, and intracellularly stained for cytokines. Additionally, cell culture supernatants are collected 24 h after restimulation and analyzed for cytokines using the MACSPlex Cytokine 10 Kit, mouse.
Protocol
5 min
Dissociation of mouse spleen tissue
18 min
Isolation of mouse CD4+ T cells
35 min
Staining for analysis of cell proliferation
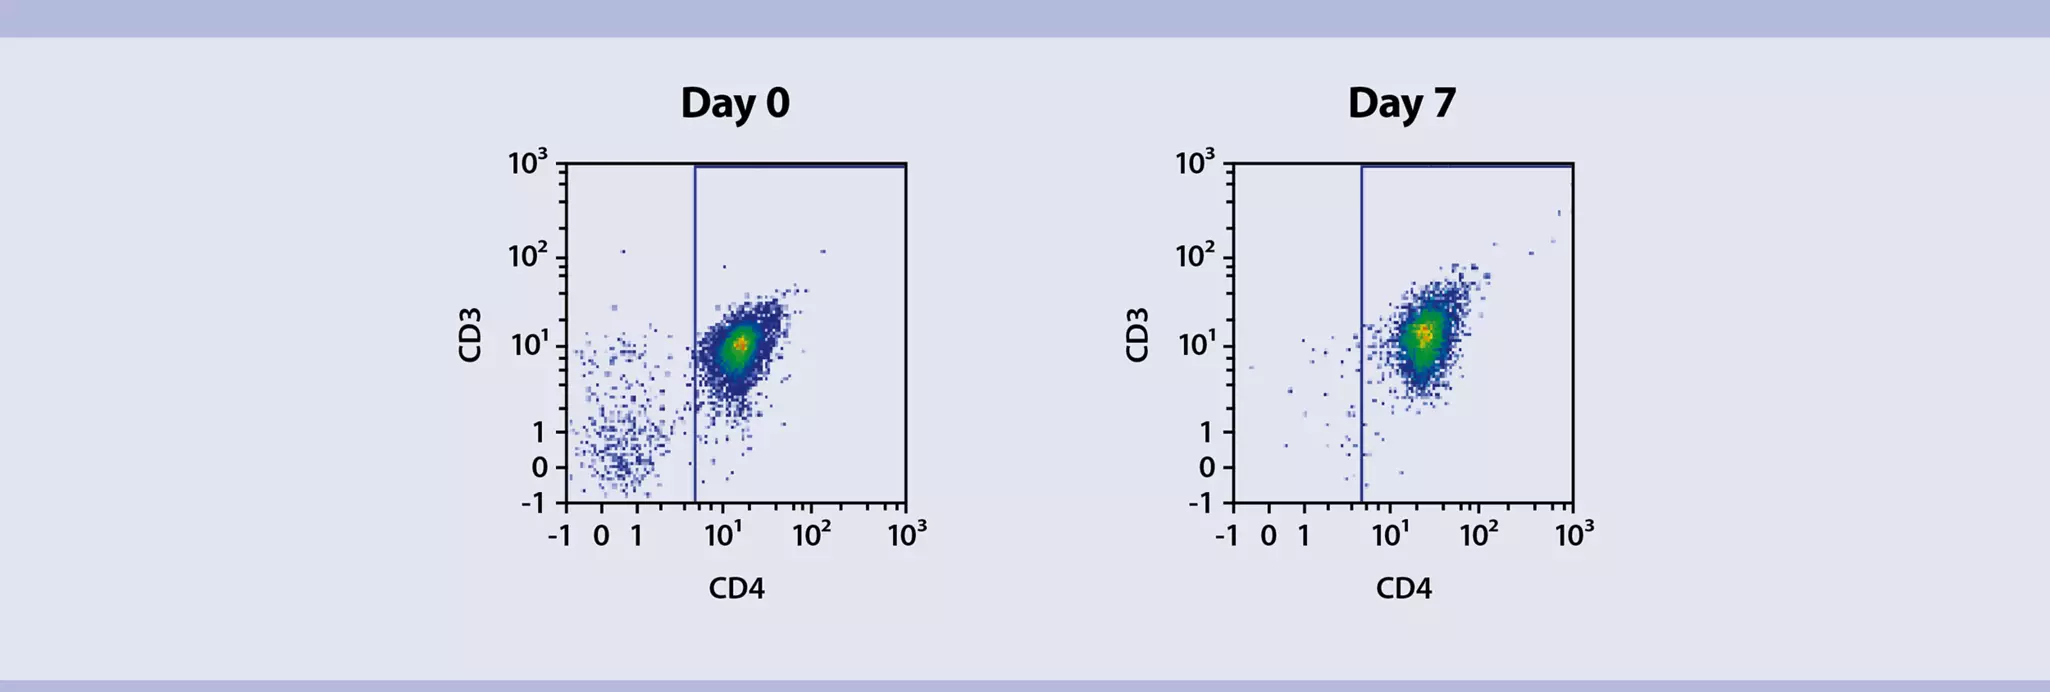
Flow cytometric analysis of phenotypical surface markers (e.g. day 0)
Flow cytometric analysis of phenotypical surface markers (e.g. day 0)
7 d
Activation and expansion of mouse CD4+ T cells
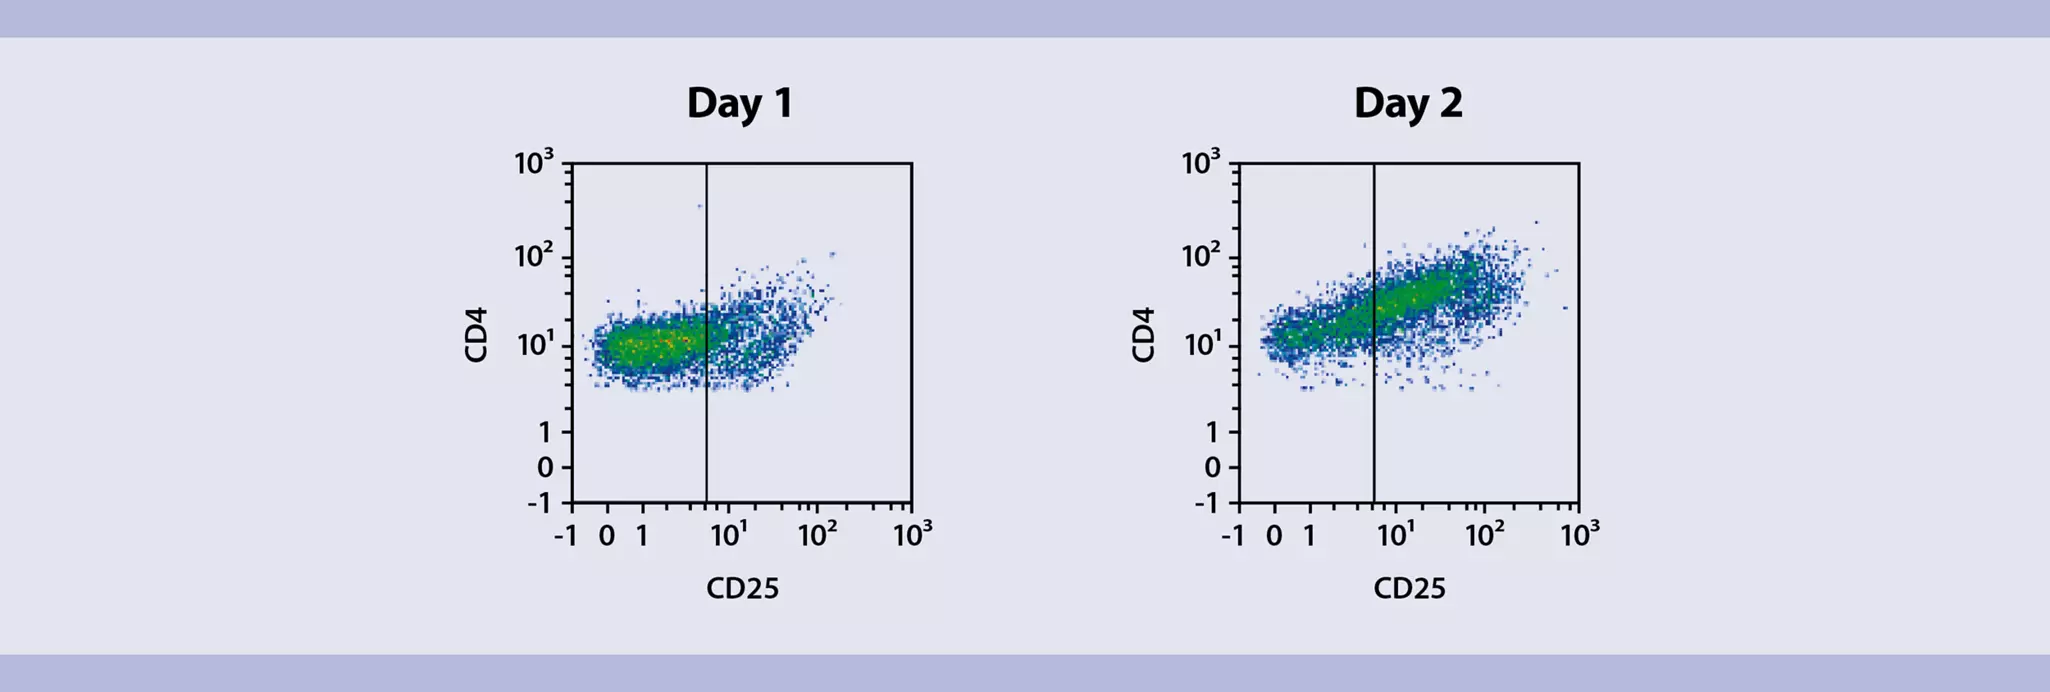
Flow cytometric analysis of activation markers (e.g. days 1, 2)
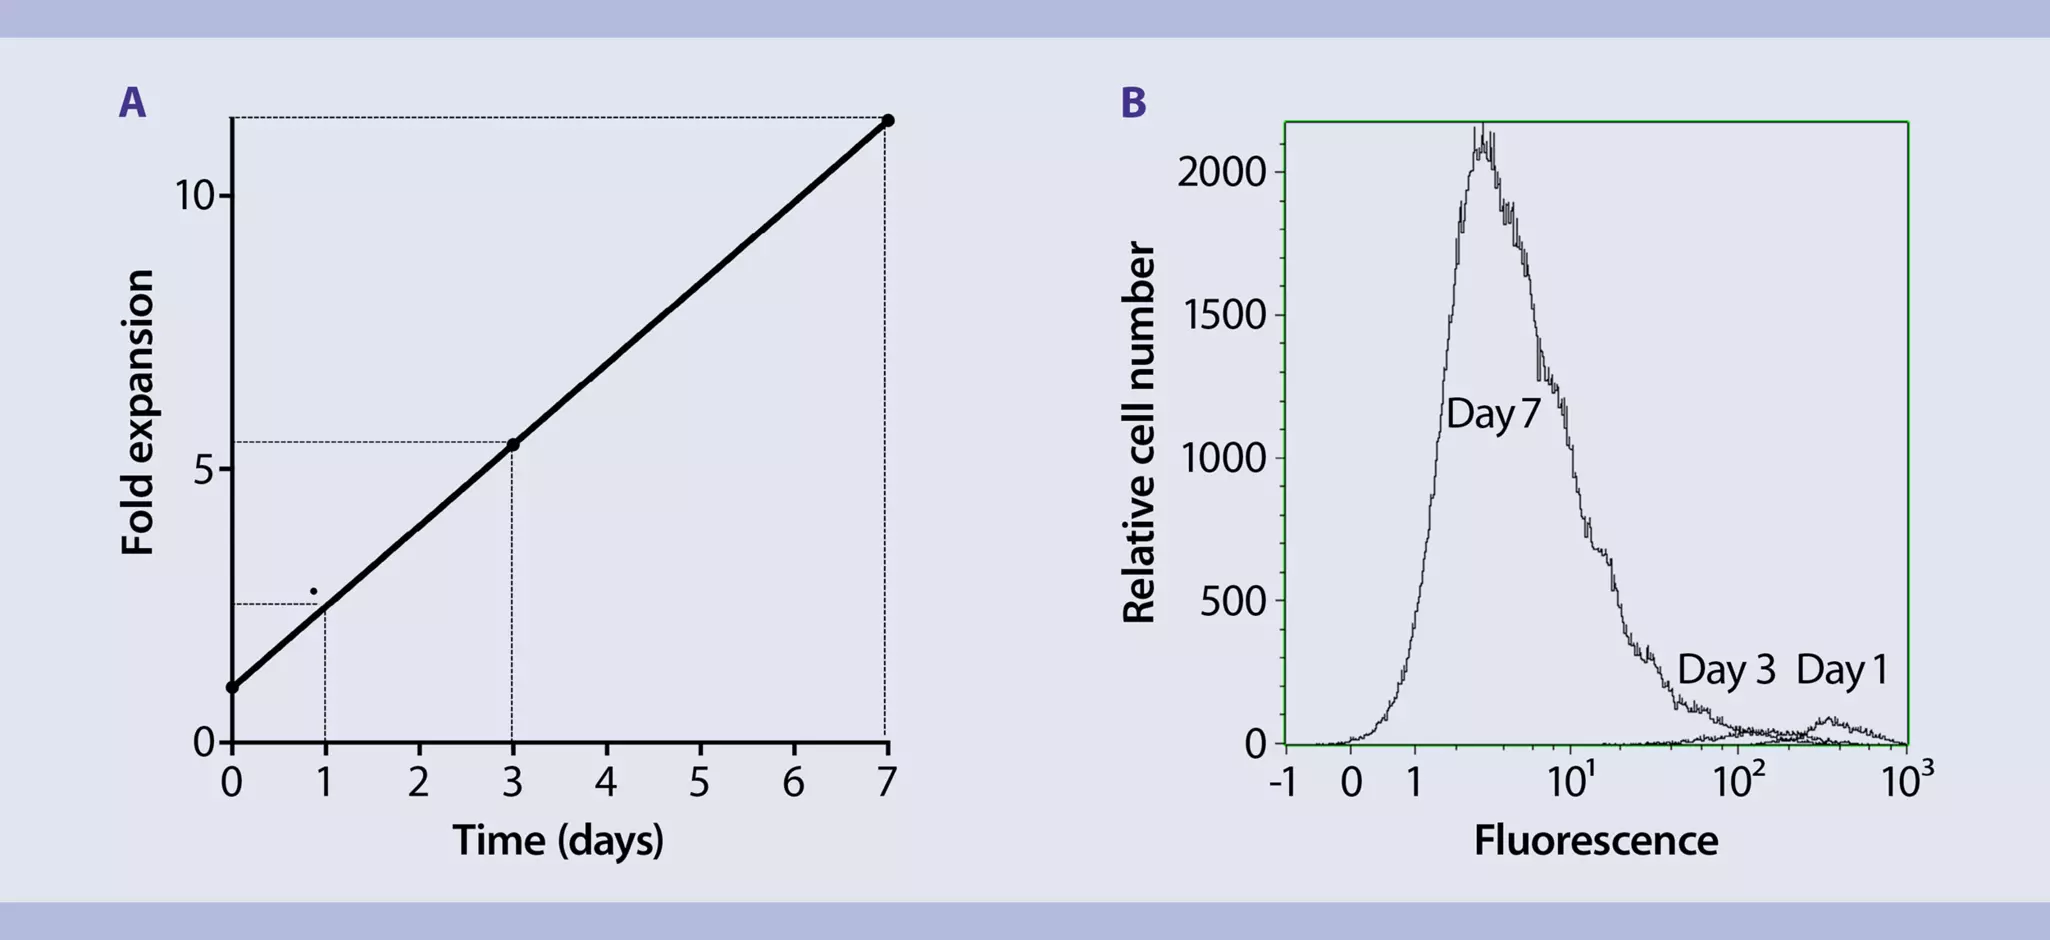
Analysis of cell proliferation (e.g. days 1, 3, 7)
Analysis of phenotypical surface markers (e.g. day 7)
8 min
Removal of MACSiBead™ Particles
4 h
Restimulation of mouse CD4+ T cell
Collection of cell culture supernatant for MACSPlex cytokine analysis
60 min
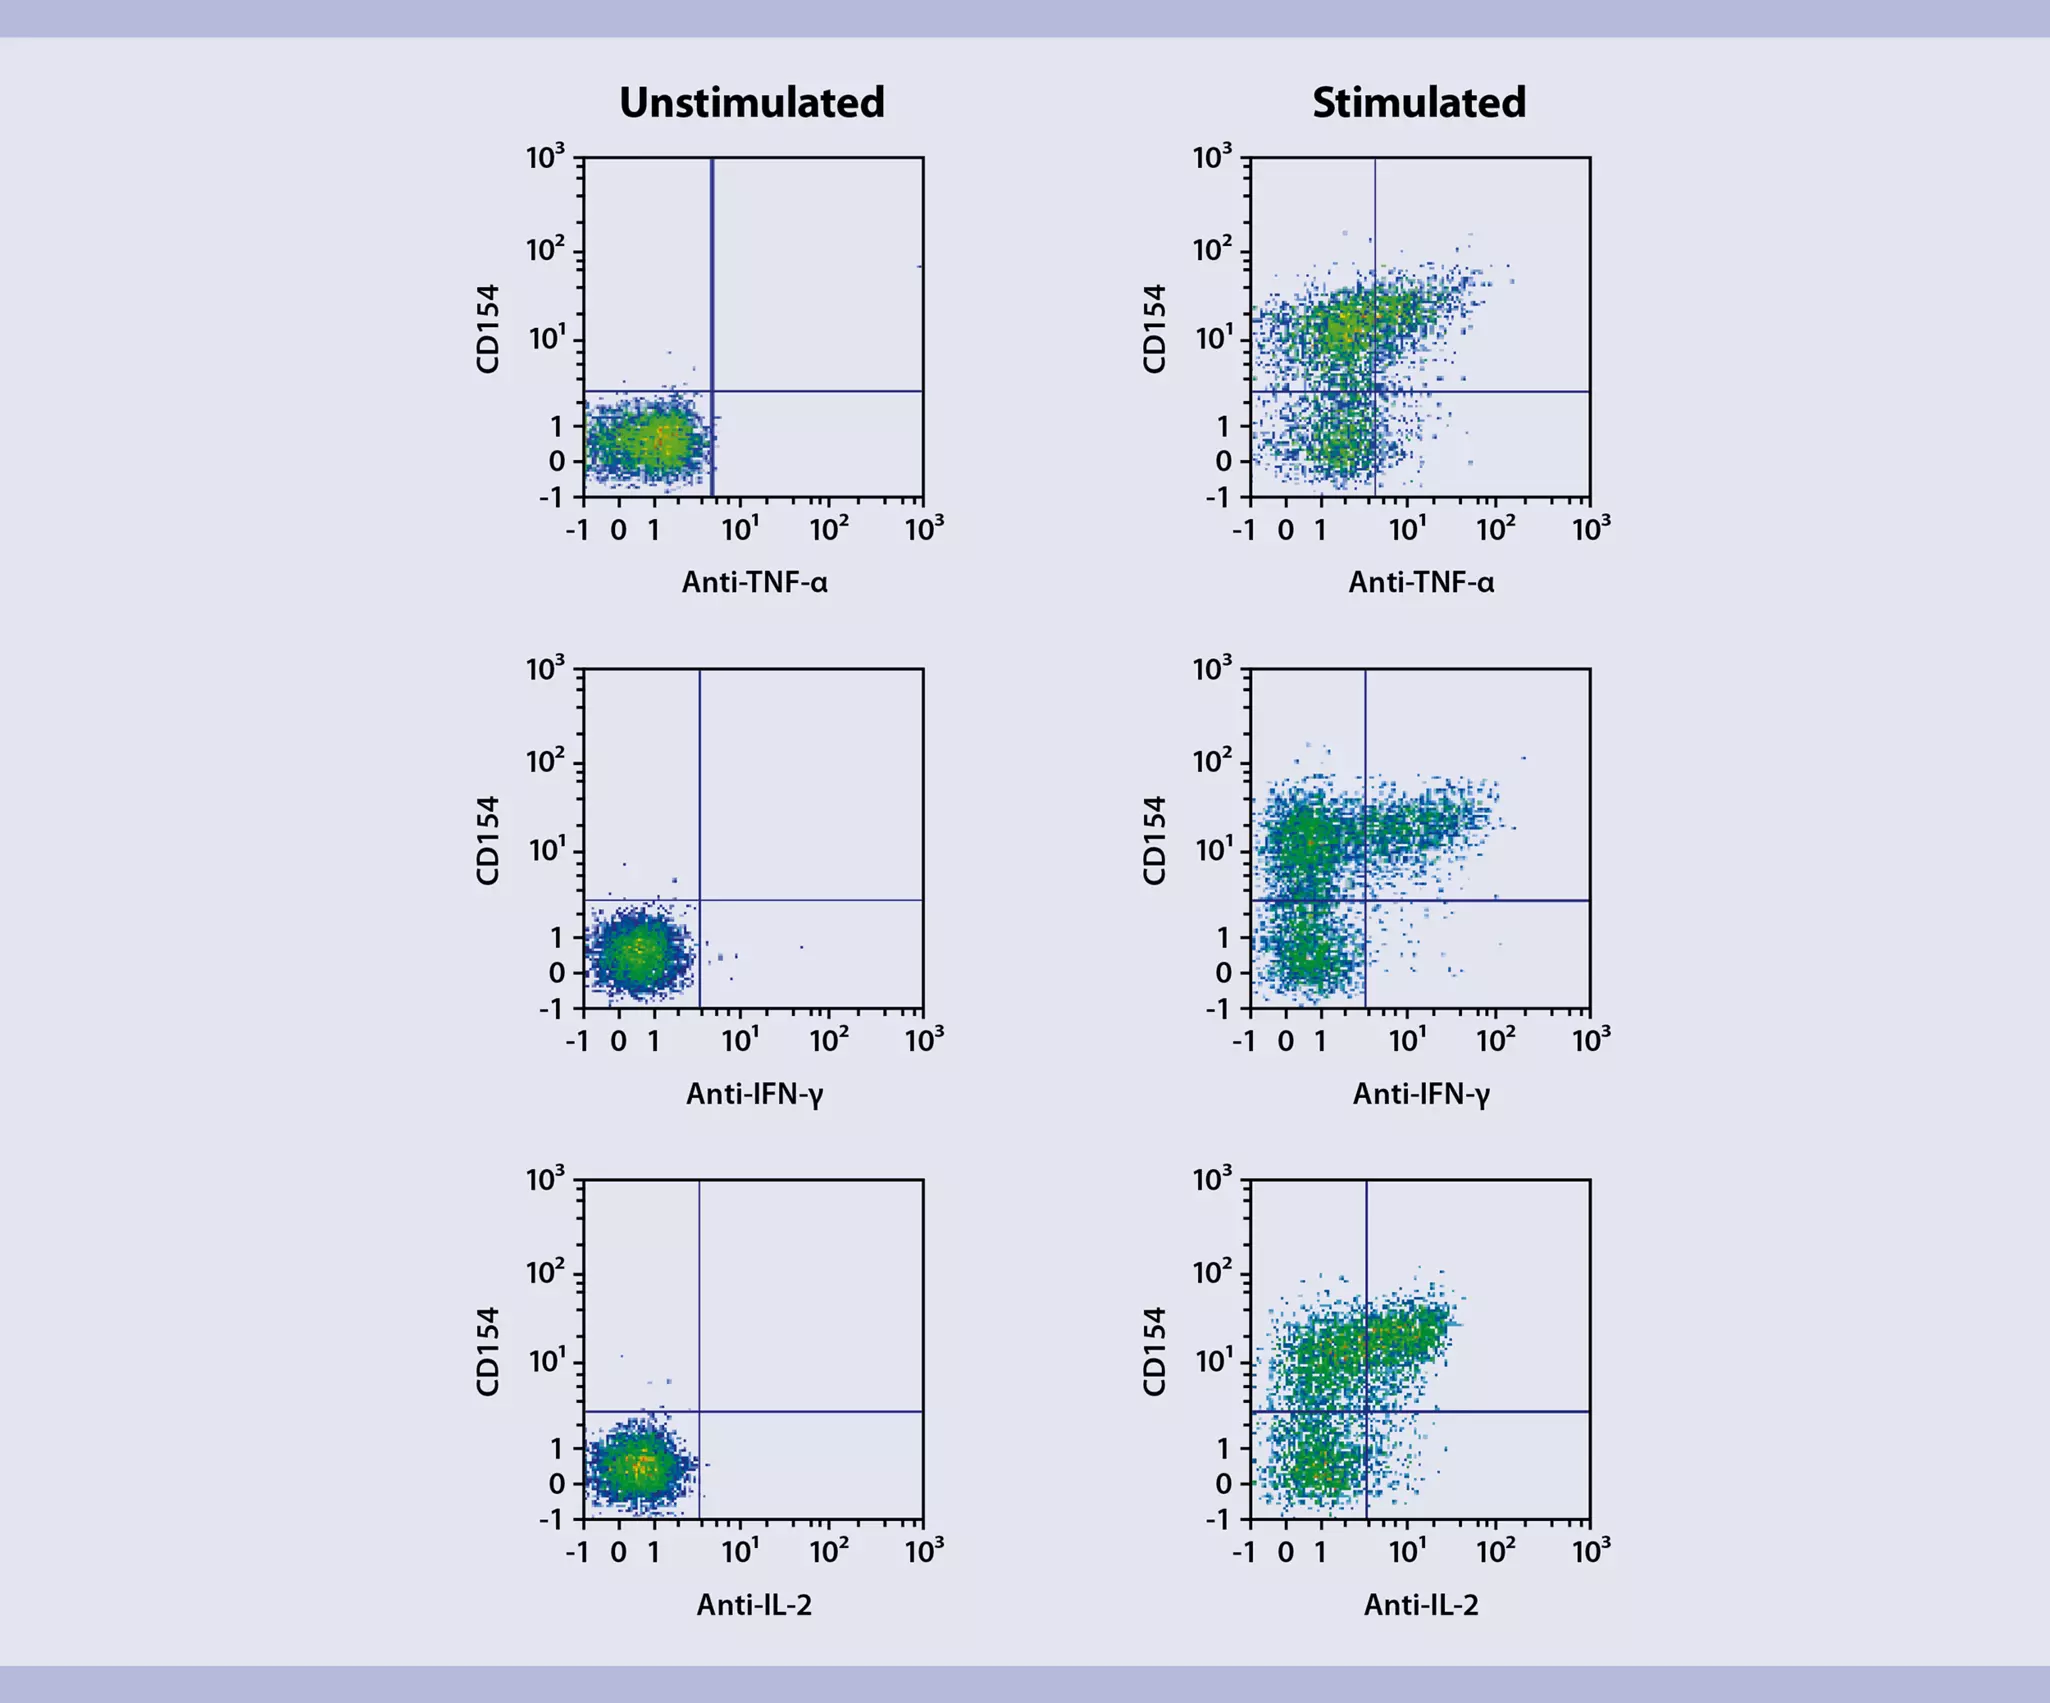
Cell harvest and intracellular staining of lineage-specific effector cytokines
Flow cytometric analysis
MACSPlex analysis of supernatants
Protocol

Buffer (standard wash and dilution buffer)
Prepare a solution of PBS, pH 7.2, 2 mM EDTA, and 0.5% BSA by diluting MACS® BSA Stock Solution 1:20 with autoMACS® Rinsing Solution.
Preparation of single-cell suspensions from mouse spleen
- For details on usage of gentleMACS™ Dissociators, refer to the gentleMACS Dissociator user manuals.
- For cell culture experiments subsequent to tissue dissociation, all steps should be performed under sterile conditions.
- The weight of one mouse spleen amounts to 80–120 mg (female BALB/c mouse, 6–7 weeks old).
- Transfer mouse spleens into a gentleMACS C Tube containing the following amount of buffer:
1–2 mouse spleens: 3 mL
3–4 mouse spleens: 6 mL
5–6 mouse spleens: 9 mL - Tightly close the C Tube and attach it upside down onto the sleeve of the gentleMACS Dissociator.
▲ Note: Close the C Tube tightly beyond the first resistance.
▲ Note: It has to be ensured that the sample material is located in the area of the rotor/stator. - Choose and run one of the following gentleMACS Programs:
1–2 mouse spleens: m_spleen_01
3–6 mouse spleens: m_spleen_04 - After termination of the program, detach the C Tube from the gentleMACS Dissociator.
- (Optional) Perform a short centrifugation step to collect the sample material at the bottom of the tube.
- Resuspend the sample in buffer and apply the cell suspension to a Pre-Separation Filter (30 μm) placed on a 15 mL tube (1–2 mouse spleens per C Tube) or to an appropriate cell strainer placed on a 50 mL tube (3–6 mouse spleens per C Tube).
- Wash Pre-Separation Filter with 5 mL of buffer.
- Discard Pre-Separation Filter and centrifuge cell suspension at 300×g for 10 minutes at room temperature. Aspirate supernatant completely.
- Resuspend cells in buffer to the required volume for further applications. For example, resuspend cells in 10 mL buffer for magnetic labeling.
▲ Note: Process cells immediately.
Magnetic labeling
- Prepare cells and determine cell number.
- Centrifuge cell suspension at 300×g for 10 minutes. Aspirate supernatant completely.
- Resuspend cell pellet in 400 µL of buffer per 1×10⁸ total cells.
- Add 100 µL of Biotin-Antibody Cocktail per 1×10⁸ total cells.
- Mix well and incubate for 5 minutes in the refrigerator (2−8 °C).
- Add 200 µL of buffer per 1×10⁸ total cells.
- Add 200 µL of Anti-Biotin MicroBeads per 1×10⁸ total cells.
- Mix well and incubate for 10 minutes in the refrigerator (2−8 °C).
- (Optional) For highest recovery wash cells by adding 1–2 mL of buffer per 1×10⁸ total cells and centrifuge at 300×g for 10 minutes. Aspirate supernatant completely. Resuspend up to 1×10⁸ cells in 500 µL of Buffer.
- Proceed to "Magnetic separation".
Magnetic separation
- Always wait until the column reservoir is empty before proceeding to the next step.
- Choose an LS Column and a suitable MACS Separator.
- Place LS Column in the magnetic field of a suitable MACS Separator. For details refer to the respective MACS Column data sheet.
- Prepare column by rinsing with 3 mL of buffer.
- Apply cell suspension onto the column. Collect flow-through containing unlabeled cells, representing the enriched naive CD4+ T cells.
- Wash column with 3 mL of buffer. Collect unlabeled cells that pass through, representing the enriched naive CD4+ T cells, and combine with the effluent from step 3.
- (Optional) Remove column from the separator and place it on a suitable collection tube. Pipette 5 mL of buffer onto the column. Immediately flush out the magnetically labeled non-naive CD4+ T cells by firmly pushing the plunger into the column.
Things to prepare in advance
Supplemented T cell medium
TexMACS™ Medium supplemented with 2-Mercaptoethanol (final concentration 0.01 mM), 100× penicillin/streptomycin stock solution (final concentration 1%), and 50 U/mL Mouse IL-2.
- Make sure to freshly add IL-2 to the T cell medium for cell expansion. For some experimental procedures, T cell medium without IL-2 has to be used (see "Restimulation of polarized T cells and brefeldin A treatment").
- Optionally, up to 10% FBS can be added to the TexMACS Medium to further boost expansion rates.
- Instead of TexMACS Medium, RPMI supplemented with FBS (10% final concentration), 100× L-glutamine stock solution (1% final concentration), 2-Mercaptoethanol (0.01 mM final concentration), 100× penicillin/streptomycin stock solution (1% final concentration), and 50 U/mL Mouse IL-2 can be used for T cell cultivation and expansion.
- Addition of penicillin/streptomycin to the T cell medium is optional.
- Cell proliferation is typically analyzed on days 1, 3 and 7. However, feel free to modify checkpoints according to experimental needs.
- Make sure to have at least one additional well per condition (e.g. stimulated and unstimulated control) for analysis purposes left.
- To analyze cell proliferation use, e.g., CellTrace™ Violet Cell Proliferation Kit (Thermofisher, #C34557).
- To assess expansion rates, determine cell numbers on each respective day by, e.g., counting cells with a Neubauer Chamber or by using the counting function of the MACSQuant® Analyzer 10.
- The here recommended procedure for using the CellTrace Violet Cell Proliferation Kit differs from the manufacturer’s instructions. If desired, follow manufacturer’s instructions instead.
Recommended procedure:
- Freshly prepare the 5 mM CellTrace Violet stock solution by adding 20 µL DMSO (Component B, provided with the CellTrace Violet Cell Proliferation Kit) to one vial of CellTrace Violet (Component A). Mix well.
- Determine cell number.
- Centrifuge cell suspension at 300×g for 10 minutes. Aspirate supernatant completely.
- For each sample resuspend up to 2×10⁶ in 1 mL PBS and transfer to a suitable tube (e.g. 15 mL tube).
- Add 1 µL of the 5 mM CellTrace Violet stock solution for a final concentration of 5 µM.
- Mix well and incubate for 5 minutes at 37 °C.
- Add 1 mL of FBS. Mix well.
- Centrifuge cell suspension at 300×g for 10 minutes. Aspirate supernatant completely.
- Resuspend cells in an appropriate amount of supplemented T cell medium (e.g. 2×10⁶ cells in 2 mL/well of a 24-well plate).
- Treat cells as other samples and proceed with cell stimulation, expansion, incubation, or analysis.
- At measuring time points, resuspend cells directly in the well and take an aliquot (e.g. 100 µL when cultivating in a 24-well plate).
- Add an appropriate amount of buffer to dilute cells (e.g. 500 µL of buffer to an aliquot of 100 µL) and analyze proliferation by flow cytometry in an instrument with a 405 nm excitation source (e.g. MACSQuant Analyzer 10).
Things to prepare in advance
T cell medium
Prepare fresh T cell medium with TexMACS™ Medium supplemented with 2-Mercaptoethanol (final concentration 0.01 mM), 100× penicillin/streptomycin stock solution (final concentration 1%), and 50 U/mL Mouse IL-2 (see "Staining for analysis of cell proliferation" for more details).
▲ Note: Make sure to freshly add IL-2 to the T cell medium for cell expansion.
Reconstitution of mouse IL-2, research grade
Recommended reconstitution: 0.1 mg/mL by reconstituting a 100 µg vial of mouse IL-2, research grade with 1 mL deionized sterile-filtered water. This results in a final activity of 500 U/µL.
- It is recommended to reconstitute lyophilized mouse IL-2, research grade with deionized sterile-filtered water to a final concentration of 0.1–1.0 mg/mL in a minimal volume of 100 µL.
- Further dilutions should be prepared with 0.1% bovine serum albumin (BSA) or human serum albumin (HSA) in phosphate-buffered saline.
- The ED50 is ≤0.2 ng/mL, corresponding to an activity of ≥5×10⁶ U/mg.
- To prepare a cell culture medium supplemented with, e.g., 50 U/mL, add 1 µL of reconstituted mouse IL-2, research grade to 10 mL cell culture medium.
- Prepared aliquots of mouse IL-2 can be stored at –70 °C for up to 6 months until further use.
Loading of Anti-Biotin MACSiBead™ Particles
- Resuspend Anti-Biotin MACSiBead Particles thoroughly by vortexing before use to obtain a homogeneous suspension.
- Anti-Biotin MACSiBead Particles are supplied without preservative. Remove aliquots under aseptic conditions.
- It is recommended to load Anti-Biotin MACSiBead Particles in batches of 1×10⁸ Anti-Biotin MACSiBead Particles. Loaded Anti-Biotin MACSiBead Particles are stable for up to 4 months when stored at 2–8 °C.
- Pipette 100 μL of CD3ε-Biotin and 100 μL CD28-Biotin into a sealable 2 mL tube and mix well.
▲ Note: This antibody combination, with a final antibody concentration of 10 μg antibody per 1 mL loaded Anti-Biotin MACSiBead Particles, is optimized for achieving maximal T cell activation. - Add 300 μL of buffer and mix well.
- Resuspend Anti-Biotin MACSiBead Particles thoroughly by vortexing.
- Remove 500 μL Anti-Biotin MACSiBead Particles (1×10⁸ Anti-Biotin MACSiBead™ Particles) and add to the antibody staining cocktail.
▲ Note: Anti-Biotin MACSiBead Particles can be loaded in a flexible manner with biotinylated antibodies or ligands other than those supplied. If desired, add other biotinylated antibodies or ligands at appropriate concentrations and adjust with buffer to a total volume of 1 mL accordingly. - Incubate for 2 hours at 2–8 °C under constant, gentle rotation by using the MACSmix™ Tube Rotator at approximately 4 rpm (slowest permanent run program).
- The loaded Anti-Biotin MACSiBead Particles (1×10⁸ Anti-Biotin MACSiBead Particles/mL) are now ready to use. Do not remove the loaded Anti-Biotin MACSiBead Particles from the antibody staining cocktail. Store at 2–8 °C for up to 4 months.
T cell activation and expansion with MACSiBeads
- Resuspend loaded Anti-Biotin MACSiBead Particles thoroughly and transfer 40 μL (4×10⁶ loaded Anti-Biotin MACSiBead Particles) per 2×10⁶ cells to a suitable tube.
▲ Note: If unloaded MACSiBead Particles are to be used for negative control experiments, replace loaded Anti-Biotin MACSiBead Particles with 40 μL (4×10⁶ beads) of unloaded Anti-Biotin MACSiBead Particles per 2×10⁶ cells. - Add 1 mL of T cell medium to the loaded Anti-Biotin MACSiBead Particles and centrifuge at 300×g for 5 minutes.
- Aspirate supernatant and resuspend loaded Anti-Biotin MACSiBead Particles in 1 mL of fresh T cell medium supplemented with IL-2.
- Resuspend cells at a density of 2×10⁶ cells per mL of T cell medium supplemented with IL-2.
- Add the cell suspension and the prepared Anti-Biotin MACSiBead Particles from step 3 to a suitable cell culture vessel at a density of 1×10⁶ cells per mL per cm2 (e.g. 2×10⁶ cells in 2 mL/well of a 24-well plate).
- Incubate at 37 °C and 5–10% CO2 for up to 2 days.
▲Note: Inspect cultures daily, and add fresh T cell medium if required. - At day 2, gently pipette culture up and down to break up all cell clumps.
- Split the cell culture every two days 1:4 or 1:2, depending on the proliferation of cells, and add fresh T cell medium supplemented with IL-2. (Keep cells at a density of 1×10⁶ cells per mL per cm2; e.g., 2×10⁶ cells in 2 mL/well of a 24-well plate).
▲ Note: Inspect the culture daily. Depending on the expansion rate, it might be necessary to split culture more frequently than every 2 days. - After 6–8 days of activation, T cells are in a resting state and further expansion of T cells requires a restimulation.
Things to prepare in advance
Phenotyping antibody panel
Prepare the following antibody staining cocktail fresh for each sample:
20 µL buffer, 5 µL of each antibody:
- CD4 Antibody, anti-mouse, VioGreen™
- CD3e Antibody, anti-mouse, APC-Vio® 770
- CD44 Antibody, anti-mouse, FITC
- CD62L Antibody, anti-mouse, PE
- CD69 Antibody, anti-mouse, VioBlue®
- CD25 Antibody, anti-mouse, PE-Vio 770
Store the antibody staining cocktail in the dark in the refrigerator (2−8 °C) until use. Do not store for extended periods.
Activation marker antibody panel
Prepare the following antibody staining cocktail fresh for each sample:
15 µL buffer, 5 µL of each antibody:
- CD69 Antibody, anti-mouse, VioBlue
- CD3e Antibody, anti-mouse, APC-Vio 770
- CD25 Antibody, anti-mouse, Vio Bright FITC
- CD4 Antibody, anti-mouse, VioGreen
- CD137 Antibody, anti-mouse, PE
- CD134 Antibody, anti-mouse, PE-Vio 770
- CD154 Antibody, anti-mouse, APC
Store antibody staining cocktail in the dark in the refrigerator (2−8 °C) until use. Do not store for extended periods.
Flow cytometry – phenotyping
- Cells are typically phenotyped on days 0 and 7. However, feel free to modify checkpoints according to experimental needs.
- The recommended antibody dilution for labeling of cells and subsequent analysis by flow cytometry is 1:10 for up to 1×10⁶ cells/50 µL of buffer.
- Volumes given below are for up to 1×10⁶ nucleated cells. When working with fewer than 1×10⁶ cells, use the same volumes as indicated. When working with higher cell numbers, scale up all reagent volumes and total volumes accordingly (e.g. for 2×10⁶ nucleated cells, use twice the volume of all indicated reagent volumes and total volumes).
- Determine cell number.
- Centrifuge cell suspension at 300×g for 10 minutes. Aspirate supernatant completely.
- For each sample, resuspend up to 1×10⁶ nucleated cells in 50 µL phenotyping staining cocktail (see phenotyping antibody panel in "Things to prepare in advance").
- Mix well and incubate for 10 minutes in the dark in the refrigerator (2−8 °C).
▲Note: Higher temperatures and/or longer incubation times may lead to non-specific cell labeling. Working on ice requires increased incubation times. - Wash cells by adding 1−2 mL of buffer and centrifuge at 300×g for 10 minutes. Aspirate supernatant completely.
- Resuspend cell pellet in a suitable amount of buffer (e.g. 500 µL) for analysis by flow cytometry.
▲Note: Add propidium iodide according to the manufacturer’s instructions before flow cytometric analysis.
Flow cytometry – activation marker
Activation markers are typically analyzed on days 1 and 2 after activation with the T Cell Activation and Expansion Kit, mouse. However, feel free to modify checkpoints according to experimental needs.
- Determine cell number.
- Centrifuge cell suspension at 300×g for 10 minutes. Aspirate supernatant completely.
- For each sample, resuspend up to 1×10⁶ nucleated cells in 50 µL activation marker staining cocktail (see activation marker antibody panel in "Things to prepare in advance").
- Mix well and incubate for 10 minutes in the dark in the refrigerator (2−8 °C).
▲Note: Higher temperatures and/or longer incubation times may lead to non-specific cell labeling. Working on ice requires increased incubation times. - Wash cells by adding 1−2 mL of buffer and centrifuge at 300×g for 10 minutes. Aspirate supernatant completely.
- Resuspend cell pellet in a suitable amount of buffer (e.g. 500 µL) for analysis by flow cytometry.
▲Note: Add propidium iodide according to the manufacturer’s instructions before flow cytometric analysis.
- For further flow cytometric analysis, it is recommended to remove the MACSiBead Particles from the cell suspension.
- Harvest cells and pool different wells of the same condition.
- Wash empty wells with cold buffer to rinse out the remaining cells on the plate.
- Determine cell number.
- Wash cells with cold buffer.
- Resuspend cells in buffer at a density of up to 2×10⁷ cells/ml and vortex thoroughly.
- Place the tube in the magnetic field of the MACSiMAG™ Separator.
- Allow the MACSiBead Particles to adhere to the wall of the tube for 4 minutes.
- Keeping the tube in the magnet, carefully remove the supernatant containing the MACSiBead-depleted cells and place in a new tube.
- Remove the tube from the separator and add buffer to the same volume as before.
- Vortex sample, replace tube in the MACSiMAG Separator and repeat steps 7–8.
- Collected cells can now be further processed as required.
Things to prepare in advance
T cell medium without IL-2
Prepare fresh T cell medium with TexMACS™ medium supplemented with 2-mercaptoethanol (final concentration 0.01 mM) and 100× penicillin/streptomycin stock solution (final concentration 1%). See "Staining for analysis of cell proliferation" for more details.
▲ Note: Restimulation of cells is performed in the absence of IL-2.
Seeding of cells for restimulation and subsequent analyses
- Determine cell number.
- Centrifuge cell suspension at 300×g for 10 minutes. Aspirate supernatant completely.
- Resuspend cells at a density of 1×10⁷ cells/mL in T cell medium without IL-2.
- Depending on the total cell number and experimental requirements, transfer either 1 mL cell suspension (1×10⁷ cells) per well to a 24-well plate or 100 µL cell suspension (1×10⁶ cells) per well to a 96-well plate.
Restimulation and brefeldin A treatment of mouse CD4+ T cells
- Make sure to treat samples from which supernatants for the MACSPlex analysis are to be taken with PMA/ionomycin only and not with brefeldin A.
- Make sure to use T cell medium without IL-2.
- Add 20 ng/mL PMA and 1 µg/mL ionomycin to the cells and incubate for 2 hours at 37 °C.
- Add brefeldin A to a final concentration of 2 µg/mL to the cells and incubate for another 2 hours at 37 °C.
- Cells are now ready for further analyses.
▲ Note: For the analysis of lineage-specific effector cytokines (see "Flow cytometric analysis of secreted cytokines"), cells can be further processed immediately after brefeldin A treatment. For the collection of supernatants for MACSPlex analysis, it is recommended to stimulate cells with PMA/ionomycin for up to 24 hours. Analysis with MACSPlex after shorter stimulation times (e.g. 2–4 hours) might still be successful, but result in lower data scores.
Collection of supernatants for MACSPlex analysis of secreted cytokines
- Make sure to treat samples from which supernatants are to be taken with PMA/ionomycin only and not with brefeldin A.
- It is recommended to collect supernatants on day 8, 24 hours after restimulation with PMA/ionomycin. Analysis with MACSPlex after shorter stimulation times (e.g. 2–4 hours) might still be successful but result in lower data scores.
- Keep supernatants cool after collection (2–8 °C) and either process them immediately or freeze at –70 °C for later use. Frozen supernatants can be stored for up to 4 weeks at –70 °C.
- Handle all blood components and biological material as potentially hazardous.
- If unknown samples are expected or known to contain levels >2000 pg/mL, it is recommended to dilute the samples to make sure the fluorescence values are within the dynamic range of the standard curve (see step 4).
- Collect 100 µL of supernatant.
- Centrifuge cell culture supernatant at 10,000×g for 10 minutes at 4 °C.
- Transfer the supernatant into a new tube.
- (Optional) Dilute with cell culture medium or MACSPlex Buffer (see "Cell harvest and intracellular staining of lineage-specific effector cytokines").
- Immediately analyze supernatants with MACSPlex (proceed to "Cell harvest and intracellular staining of lineage-specific effector cytokines") or store at –70 °C until use.
Things to prepare in advance
MACSPlex Cytokine 10 Standard
- Reconstitute and dilute MACSPlex Cytokine 10 Standard with MACSPlex Buffer or use the same medium as is used for the dilution of the unknown sample.
- Always use freshly prepared MACSPlex Cytokine 10 Standard solutions. Do not store or reuse reconstituted or diluted standards.
- Use polypropylene or polystyrene reagent tubes. Do not use glass vials. The generation of standard curves requires eight samples: seven samples of the MACSPlex Cytokine 10 Standard and one blank control. These samples are measured as duplicates (see "Flow cytometric analysis of secreted cytokines").
- Thaw one vial containing the lyophilized MACSPlex Cytokine 10 Standard.
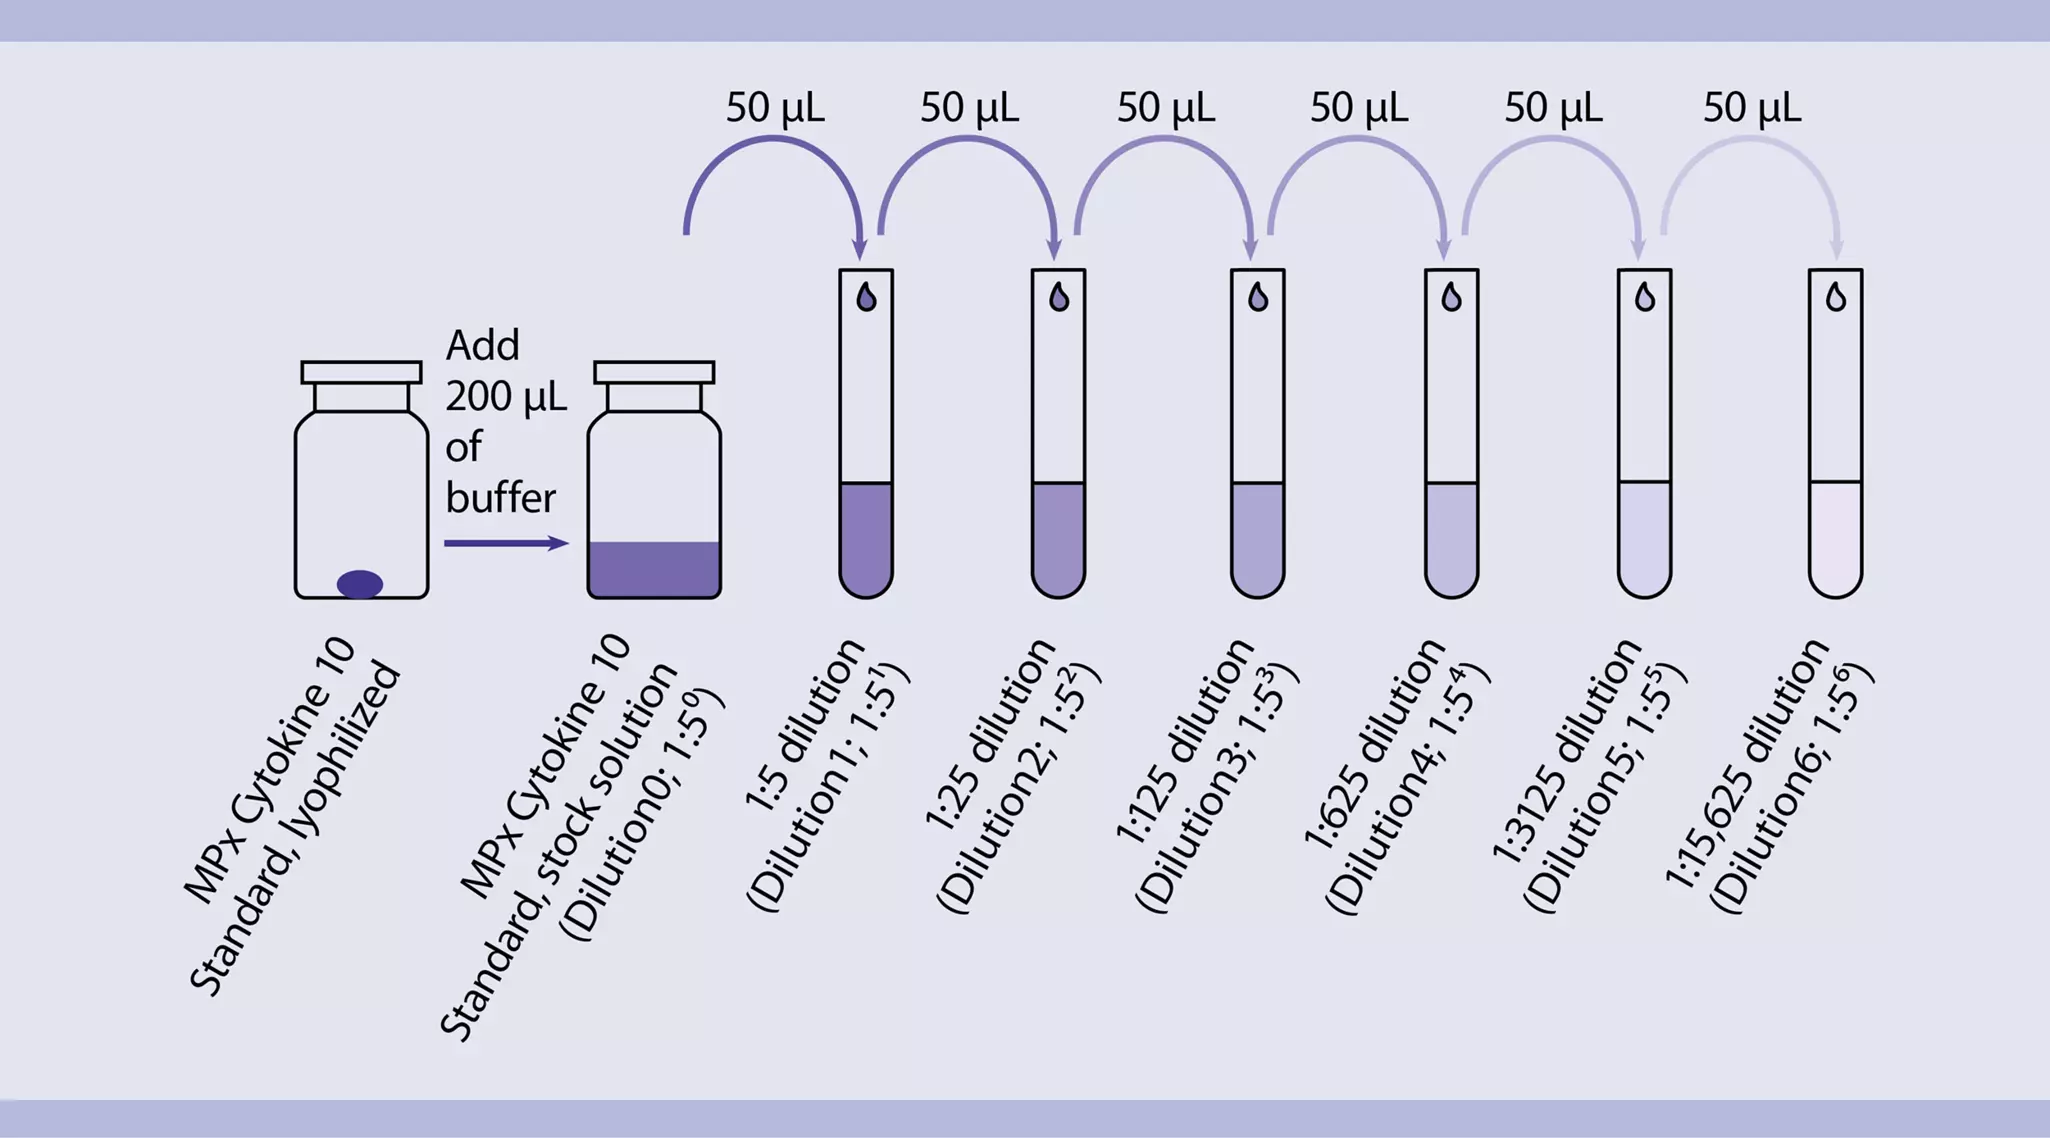
- Open the vial and add 200 μL of MACSPlex Buffer or medium to the pellet. Mix gently. This is the stock solution (10,000 pg/mL for IL-4, IL-5, IL-17A, IL-23 and 50,000 pg/mL for IL-2, IL-10, IL-12p70, IFN-γ, TNF-α, GM-CSF).
- Label six reagent tubes and arrange them in the following order:
1:5 (1:51; 2,000 pg/mL or 10,000 pg/mL)
1:25 (1:52; 400 pg/mL or 2000 pg/mL)
1:125 (1:53, 80 pg/mL or 400 pg/mL)
1:625 (1:54; 16 pg/mL or 80 pg/mL)
1:3125 (1:55; 3.2 pg/mL or 16 pg/mL)
1: 15,625 (1:56; 0.6 pg/mL or 3.2 pg/mL) - Pipette 200 μL of MACSPlex Buffer or medium into each tube.
- Perform a 1:5 dilution by transferring 50 μL from the stock solution to the tube labeled 1:5 and mix thoroughly. Continue making 1:5 serial dilutions by transferring 50 μL from the tube labeled 1:5 to the tube labeled 1:25, etc. (see figure 1). Mix each dilution well before performing the next transfer.
- Keep 200 μL MACSPlex Buffer or medium as blank control (0 pg/mL).
 View details
Analysis of lineage-specific effector cytokines by intracellular staining
- The recommended dilution for the CD154-APC, TNF-α Antibody-FITC, IFN-γ Antibody-PE, and IL-2 Antibody-PE for cell labeling and subsequent flow cytometric analysis is 1:10 for up to 1×10⁶ cells/50 μL of buffer.
- Volumes given below are for up to 1×10⁶ nucleated cells. When working with fewer than 1×10⁶ cells, use the same volumes as indicated. When working with higher cell numbers, scale up all reagent volumes and total volumes accordingly (e.g. for 2×10⁶ nucleated cells, use twice the volume of all indicated reagent volumes and total volumes).
- For the following staining panels, two cell samples are required.
- Wash up to 1×10⁶ cells by adding 1–2 mL of buffer and centrifuge at 300×g for 10 minutes. Aspirate supernatant completely.
- (Optional) Stain cell surface antigens that are sensitive to fixation with appropriate antibodies according to the manufacturer's recommendations. Wash cells by adding 1–2 mL of buffer and centrifuge at 300×g for 10 minutes. Aspirate supernatant completely.
- Resuspend up to 1×10⁶ cells in 250 μL of buffer.
- Add 250 μL of Inside Fix (Inside Stain Kit). Mix well and incubate for 20 minutes in the dark at room temperature.
- Centrifuge at 300×g for 5 minutes. Aspirate supernatant carefully.
- Wash cells by adding 1 mL of buffer and centrifuge at 300×g for 5 minutes. Aspirate supernatant carefully.
▲ Note: Fixed cells may be stored in azide containing buffer at 2–8 °C for up to one week. - (Optional) Stain cell surface antigens that are sensitive to permeabilization with appropriate antibodies according to the manufacturer's recommendations. Then wash cells by adding 1–2 mL of buffer and centrifuge at 300×g for 10 minutes. Aspirate supernatant completely.
- Wash cells by adding 1 mL of Inside Perm (Inside Stain Kit) and centrifuge at 300×g for 5 minutes. Aspirate supernatant carefully.
- Resuspend cells in 35 μL of Inside Perm. Depending on the panels that is to be stained, add 5 μL of each antibody:
Panel 1:
CD154 Antibody, anti-mouse, APC
TNF-α Antibody, anti-mouse, FITC
IFN-γ Antibody, anti-mouse, PE
Panel 2:
CD154 Antibody, anti-mouse, APC
TNF-α Antibody, anti-mouse, FITC
IL-2 Antibody, anti-mouse, PE
▲ Note: For staining with even more antibodies in this step, reduce the volume of Inside Perm accordingly. For efficient permeabilization, the volume of Inside Perm should be at least 30% of the overall staining volume. - Mix well and incubate for 10 minutes in the dark at room temperature.
- Wash cells by adding 1 mL of Inside Perm and centrifuge at 300×g for 5 minutes. Aspirate supernatant carefully.
- (Optional) If biotinylated antibody was used, resuspend the cell pellet in 100 μL of Inside Perm, add 10 μL of fluorochrome-conjugated Biotin Antibody, and continue as described in steps 10 and 11.
- Resuspend cell pellet in a suitable amount of buffer for analysis by flow cytometry or fluorescence microscopy. Store cells at 2–8 °C in the dark until analysis. Mix well before flow cytometric acquisition.
▲ Note: Samples may be stored at 2–8 °C in the dark for up to 24 hours.
▲ Note: Do not use propidium iodide (PI) or 7-AAD staining.
Flow cytometric analysis of secreted cytokines using the MACSPlex Cytokine 10 Kit, mouse
- Run the assay at room temperature. Work fast and keep samples protected from light, for example, cover plates or tubes with aluminum foil, especially during incubation steps.
- Unknown samples should be run in replicates, for example, in duplicates or triplicates, and in different dilutions to make sure the fluorescence values are within the dynamic range of the standard curve.
- The MACSPlex assay can either be performed using the MACSPlex Filter Plate with a vacuum manifold or standard polypropylene or polystyrene 1.5 mL reagent tubes. Please refer to the respective protocol (see below) when proceeding.
Protocol for the assay using the MACSPlex Filter Plate
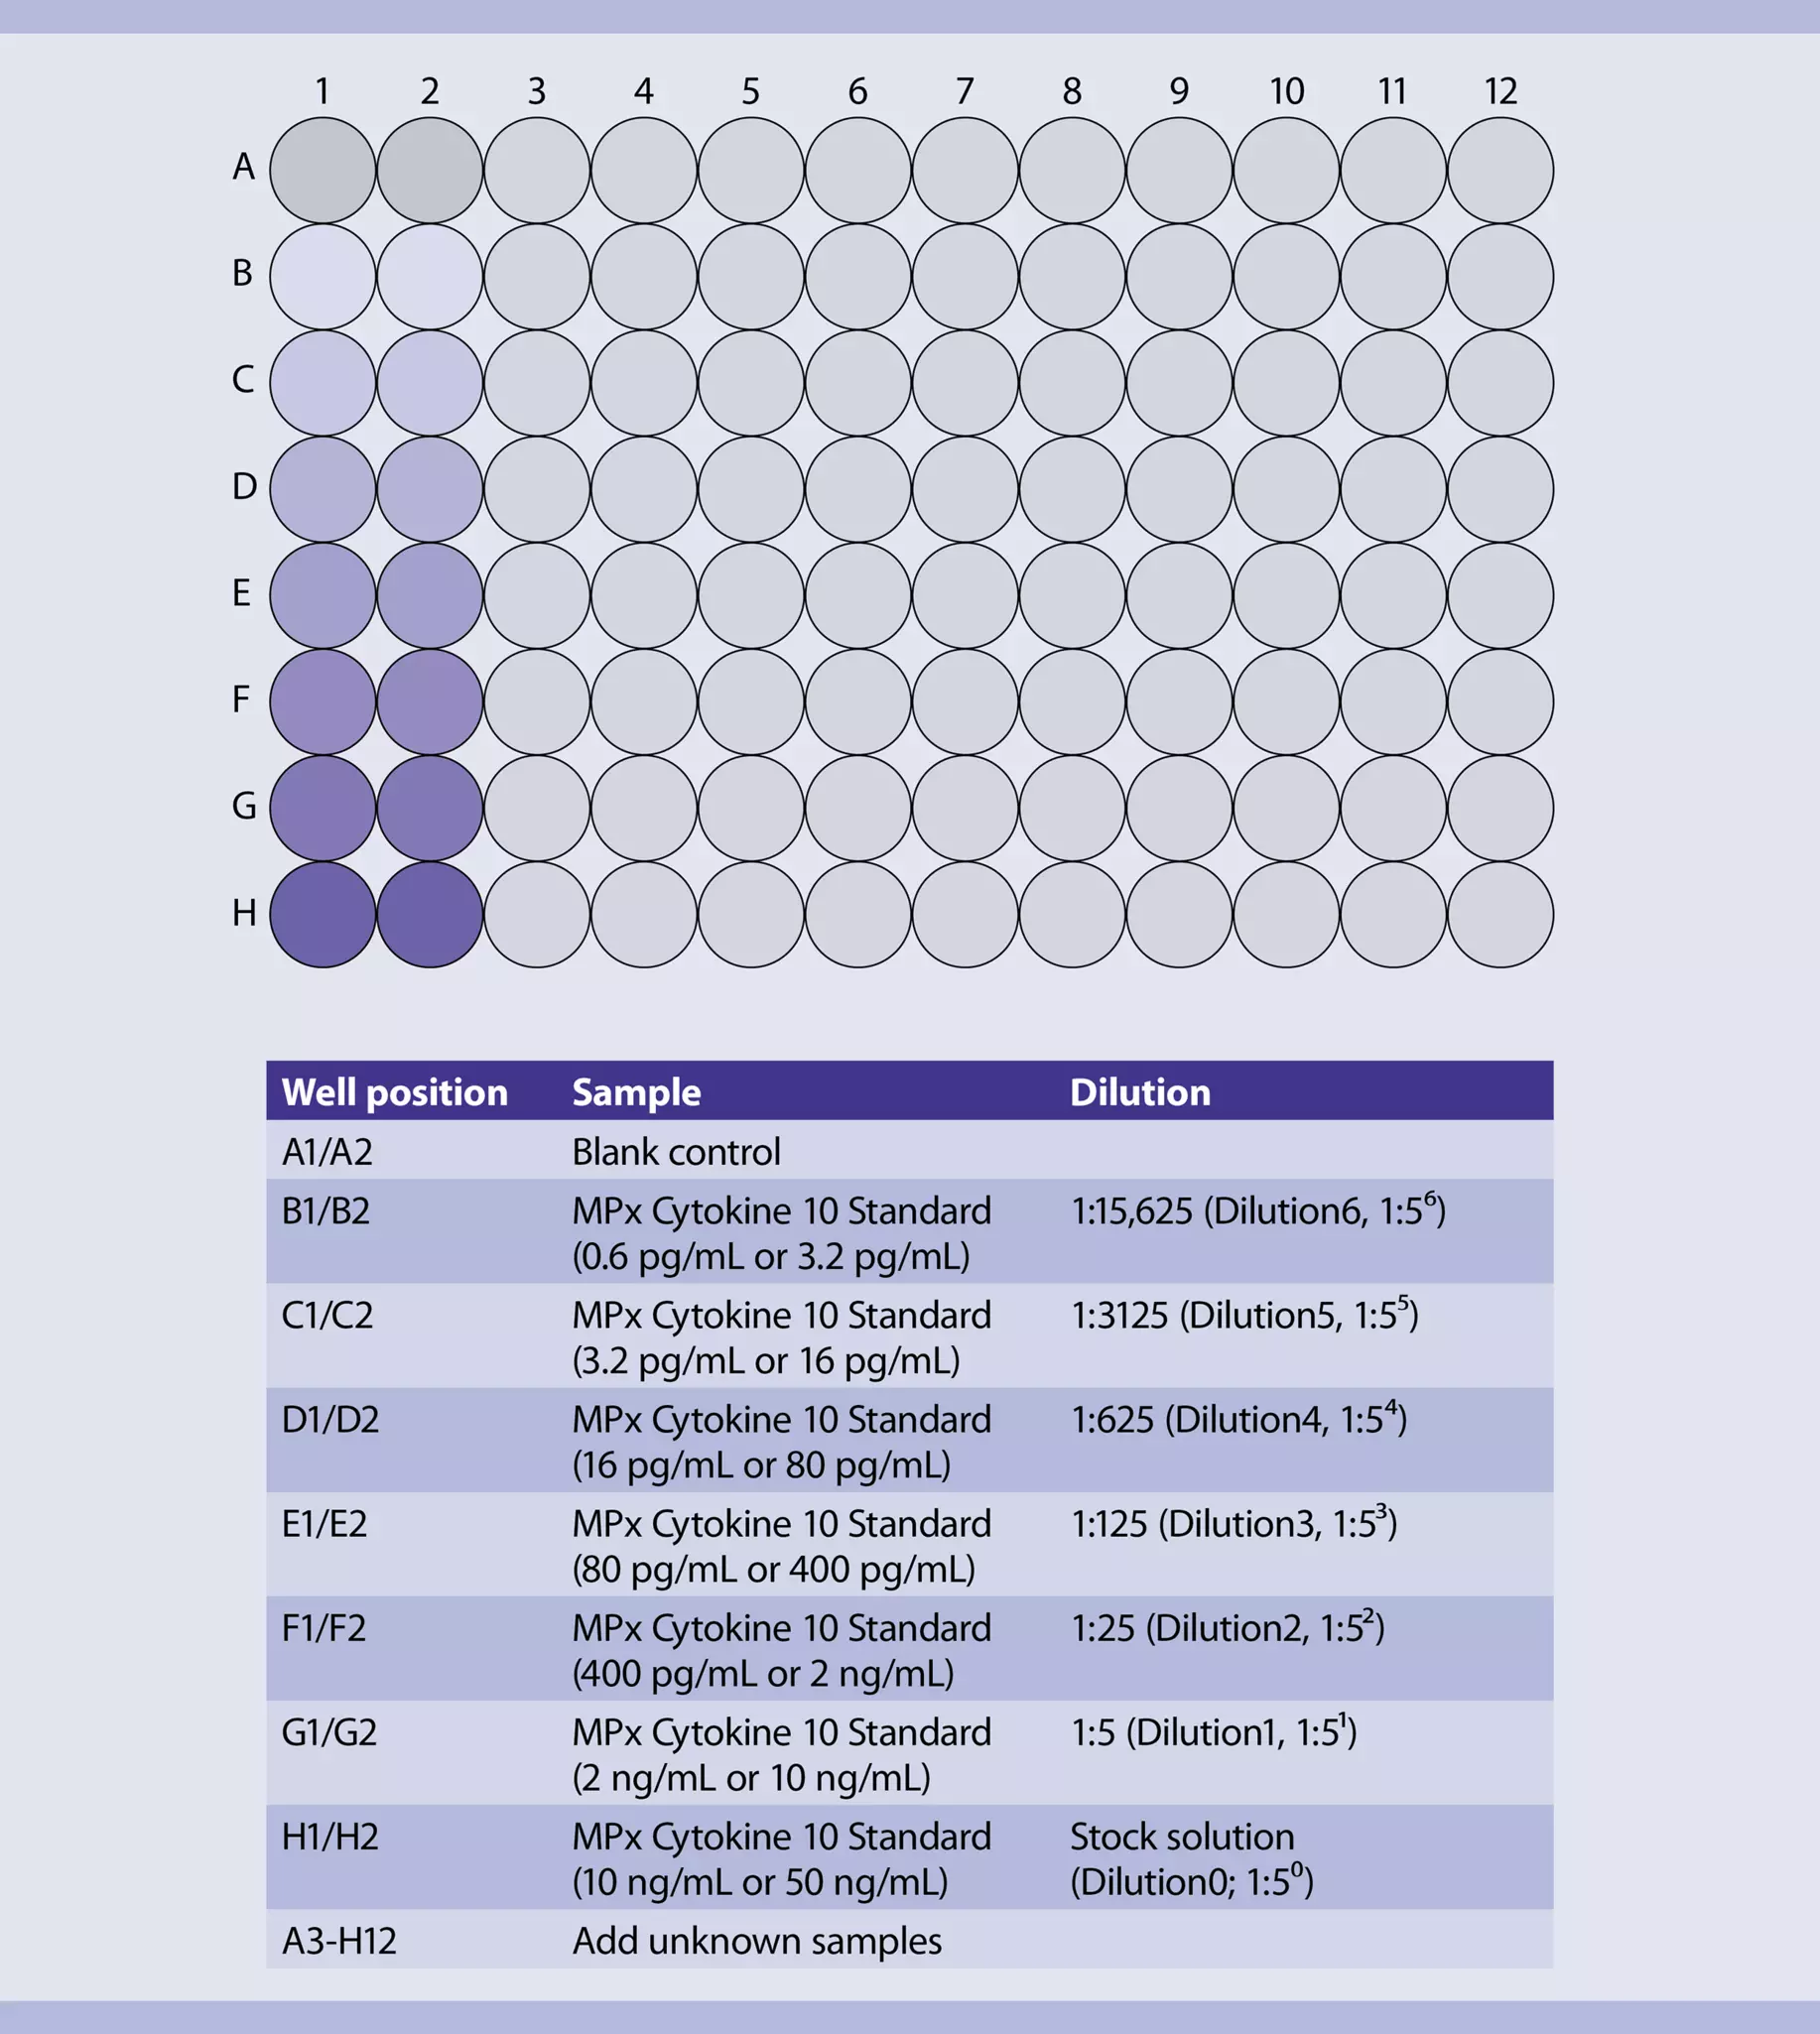
Design the assay using two columns of the MACSPlex Filter Plate for the standards. Add each of the seven standard samples in duplicates next to each other. Standards should be run in order from the lowest concentration (blank control: 0 pg/mL) to the highest concentration (stock solution: 10,000 pg/mL or 50,000 pg/mL). Start with the unknown sample in the next column of the plate. For details, see figure 2.
- Place the MACSPlex Filter Plate on a non-absorbent surface during loading steps and incubation, i.e., remove any tissues from the surface, to prevent the wells from running dry. Ensure that residual drops under the plate are completely removed to prevent liquid transfer by placing the plate briefly on a tissue.
- Cover unused wells of the filter plate for later use with the adhesive foil provided with the kit.
- Washing steps are described for the use of a vacuum manifold. Alternatively, a centrifuge with an adapter for microtiter plates can be used: Put the MACSPlex Filter Plate on top of a conventional 96-flatbottom microtiter plate without lid and place both into the adapter. Centrifuge at 300×g for 3 minutes at room temperature.
- Pre-wet required wells of the MACSPlex Filter Plate with 200 μL of MACSPlex Buffer per well and aspirate off using a vacuum manifold designed to accommodate the filter plate (max. –300 mbar) until the wells are drained.
- Place the filter plate briefly on a tissue to remove any residual liquid.
- Add 50 μL of MACSPlex Buffer or media as a blank control, 50 μL of each dilution, and the stock solution of the MACSPlex Cytokine 10 Standard to the corresponding wells of the filter plate.
- Add 50 μL of each unknown sample per well.
- Resuspend MACSPlex Cytokine 10 Capture Beads by vortexing for at least 30 seconds and transfer 20 μL of MACSPlex Capture Beads to each well.
- Incubate filter plate for 2 hours protected from light on an orbital shaker (450 rpm).
- Apply the filter plate to the vacuum manifold and aspirate until wells are drained. Place the filter plate briefly on a tissue to remove any residual liquid.
- Add 200 μL MACSPlex Buffer to each well and apply the filter plate to the vacuum manifold and aspirate off until wells are drained. Place the filter plate briefly on a tissue to remove residual liquid.
- Repeat step 8.
- Add 80 μL of MACSPlex Buffer to each well.
- Add 20 μL of MACSPlex Cytokine 10 Detection Reagent to each well.
- Incubate filter plate for 1 hour protected from light on an orbital shaker (450 rpm).
- Repeat wash steps 7 and 8.
- Add 200 μL of MACSPlex Buffer to each well.
- For sample acquisition using MACSQuant Instruments and the Express Mode place the filter plate onto the Chill 96 Rack. To prevent liquid transfer from the wells, ensure that residual drops under the plate are completely removed by placing the plate briefly on a tissue.
▲ Note: Perform flow cytometric acquisition on the same day, as prolonged storage of samples can result in increased background and reduced sensitivity.
▲ Note: Keep samples protected from light by using the protection lid during the flow cytometry acquisition with the MACSQuant Instrument.
Protocol for the assay using 1.5 mL reagent tubes
- Use polypropylene or polystyrene reagent tubes. Do not use glass vials.
- Standards should be run as duplicates. The order starts from the blank control (0 pg/mL) moving to the highest concentration (stock solution 10,000 pg/mL or 50,000 pg/mL).
- Label reagent tubes for the blank control, each dilution, the stock solution of the MACSPlex Cytokine 10 Standard, and unknown samples.
- Pipette 50 μL of MACSPlex Buffer or medium as blank control, 50 μL of each dilution and the stock solution of the MACSPlex Cytokine 10 Standard into the corresponding reagent tubes. Pipette 50 μL of each unknown sample into the corresponding reagent tube.
- Resuspend MACSPlex Cytokine 10 Capture Beads by mixing for at least 30 seconds. Transfer 20 μL of MACSPlex Cytokine 10 Capture Beads to each tube.
- Incubate for 2 hours protected from light on an orbital shaker (1400 rpm).
- Add 0.5 mL of MACSPlex Buffer to each tube.
- Centrifuge at 3000×g for 5 minutes.
- Carefully aspirate off the supernatant, leaving 20 μL in the tube.
- Resuspend the MACSPlex Capture Bead pellet in each tube by adding 0.5 mL of MACSPlex Buffer and pipetting up and down.
- Repeat steps 6 and 7.
- Resuspend the MACSPlex Capture Bead pellet in each tube with MACSPlex Buffer to a total volume of 80 μL by pipetting up and down, e.g., add 60 μL of MACSPlex Buffer to the remaining 20 μL of supernatant (see step 7).
- Add 20 μL of MACSPlex Cytokine 10 Detection Reagent to each tube.
- Incubate for 1 hour protected from light on an orbital shaker at 1400 rpm.
- Add 0.5 mL of MACSPlex Buffer to each tube.
- Centrifuge at 3000×g for 5 minutes.
- Carefully aspirate off the supernatant, leaving 20 μL in the tube.
- Resuspend each pellet in 0.5 mL of MACSPlex Buffer by pipetting up and down.
- Repeat steps 14 and 15.
- Resuspend the pellet in each tube with 200 μL of MACSPlex Buffer.
- For sample acquisition with the MACSQuant Express Mode, transfer samples to a 96-well microtiter plate. Place the microtiter plate onto a Chill 96 Rack and start the measurement.
▲ Note: Acquire cytokine standards first, beginning with the standard samples of the first dilution series in order from the blank control to the highest concentration. Then process the standard samples of the second dilution series in the same order (see also figure "Analysis of cell proliferation"). Afterwards acquire the unknown samples.
▲ Note: Perform flow cytometric acquisition on the same day, as prolonged storage of samples can result in increased background and reduced sensitivity.
▲ Note: Keep samples protected from light by using the protection lid during flow cytometric acquisition with the MACSQuant Instrument.
Flow cytometer setup
The kit includes MACSPlex Setup Beads for flow cytometer instrument setup. MACSPlex Setup Beads are not required when using the MACSQuant Analyzer or MACSQuant Analyzer 10 but for all other instruments. The kits is not suitable for use with the MACSQuant VYB.
Setup of the MACSQuant Instrument
- Calibrate the MACSQuant Instrument using MACSQuant Calibration Beads (# 130-093-607).
- For details, refer to the data sheet of the MACSQuant Calibration Beads. After successfully completing the calibration, the MACSQuant Instrument is ready for measurement. No further steps are required as all necessary setup steps are performed automatically during calibration.
Setup of other flow cytometers
The analysis of MACSPlex Cytokine 10 Kit requires a flow cytometer with a blue (e.g. 488 nm) and a red (e.g. 635 nm) laser, which are capable of detecting FITC, PE, and APC. For the purpose of setting up these cytometers, MACSPlex Setup Beads are included in the kit. For instructions on the setup procedures of other flow cytometers, refer to the Application note "General instructions for MACSPlex Cytokine Kits".
Flow cytometric acquisition and data analysis using the MACSQuant Express Mode
To perform the acquisition and data analysis of the MACSPlex Cytokine 10 Kit, mouse with the MACSQuant Instrument, it is recommended to use the Express Modes MACSPlex_Standard and MACSPlex_Sample to achieve automated measurement and data analysis. For details, refer to the relevant special protocol under the Resources tab of the product page. The minimal version number of the Express Mode package needed to run the assay on the MACSQuant Instrument can be found there as well. To check the version number of the Express Mode package available on a MACSQuant Instrument, select Help> Info> expressModes within the MACSQuantify Software. The version number of the Express Mode package increases with each Express Mode update. Make sure the MACSQuant Instrument contains an Express Mode package with at least the same or higher version number than the special protocol is marked with.