The TCR α/β RNA Profiling Kit, human supports RNA input equivalent to 100 to 500,000 sorted or purified T cells, derived from peripheral blood leukocytes or from T cell–containing tissues and produces indexed ready-to-sequence-on-Illumina® libraries.
Generation of TCR alpha and beta cDNA libraries using the TCR α/β RNA Profiling Kit, human
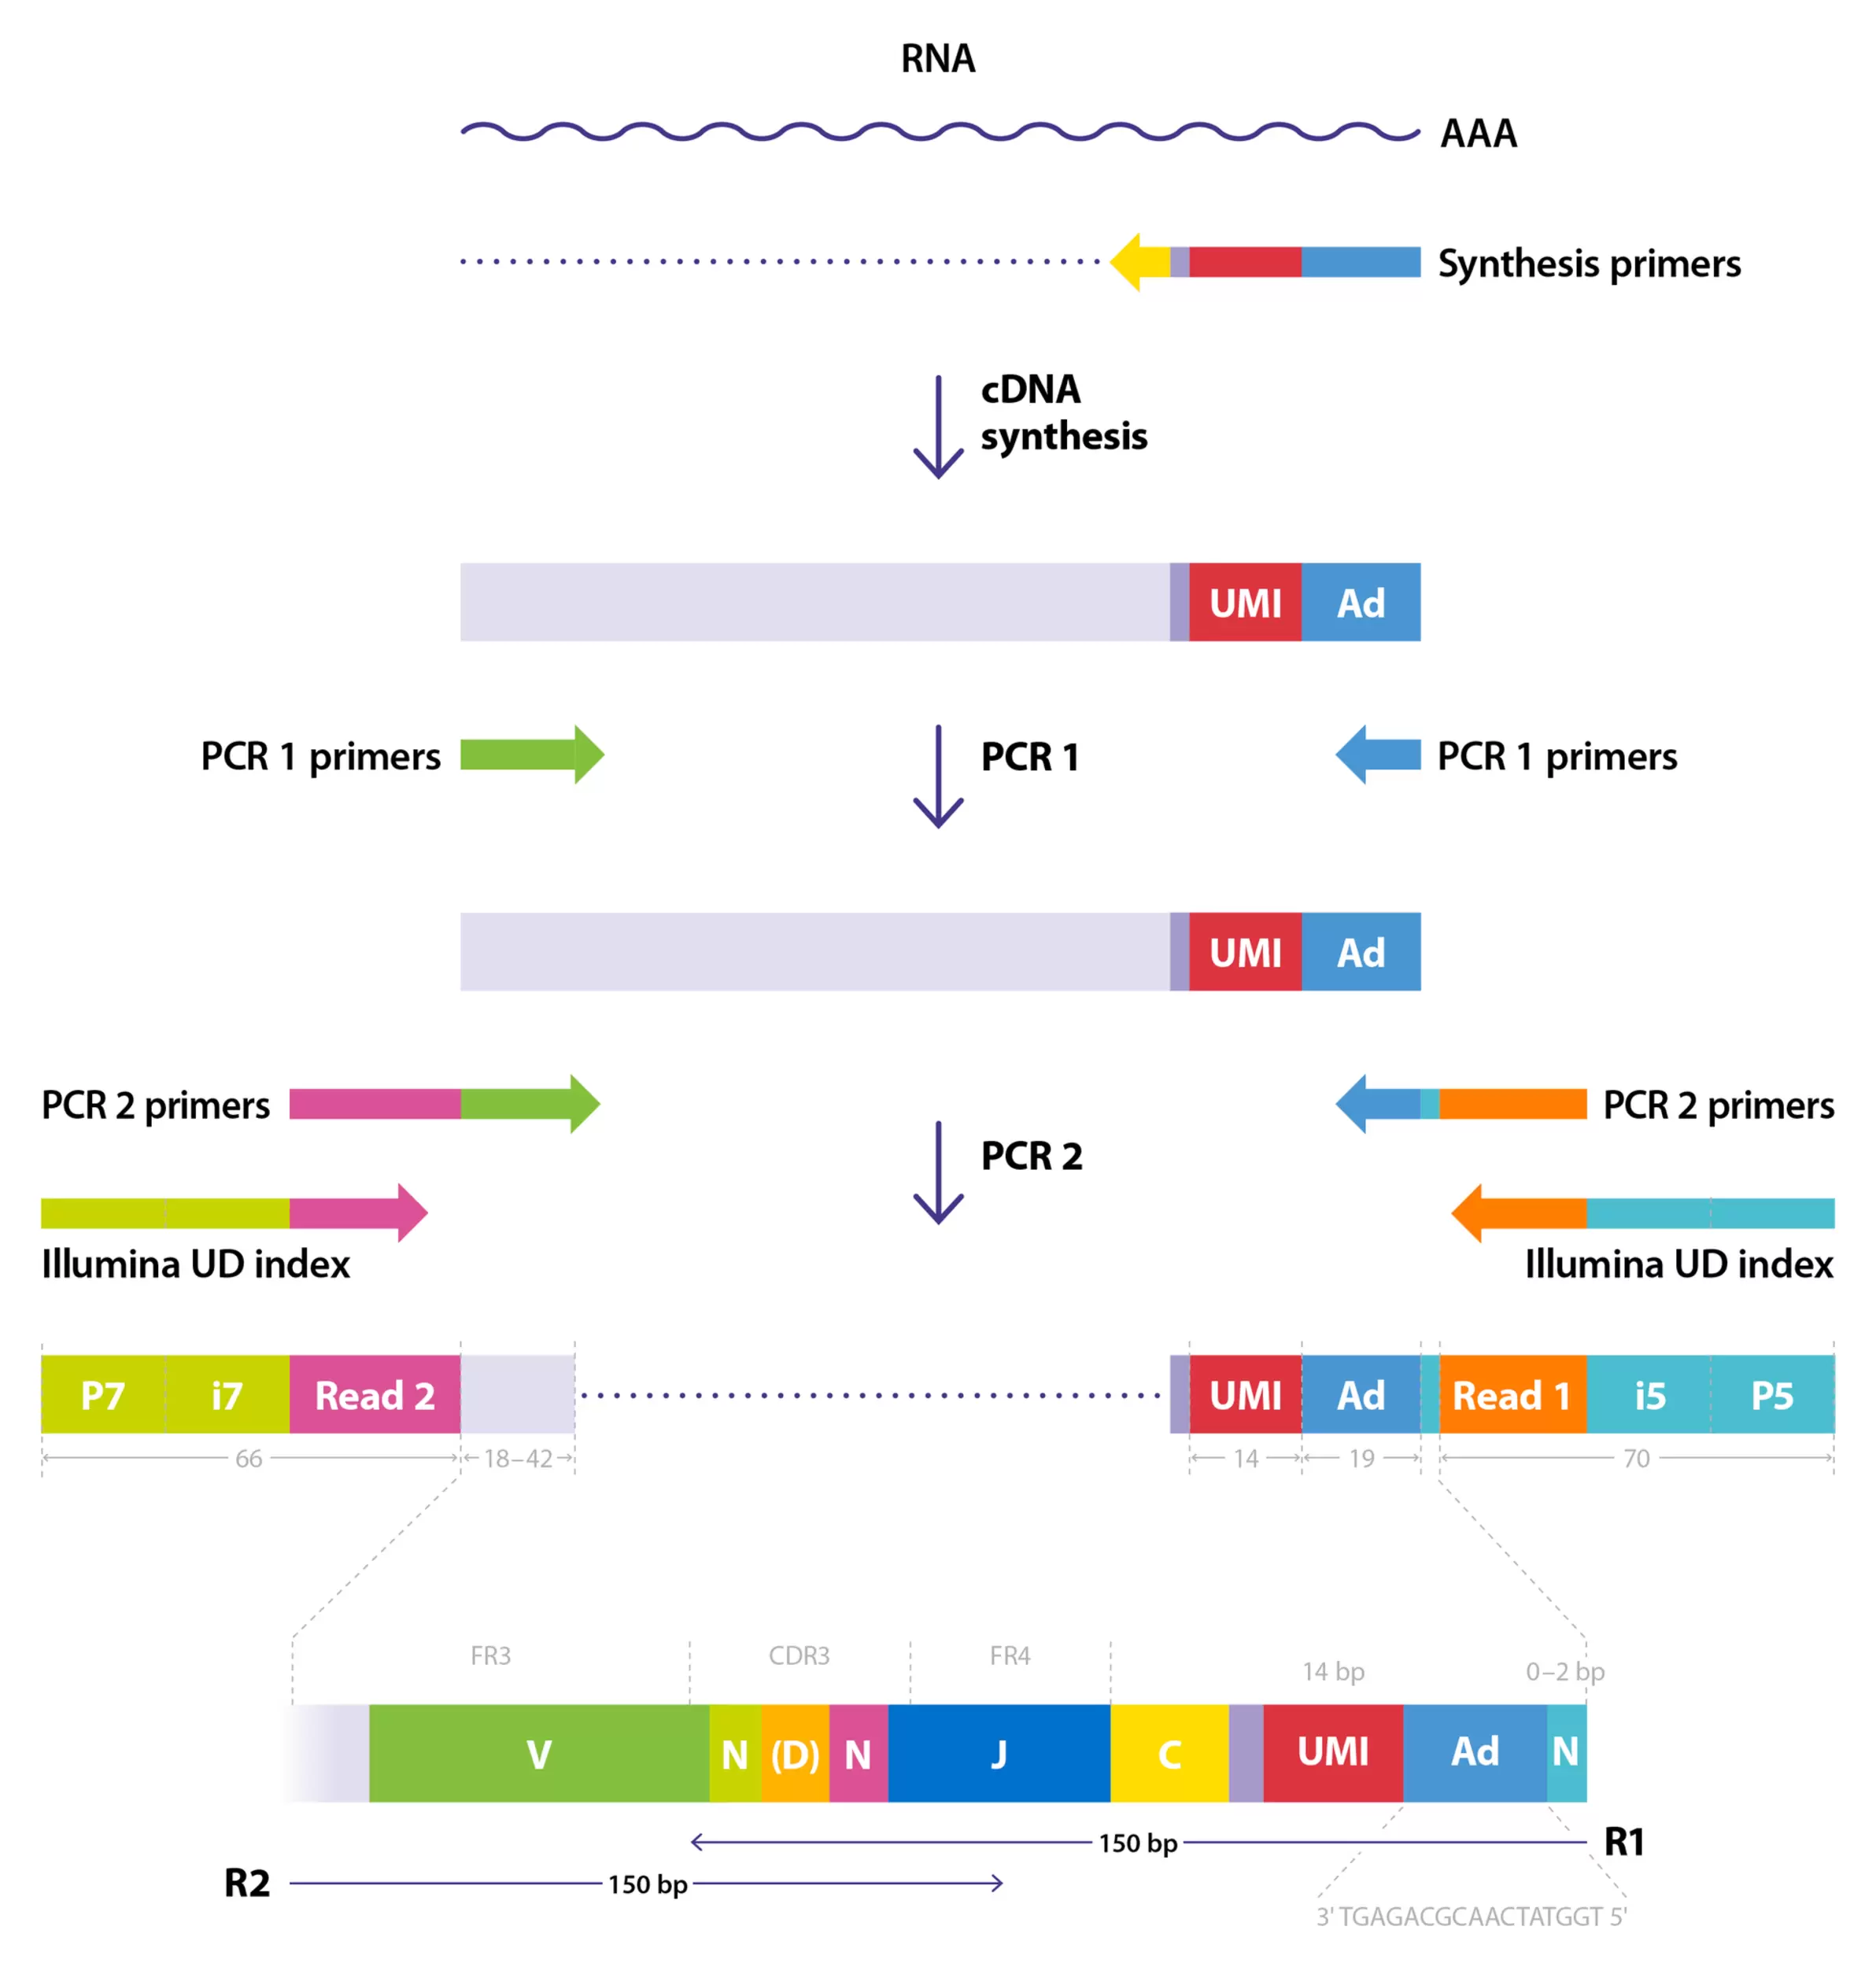
This application protocol describes the generation of TCR α/β cDNA libraries using the combination of highly sensitive multiplex PCR and Unique Molecular Identifiers (UMIs) with the TCR α/β RNA Profiling Kit, human. UMIs are introduced along with first strand cDNA synthesis and allow for advanced PCR and sequencing error correction, elimination of PCR biases, exact quantification of template cDNA molecules, and accurate normalization of samples for comparison of repertoire diversity metrics.
For information on the required materials and instruments, please refer to the 'Materials' tab on the protocol's website.
Protocol

 View details
General recommendations to prevent contamination
General recommendations to lower the risk of RNA degradation and contamination should be implemented, such as using lab coats, gloves, tips with aerosol filters, certified RNAse/DNAse-free reagents, and decontamination of the workspace before starting to work with RNA (e.g. using AppliChem RNase-ExitusPlus™).
Performing non-template control reactions is strongly recommended for each experiment. To prevent cross-sample contamination, library preparation should be performed in two physically separated workspaces (PCR boxes): one for pre–PCR and one for post–PCR, located in different rooms. Avoid transferring anything (reagents, pipets, racks, etc.) from the post–PCR to the pre–PCR workspace. In the case of possible contamination, use decontaminating procedures with special reagents (e.g. using AppliChem DNA/RNA-ExitusPlus).
Cell isolation, RNA purification, cDNA synthesis, first and second PCR Master Mix preparations should be performed in the pre–PCR workspace. After the first PCR amplification, the tubes should be transferred to the post–PCR workspace to perform all remaining steps except PCR Master Mix preparation.
Starting material
As starting material, isolated RNA from sorted/isolated T cells, peripheral blood mononuclear cells (PBMCs), or T cell–containing tissues can be used. Furthermore, it is possible to start directly from intact PBMCs or T cells.
When starting directly from cells, no RNA isolation is needed. Cells should be pelleted by centrifugation and kept on ice during processing. Direct-from-cells procedure was tested for fresh and frozen samples containing up to 20,000 PBMCs or T cells.
When starting with RNA, it is necessary to use a Qubit® fluorimeter or other fluorescent based methods to determine the RNA concentration. High RNA quality is critical for efficient library preparation. Residual traces of proteins, salts, or other contaminants may decrease the efficiency of the enzymatic activity necessary for optimal targeted enrichment. Refer to section "5. Appendix A: Preparing starting material" for more details about recommendations of RNA quality as input to the protocol.
In appendix A, recommendations for RNA Isolation are listed covering the following initial situations:
- RNA isolation for large samples (>50,000 cells)
- RNA isolation for small samples (i.e. <50,000 cells)
If further guidance is needed, some frequently occurring situations are described in appendix A and help to choose the appropriate strategy for RNA isolation from:
- PBMCs
- 100 to 50,000 sorted or purified T cells
- more than 50,000 sorted or purified T cells
- T cell–containing tissues
- T cell–containing FFPE tissue
It is also possible to use TRIzolTM reagent to isolate RNA.
Refer appendix B for the detailed protocol.
Additional information
Before starting the experiment, it is recommended to read the datasheet of the TCR α/β RNA Profiling Kit, human. Also read the specifications of the necessary materials and instruments that are described on the 'Materials' tab of the protocol web-page.
Download data sheet
Start of the experiment
- Perform cDNA synthesis, clean-up after cDNA synthesis, and the PCR1 and PCR2 Master Mix preparation in a pre–PCR workspace.
- All samples and reagents from the TCR α/β RNA Profiling Kit Box 1 must be kept on ice during reaction set-up. After use, immediately return enzymes to freezer.
- Clean-up steps are performed at room temperature (+15 to +25 °C).
- Mix all components thoroughly before use.
- For mixing by pipetting, especially at low volumes, it is advised to set the pipette volume to ca. 80% to avoid creating bubbles.
cDNA synthesis starting from RNA
Before start: Thaw RNA samples on ice. Thaw the TCR-A/B cDNA Synthesis Primers briefly at room temperature (+15 to +25 °C), mix primers by vortexing, and spin down. Take the RT Master Mix from –20 °C freezer, mix briefly by vortexing, and spin down. Place all components on ice until use.
1. In nuclease-free PCR tubes, mix the following components in a final reaction volume of 12 μL per reaction according to table 1.
| Component | Volume (in μL) |
| RNA (0.1 – 500 ng per reaction) | 1 – 10 |
| TCR-A/B cDNA Synthesis Primers | 2 |
| Water | 0 – 9 |
| Total volume per reaction | 12 |
Table 1: cDNA Synthesis Primer Mix
2. Pre-heat a thermal cycler at +70 °C. Incubate the samples for 2 minutes at +70 °C, followed by 2 minutes at +4 °C.
3. During incubation, prepare the Reverse Transcription Mix according to table 2.
| Component | Volume (in μL) |
| RT Master Mix | 4 |
| Water | 4 |
| Total volume per reaction | 8 |
Table 2: Reverse Transcription Mix
4. After incubation, add 8 μL of the Reverse Transcription Mix to each sample, mix well by pipetting up and down 15 times without creating bubbles. Spin briefly and incubate for 30 minutes at +55 °C (lid temperature set to +60 °C).
5. Proceed with clean-up after cDNA synthesis (see chapter “Clean-up after cDNA synthesis”).
cDNA synthesis starting directly from cells
For samples containing less than 20,000 PBMCs or sorted T cells, cDNA synthesis can be done directly with intact cells.
For working with input of under 1,000 T cells, use cells that have been sorted directly into a tube containing cDNA Synthesis Master Mix. Skip the pelleting step to avoid the risk of losing the sample and start with step 7. When starting with frozen samples (cell pellets), skip the steps 1–6 and directly start with step 7.
Before start: Thaw the TCR-A/B cDNA Synthesis Primers briefly at room temperature (+15 to +25 °C). Mix each component thoroughly by pipetting up and down before use, and spin down. Take the RT Master Mix from –20 °C freezer, mix briefly by vortexing, and spin down. Place all components on ice until use. Do not use DNAse in washing buffers.
1. Transfer cells into a nuclease-free 1.5 mL tube.
2. Centrifuge at 350×g for 5 minutes at room temperature (+15 to +25 °C).
3. Wash the cells once with 1 mL PBS without Ca2+, Mg2+, or BSA and repeat centrifugation at 350×g for 5 minutes.
4. Remove the supernatant by carefully removing 900 µL using a 1 mL pipette tip.
5. Continue to remove the supernatant by carefully removing approximately 90 µL using a 100 or 200 µL pipette tip. Be careful not to touch the side of the tube where the pellet is located.
▲ Note: The remaining PBS will not influence the reaction performance.
6. Place the tube on ice.
7. Prepare the cDNA Synthesis Master Mix for cells of the following components in a final volume of 16 µL per reaction according to table 3.
| Component | Volume (in μL) |
| RT Master Mix | 4 |
| Water | 5 |
| Lysis Solution | 5 |
| TCR-A/B cDNA Synthesis Primers | 2 |
| Total volume per reaction | 16 |
Table 3: cDNA Synthesis Master Mix for cells
8. If starting from frozen cell pellets or <1,000 T cells: thaw the samples on ice, until no ice is visible.
▲ Note: If starting with cells sorted directly into the cDNA Synthesis Master Mix, sort the target cell population straight into the tube containing the Master Mix. Up to 1,000 cells can be sorted into the Master Mix volume of 16 µl, provided the total droplet volume does not exceed 4 µl. After sorting, briefly spin down the tube to collect any droplets from the walls of the tube. Then gently pipette up and down 10 times, avoiding bubble formation, and proceed to step 10.
9. Pipette 16 µL of the cDNA Synthesis Master Mix to the tube containing cell pellet. Mix carefully by pipetting up and down 10 times without creating bubbles.
10. Transfer the samples into the corresponding tube of a PCR strip, keep on ice until all samples are transferred.
11. Centrifuge briefly and incubate the samples for 30 minutes at +55 °C (lid temperature set to +60 °C).
12. Proceed with clean-up after cDNA synthesis.
Clean-up after cDNA synthesis
Purify the obtained cDNA synthesis products using AMPure® XP Beads or SPRIselect® reagent (Beckman Coulter®) as follows:
Before start: Freshly prepare 80% ethanol and adjust beads to room temperature according to manufacturer’s instructions.
- Before use, thoroughly vortex the beads until homogenized and no pellet remains at the bottom of the bottle.
- Add 30 μL of beads to each reaction and mix well by pipetting up and down 10 times without creating bubbles.
- Incubate the solution for 5 minutes at room temperature (+15 to +25 °C).
- Place the tubes on the magnetic rack and wait for the solution to turn to clear blue.
- While the tubes are on the magnetic rack, carefully remove the supernatant.
- Keep the tubes on the magnetic rack and add 200 μL of freshly prepared 80% ethanol. Wait for 30 seconds and remove the ethanol.
- Remove tubes from the magnetic rack. Briefly spin the tubes down and place them back on the magnetic rack. Remove all the residual ethanol carefully, using a small pipet.
- Remove tubes from the magnetic rack. Add 10 μL of Elution Buffer to the beads Mix well by pipetting up and down 15 times without creating bubbles and incubate for 1 minute at room temperature (+15 to +25 °C).
- As described in step 1, homogenize beads by vortexing thoroughly.
- Add 15 μL beads and mix well by pipetting up and down 10 times without creating bubbles.
- Incubate the solution for 5 minutes at room temperature (+15 to +25 °C).
- Place tubes on the magnetic rack and wait for the solution to clear.
- While tubes are on the magnetic rack, carefully remove and discard the supernatant.
- Add 200 μL of freshly prepared 80% ethanol to the tubes, while they remain on the magnetic rack. Wait for 30 seconds and remove the ethanol.
- Remove tubes from the magnetic rack. Briefly spin the tubes down and place them back on the magnetic rack. Remove all the residual ethanol carefully, using a small pipet.
▲ Note: It is important to remove all traces of ethanol at this step as it could inhibit subsequent PCR reactions. - Remove tubes from the magnetic rack. Add 21 μL of Elution Buffer to the beads for elution and mix well by pipetting up and down without creating bubbles.
- Incubate the solution for 5 minutes at room temperature (+15 to +25 °C).
- Place tubes on the magnetic rack and wait for the solution to clear.
- Keep tubes on the magnetic rack and carefully transfer 20 μL of the cDNA into a new nuclease-free reaction tube.
▲ Note: During the elution steps, beads clumping can significantly reduce the cDNA yield, which is critical at the cDNA purification step. In case bead clumping is observed, please refer to the chapter “Troubleshooting - Decreased cDNA synthesis / yield”.
First PCR amplification
Before start: Thaw TCR-A PCR1 and TCR-B PCR1 Primers briefly at room temperature (+15 to +25 °C) and PCR Master Mix on ice. Mix each component thoroughly by pipetting up and down before use and spin down. Place all components back on ice until use.
1. At this point, each cDNA sample must be split into two nuclease-free tubes with 10 μL per tube, one for TCRα and one for TCRβ libraries.
2. Prepare in the nuclease-free tubes the PCR1 Master Mixes for TCRα and TCRβ respectively according to tables 4 and 5.
| Component | Volume (in µL) |
| Water | 13 |
| PCR Master Mix | 25 |
| TCR-A PCR1 Primers | 2 |
| Total volume per reaction | 40 |
Table 4: TCR-A PCR1 Master Mix
| Component | Volume (in µL) |
| Water | 13 |
| PCR Master Mix | 25 |
| TCR-B PCR1 Primers | 2 |
| Total volume per reaction | 40 |
Table 5: TCR-B PCR1 Master Mix
3. Mix well by pipetting up and down and centrifuge briefly.
4. Add 40 μL of TCR-A PCR1 Master Mix for TCRα samples and 40 µL TCR-B PCR1 Master Mix for TCRβ samples to each of 10 μL cDNA samples. Mix gently by pipetting 10 times without creating bubbles and centrifuge briefly.
5. Perform a PCR using the following parameters according to table 6.
| Lid temperature | Reaction volume | Run time |
| +105 °C | 50 µL | |
| Step | Temperature | Time (hh:mm:ss) |
| 1 | +95 °C | 00:15:00 |
| 2 | +94 °C | 00:00:30 |
| 3 | +60 °C | 00:01:30 |
| 4 | +72 °C | 00:00:30 |
| Go to step 2, repeat X cycles* | ||
| 5 | +68 °C | 00:04:00 |
| Hold | +4 °C | Hold |
| * Choose the number of cycles according to the amount of RNA/T cells used as input for the experiment (see table 10). | ||
Table 6: Thermal cycler condition for the first PCR
Clean-up after first PCR
▲ Proceed in the post-PCR workspace.
- Before use, thoroughly vortex the beads until homogenized and no pellet remains at the bottom of the bottle.
- Add 75 μL of beads to each reaction and mix well by pipetting up and down 10 times without creating bubbles.
- Incubate the solution for 5 minutes at room temperature (+15 to +25 °C).
- Place the tubes on the magnetic rack and wait for the solution to clear.
- While the tubes are on the magnetic rack, carefully remove the supernatant.
- Keep the tubes on the magnetic rack and add 200 μL of freshly prepared 80% ethanol. Wait for 30 seconds and remove the ethanol.
- Repeat the washing step with 80% ethanol without removing the tubes of the magnetic rack.
- Remove tubes from the magnetic rack. Briefly spin the tubes down and place them back on the magnetic rack. Remove all residual ethanol carefully, using a small pipet.
- Remove tubes from the magnetic rack. Add 21 μL of Elution Buffer to the beads for elution and mix well by pipetting up and down 15 times without creating bubbles.
- Incubate the solution for 5 minutes at room temperature (+15 to +25 °C).
- Place the tubes on the magnetic rack and wait for the solution to clear.
- Keep tubes on the magnetic rack and carefully transfer 20 μL of the purified first PCR products into new nuclease-free reaction tubes, one for TCRα and one for TCRβ samples.
▲ Note: It is important to remove all the traces of ethanol at this step as it could inhibit subsequent PCR reaction.
▲ Note: The purified PCR product can be stored up to 1 month at −20 °C.
Second PCR amplification
Before start: Thaw TCR-A PCR2 and TCR-B PCR2 Primers briefly at room temperature (+15 to +25 °C) and the PCR Master Mix on ice. Mix each component thoroughly by pipetting up and down before use and spin down. Thaw the DNA/RNA UD Indexes (Illumina) briefly at room temperature (+15 to +25 °C) and spin them down. Place all components on ice until use.
1. Prepare primer dilution for PCR2-A and PCR2-B Primers: For this, calculate the volume of PCR2 primers required to process N number of samples (1 μL of diluted primer mix is required per sample). Prepare at least 10 μL. Both primers should be diluted with water by a dilution ratio of 1:10 (e.g., 2 µL primer + 18 µL water = 20 µL of 1:10 primer dilution). Discard the left-over diluted aliquots after use.
2. Prepare two separate PCR2 Master Mixes in a final volume of 22 μL per reaction without indexes according to tables 7 and 8.
| Component | Volume (in μL) |
| Water | 8.5 |
| PCR Master Mix | 12.5 |
| TCR-A PCR2 Primers (1:10 diluted) | 1 |
| Total volume per reaction | 22 µL |
Table 7: TCR-A PCR2 Master Mix
| Component | Volume (in μL) |
| Water | 8.5 |
| PCR Master Mix | 12.5 |
| TCR-B PCR2 Primers (1:10 diluted) | 1 |
| Total volume per reaction | 22 µL |
Table 8: TCR-B PCR2 Master Mix
3. Mix well by pipetting up and down and centrifuge briefly.
4. For each reaction, add 22 μL of corresponding PCR2 Master Mix to a nuclease-free PCR tube, respectively, for TCRα and TCRβ samples.
▲ Note: Proceed to the post–PCR workstation.
5. Add 2 μL of the purified first PCR product to each of the TCR-A PCR2 Master Mix and TCR-B PCR2 Master Mixes.
6. Add 1 μL of DNA/RNA UD Index (Illumina) to each reaction. Use a unique index for each reaction and record their assignment.
7. Mix by pipetting up and down 10 times without creating bubbles and centrifuge briefly.
8. Perform a PCR with the TCRα and TCRß samples using the parameters from table 9.
| Lid temperature | Reaction volume | Run time |
| +105 °C | 25 µL | |
| Step | Temperature | Time (hh:mm:ss) |
| 1 | +95 °C | 00:15:00 |
| 2 | +94 | 00:00:30 |
| 3 | +55 °C | 00:01:30 |
| 4 | +72 °C | 00:00:30 |
| Go to step 2, repeat X cycles* | ||
| 5 | +68 °C | 00:04:00 |
| Hold | +4 °C | Hold |
| * Choose the number of cycles according to the amount of RNA/T cells used as input for the experiment (see table 10). | ||
Table 9: Thermal cycler condition for the second PCR
▲ The optimal number of second PCR cycles may vary for different templates, cell types, thermal cyclers, and sample amounts. It is recommended to determine the minimal number of PCR cycles required to obtain a sufficient amount (at least 30 ng of each library) empirically for each experiment (see table 10).
Furthermore, it is recommended to generate parallel libraries of similar nature (e.g., ten samples of 2,000 – 20,000 sorted T cells each, TCRα and TCRβ chains) using the same number of PCR cycles and mix the obtained libraries in equal volume proportions for sequencing.
This allows obtaining an even coverage in terms of reads-per-cDNA (reads-per-UMI). For example, the library generated with 50,000 T cells may produce more PCR product than one with 20,000 T cells after the same number of PCR cycles. However, the library from 50,000 cells would also carry proportionally more TCR cDNA molecules and thus requires more sequencing reads to achieve a comparable coverage.
Overview of recommended total PCR cycle numbers:
| Estimated count of T cells in a sample | Amount of template RNA purified from sorted T cells/PBMC used at start | Recommended number of first PCR cycles (total cycles) | Recommended number of second PCR cycles (total cycles) | Recommended number of sequencing reads |
| 102 – 5×10² | 0.1 – 1ng | 25 | 18 – 22 | 100 reads per input T cell (calculated per library based on total input amount) |
| 5×10² – 5×10³ | 0.5 – 10ng | 25 | 14 – 19 | |
| 5×10³ – 5×10⁴ | 5 – 100ng | 22 | 13 – 16 | |
| 5×10⁴ – 5×10⁵ | 50 – 500ng | 19 | 13 – 16 |
Table 10: Recommended PCR cycle numbers for both PCRs
Quality control and pooling
- Verify quality and concentration of the obtained PCR product by capillary electrophoresis (TapeStation® or Bioanalyzer®).
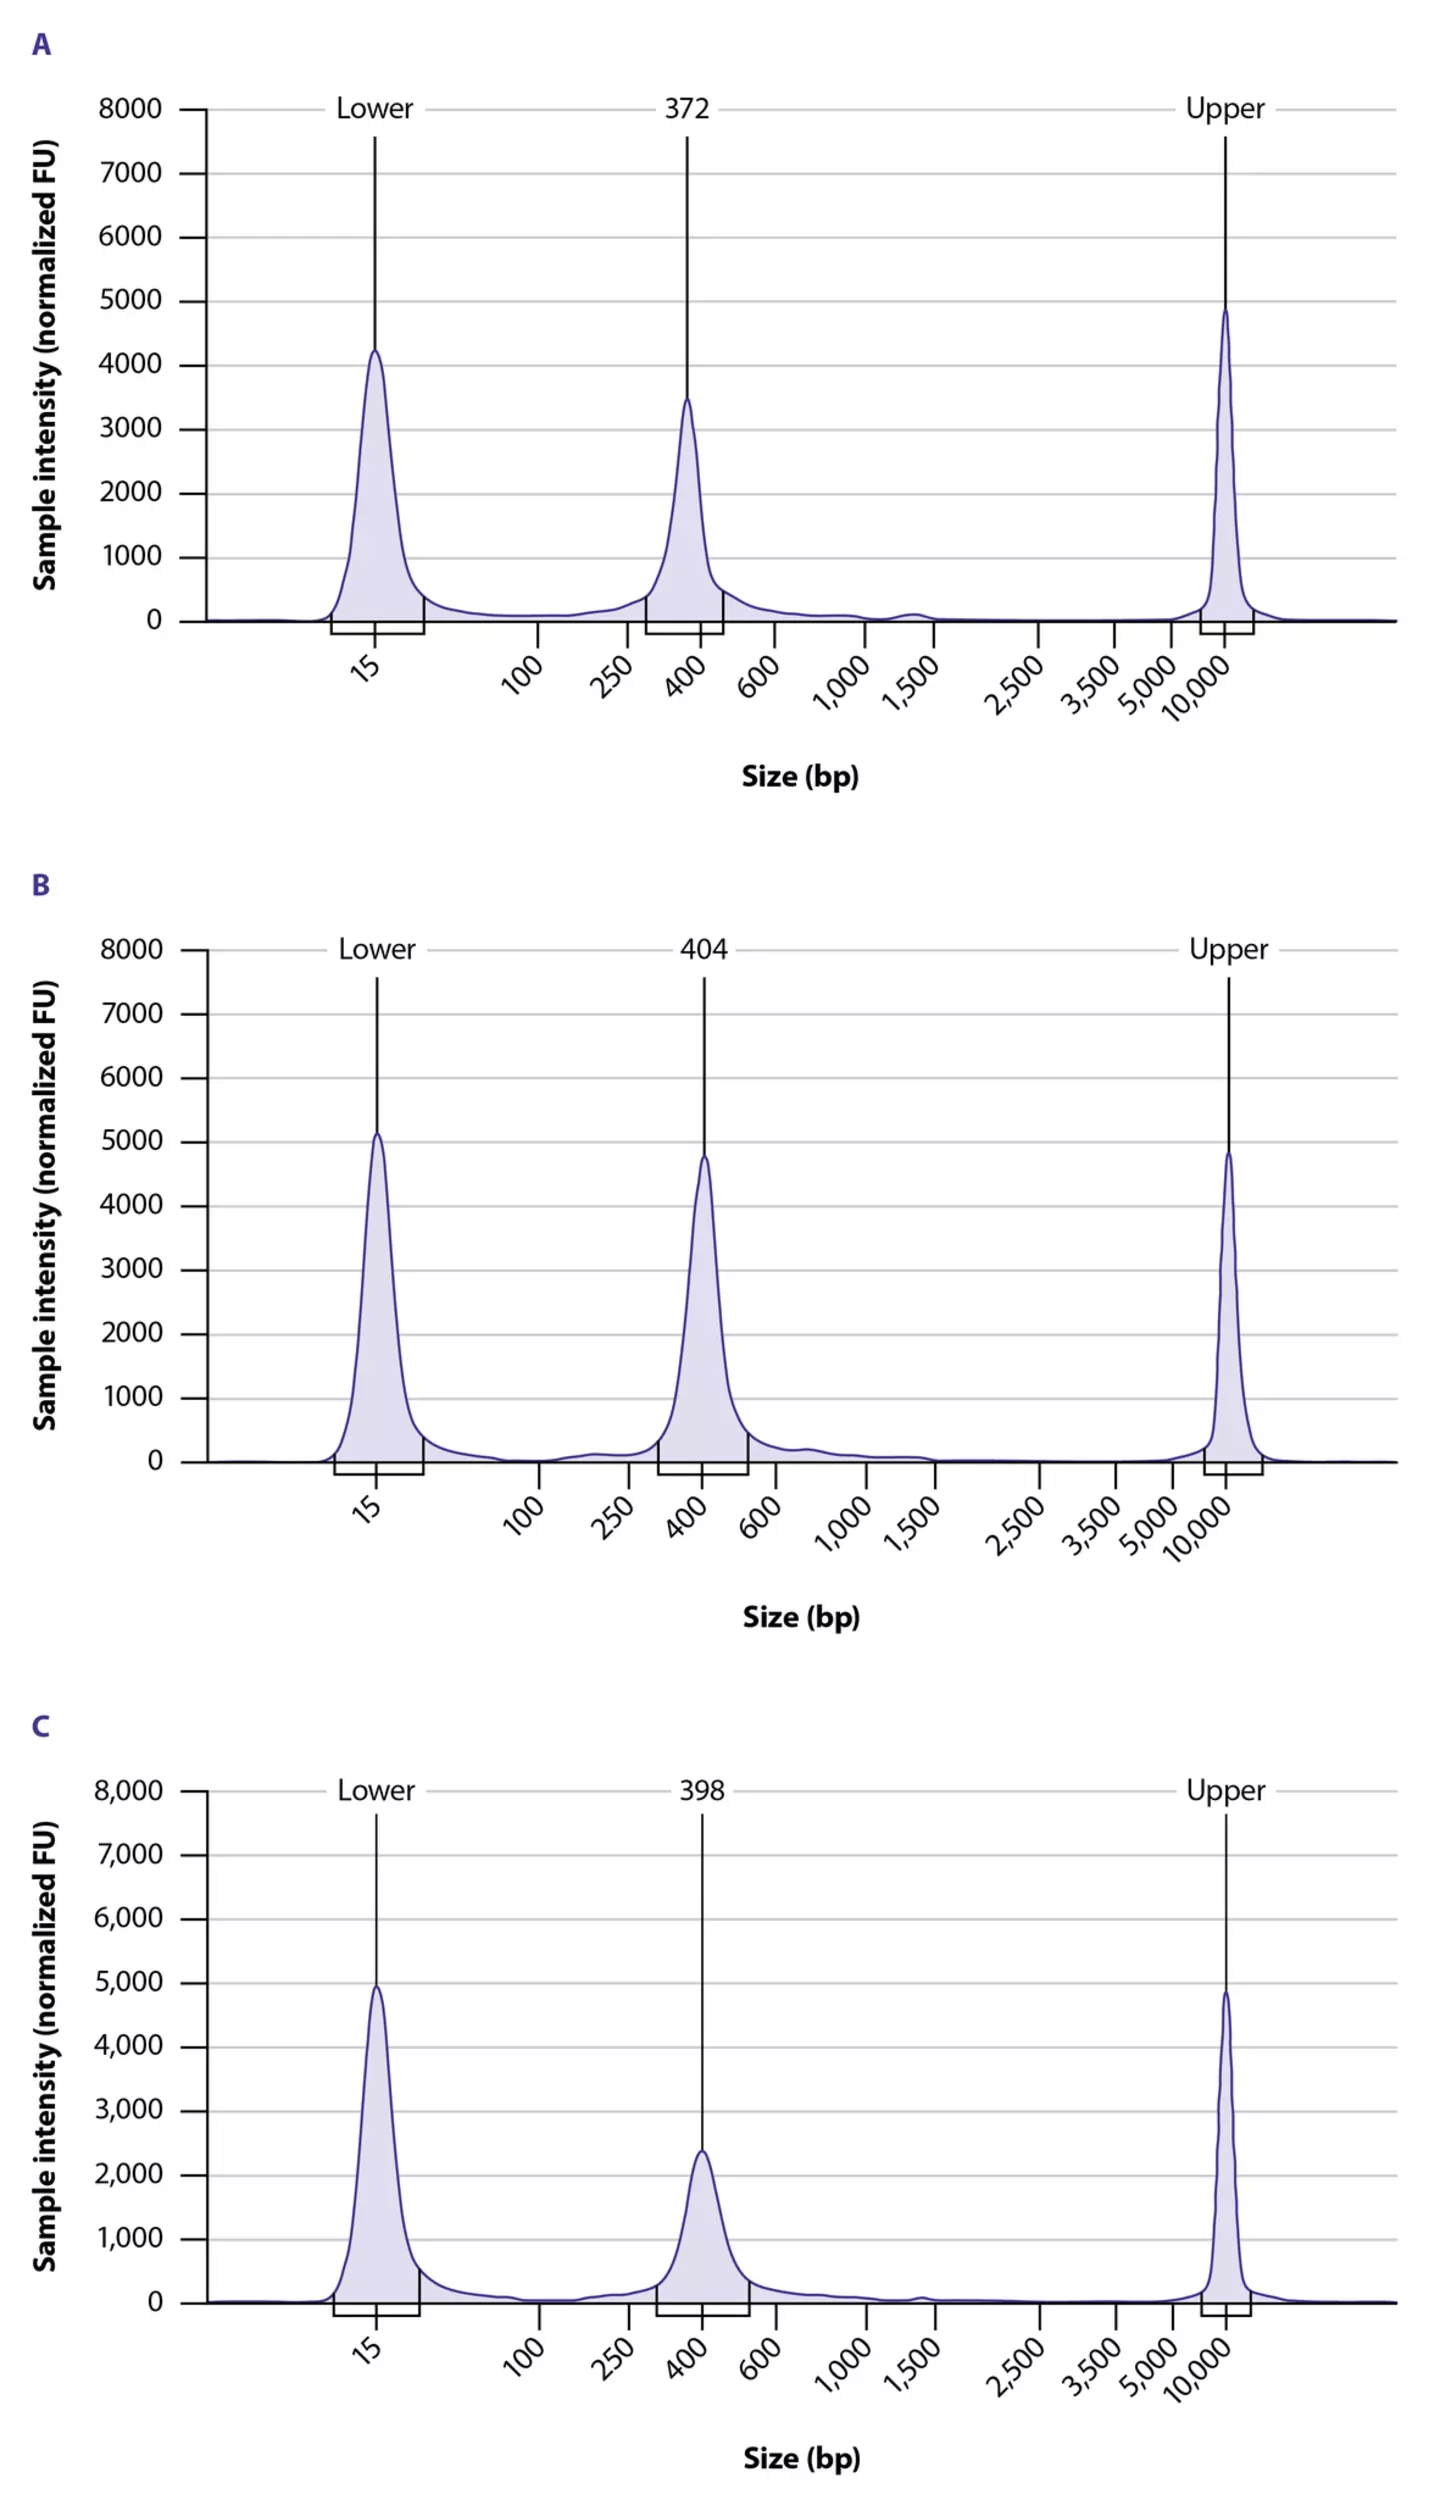
The fragment size of the library should have a peak at approximately 300 – 340 bp for TCRα and 320 – 380 bp for TCRβ chains, respectively in the case of using D5000 ScreenTapes (TapeStation).
▲ Note: the peak range may differ if other screen tapes or BioAnalyzer reagents are used. - If multiple libraries were generated, pool the obtained second PCR libraries of similar nature (i.e. libraries generated with similar cell/RNA input amounts) separately for TCRα and TCRβ. To do this, combine equal volume portions from each individual sample after the second PCR.
If 1 – 4 libraries are prepared at the same time, the whole reaction volumes of the second PCRs can be pooled. For more than four samples, pool 5 – 10 µL from each second PCR. The total amount of pooled DNA products should be at least 50 ng.
▲ Note: When generating libraries with low RNA input amounts or FFPE RNA, a non-specific band (smaller than target band) can be observed. Performing an additional clean up (after the final library clean up) with a modified beads-to-sample ratio, either reduces the non-specific band or increases the sequencing depth.
Library clean-up
Before start: Adjust beads to room temperature (+15 to +25 °C) according to manufacturer’s instructions.
Purify the obtained pooled DNA using bead protocol with 1:1 sample-to-bead ratio as follows:
- Before use, thoroughly vortex the beads until homogenized and no pellet remains at the bottom of the tube.
- Аdd the volume of beads equal to the volume of pooled DNA to each reaction and mix well by pipetting up and down 10 times without creating bubbles.Incubate the solution for 5 minutes at room temperature (+15 to +25 °C).
- Place the tubes on the magnetic rack and wait for the solution to clear.
- While the tubes are on the magnetic rack, carefully remove and discard the supernatant.
- Add 200 µL of freshly prepared 80% ethanol to the tubes, while on the magnetic rack. Wait for 30 seconds and remove the ethanol.
- Repeat the washing step with 80% ethanol without removing the tubes of the magnetic rack.Remove tubes from the magnetic rack. Briefly spin the tubes down and place them back on the magnetic rack. Remove all the residual ethanol carefully, using a small pipet.
▲ Note: It is important to remove all traces of ethanol at this step as it could inhibit subsequent sequencing procedures. - Remove tubes from the magnetic rack. Add 21 μL of Elution Buffer for elution and mix well by pipetting up and down without creating bubbles.
- Incubate the solution for 5 minutes at room temperature (+15 to +25 °C).
- Place the tubes on the magnetic rack and wait for the solution to clear.
- Keep tubes on the magnetic rack and carefully transfer 20 μL of purified second PCR products into a new tube, respectively for TCRα and TCRβ samples.
Final quality control
- Verify the quality of obtained pooled TCRα and TCRβ libraries by analyzing an aliquot by capillary electrophoresis (Bioanalyzer or TapeStation) (see figure 3 for an example of Agilent TapeStation traces). Quantify the obtained purified pools using Qubit fluorimeter and Qubit dsDNA High Sensitivity Assay Kit.
- TCRα and TCRβ pools can be mixed together in equimolar ratio for sequencing.
▲ Note: Purified PCR product can be stored for 1 – 3 months at −20 °C.

1 product found
|
