Light sheet microscopy


1 What is light sheet microscopy? 2 Why choose light sheet microscopy? 3 Sample preparation for light sheet microscopy 4 Data acquisition in light sheet microscopy 5 Image processing in light sheet microscopy 6 Applications of light sheet microscopy
1 What is light sheet microscopy?
Light sheet microscopy, also known as light sheet fluorescence microscopy (LSFM), is a fluorescence microscopy technique that enables the 3D visualization of samples ranging from 3D cell cultures, organoids, and organs to even whole organisms.
To enable volumetric imaging, samples must be optically transparent. If a sample is not inherently transparent, this is typically achieved through tissue clearing techniques, which remove light-scattering components such as lipids and pigments.
Although the concept of light sheet microscopy was first introduced in 1901, it wasn't until recent decades, with advancements in technology and tissue clearing, that it became the gold standard for 3D imaging at single-cell resolution.
 Related PDFs:
 Related videos:
 Related products:
1.1 Basic principle of light sheet microscopy
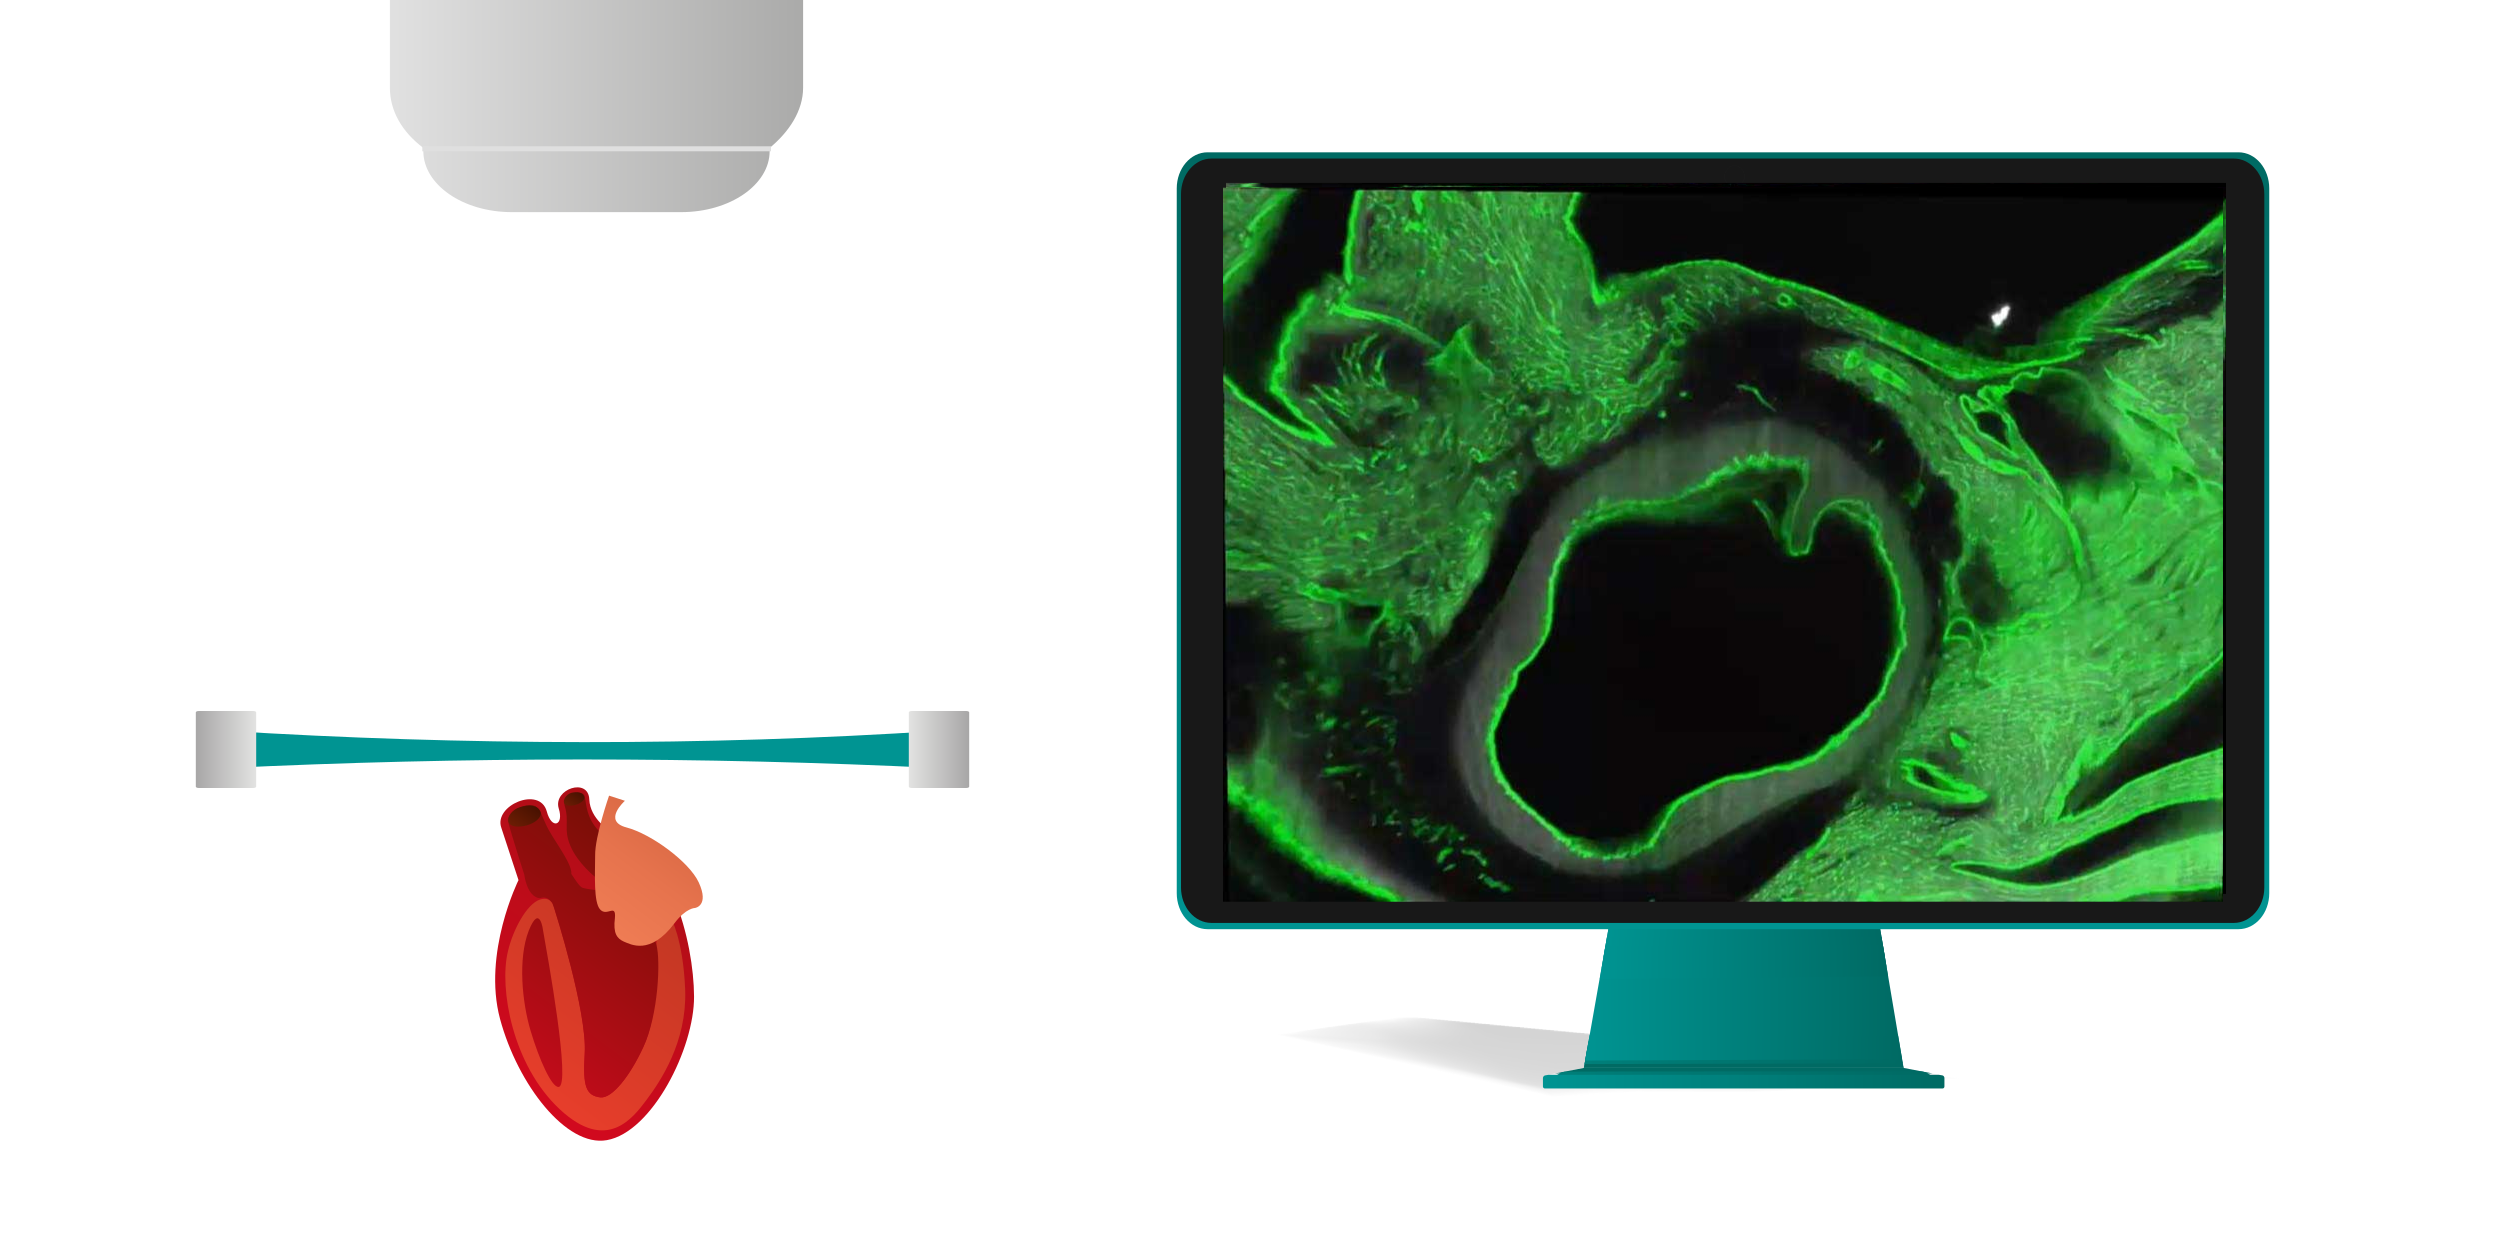
Light sheet microscopy, in its basic form, relies on the 90-degree principle: a thin plane of a 3D sample (such as a whole organ or mouse brain) is illuminated with a sheet of light (hence the name "light sheet"). Simultaneously, images of the illuminated plane are captured from a perpendicular angle (fig. 1). By sequentially acquiring images of individual planes in the z-direction, a 3D image can be reconstructed.
While various systems with different geometries are now available – including upright systems (detection objective above the sample), inverted systems (detection objective below the sample), and others with non-90-degree illumination-detection angles – the fundamental principle of decoupling excitation and detection remains consistent.
1.2 3D optical sectioning
By sequentially scanning different planes of a sample using the 90-degree principle, a 3D image of the entire specimen can be reconstructed at single-cell resolution. Typically, samples are mounted on movable stages or within imaging chambers and then passed through the light sheet (fig. 1). As the sample traverses the light sheet, images of individual planes are captured, ultimately forming a complete 3D dataset.
This non-destructive approach allows for the visualization of intricate details within thick samples, without the need for physical sectioning, which can damage the sample and introduce artifacts.
2 Why choose light sheet microscopy?
Light sheet microscopy offers unique advantages by illuminating only a thin plane of the sample at a time, significantly reducing photobleaching and phototoxicity and enabling rapid, single-cell resolved imaging of large, 3D samples. This makes it ideal for studying the tissue architecture of mesoscale samples, enabling a macroscopic overview (e.g., an entire organ) combined with microscopic details (e.g., single cells). A detailed overview of the main advantages of light sheet microscopy is described here (table 1):
Table 1: Advantages of light sheet microscopy
| Advantages of light sheet microscopy | Explanation |
| Mesoscale imaging | Microscopy often focuses on high resolution, even at the nanometer scale (e.g., electron microscopy). However, this comes at the cost of a limited field of view. Macroscopic techniques like MRI and CT, while imaging entire organisms, lack the resolution to visualize cellular details. Light sheet microscopy uniquely bridges this gap, enabling mesoscale imaging. It can image a wide range of samples, from small organoids to whole organisms, while maintaining near-cellular resolution. |
| Low photobleaching | Over time, fluorescent molecules can lose their ability to emit light when repeatedly exposed to excitation light, a phenomenon known as photobleaching. Light sheet microscopy minimizes this risk by illuminating only a thin plane of the sample at a time, reducing the overall light exposure to the fluorescent molecules. |
| Low phototoxicity | Excessive light exposure can damage cells and tissues, a phenomenon known as phototoxicity. Light sheet microscopy minimizes this risk by illuminating only a thin plane of the sample at a time, reducing the overall light exposure to the specimen. This targeted illumination strategy significantly reduces phototoxic effects, allowing for gentler imaging of delicate samples. |
| High speed | Light sheet microscopy is significantly faster than traditional techniques like confocal microscopy because it illuminates and captures an entire plane of the sample simultaneously, rather than scanning each point sequentially. This imaging approach enables rapid 3D imaging of large volumes of data, making it ideal for large samples. |
Table 2 provides a comprehensive comparison of various imaging technologies with 3D capabilities, including light sheet microscopy, electron microscopy, super-resolution microscopy, confocal microscopy, two-photon microscopy, micro-computed tomography (µCT), magnetic resonance imaging (MRI), and positron emission tomography - single photon emission computed tomography (PET-SPECT).
Generally speaking, while techniques like electron microscopy and super-resolution microscopy offer exceptional resolution, they are often limited to small fields of view and require extensive sample preparation. Confocal microscopy can suffer from phototoxicity and the imaging depth is limited. Two-photon microscopy offers deep imaging with low damage to the sample. µCT, MRI, and PET-SPECT are primarily used for medical imaging and offer levels of resolution, contrast, and sensitivity that are not comparable with those achieved by microscope systems.
Overall, light sheet microscopy provides a unique balance of speed, resolution, and minimal invasiveness, making it a valuable tool for a wide range of biological research applications.
Table 2: Comparison of various imaging technologies with 3D capabilities
| Electron microscopy | Super-resolution microscopy | Confocal microscopy | Two-photon microscopy | Light sheet microscopy | µCT | MRI | PET-SPECT | |
| Illumination | High-energy or electron beam | Laser light | Laser light | Near-infrared laser light | Sheet of laser light | X-rays | Radio waves and magnetic fields | Gamma rays emitted from radioactive tracers |
| Sample size/scale | Very small (nm-µm) | Very small (nm-µm) | Small (µm) | Small (µm) | Large (mm-cm) | Large (mm-cm) | Large to very large (cm-m) | Large to very large (cm-m) |
| Imaging depth | Low (microns) | Low (microns) | Moderate (10s of microns) | High (100s of microns) | High (for cleared samples, 100s of microns) | Very high (cm) | Very high (cm) | Very high (cm) |
| Photobleaching / phototoxicity | N/A | Very high | High | Moderate | Low | N/A | N/A | N/A |
| Imaging speed | Slow | Slow | Slow | Slow | Fast | Fast | Slow | Slow |
| Resolution | Highest (nm) | Highest (nm) | Very high (nm - µm) | High (microns) | High (microns) | High (microns) | Low (mm) | Low (mm) |
| Cost | High | High | Moderate | High | Moderate | High | High | High |
3 Sample preparation for light sheet microscopy
Originally, light sheet microscopy was applied to small, transparent living organisms like zebrafish or Drosophila larvae for in vivo imaging sessions over extended periods. However, the advent and rapid development of tissue clearing protocols enable the imaging of potentially any specimen from any model organism, justifying the rapid growth of light sheet microscopy applications in recent years.
A multi-step process is typically followed to prepare tissues for light sheet microscopy. This involves harvesting, perfusion, fixation, immunostaining, tissue clearing, and sample mounting.
3.1 Harvesting, perfusion, and fixation
Tissue harvesting and fixation are crucial initial steps in preparing samples for light sheet microscopy. The specific methods will depend on the type of tissue being studied.
Table 3: Considerations for harvesting, perfusion, and fixation of different samples
| Sample | What to consider |
| Organoids | Organoids can be relatively straightforward to harvest. Once they reach the desired maturity, they can be directly transferred from their culture vessel to downstream processing steps. |
| Animal tumors and organs | For animal tumors and organs, careful dissection is necessary. In research models, perfusion is often employed to remove blood and other fluids from the tissue. This involves injecting a fixative solution into the circulatory system of the animal model. The choice of fixative and perfusion time depends on the specific tissue and desired outcomes. |
| Human tissues | In cases where perfusion is not feasible, immediate fixation is essential to preserve tissue structure and antigenicity. |
Factors that influence fixation are:
- Fixation time: The duration of fixation should be optimized to prevent under- or over-fixation.
- Fixative choice: The choice of fixative depends on the specific tissue and the desired outcome. Common fixatives include formaldehyde and paraformaldehyde.
- Penetration depth: The size and density of the tissue can influence the penetration depth of the fixative. For larger tissues, longer fixation times or alternative fixation methods may be necessary.
3.2 Immunostaining
To enhance contrast and specificity, various staining techniques can be employed (table 4). Staining techniques are crucial for light sheet microscopy as they enhance the visibility and specificity of biological structures within the sample. By labeling specific cellular components, researchers can gain valuable insights into tissue architecture, cellular interactions, and dynamic processes.
Table 4: Staining techniques for light sheet microscopy
| Method | Example | Advantages | Challenges |
| Endogenous proteins | Chlorophyll, fluorescent proteins like GFP | Convenient No additional labeling required | Limited to organisms with naturally occurring fluorescent markers |
| Dye-based staining | DAPI (nuclei), lipid dyes | Simple staining Labeling of multiple structures | Limited specificity Potential for background staining |
| Immunostaining | Antibodies | High specificity Widest range of targets Detailed 3D imaging | Requires complex sample preparation Potential for antibody-related artifacts |
In essence, staining techniques, particularly antibody-based methods, are crucial for unlocking the full potential of light sheet microscopy.
By using antibodies that selectively bind to target proteins, researchers can highlight particular cells, tissues, or molecular components, enhancing image contrast and clarity. Fluorescent tags attached to these antibodies emit light when exposed to the microscope’s illumination, making labeled targets easily identifiable in the final images. This selective labeling helps differentiate complex structures and pathways within a 3D context, allowing for a more detailed and accurate analysis of spatial organization within the sample.
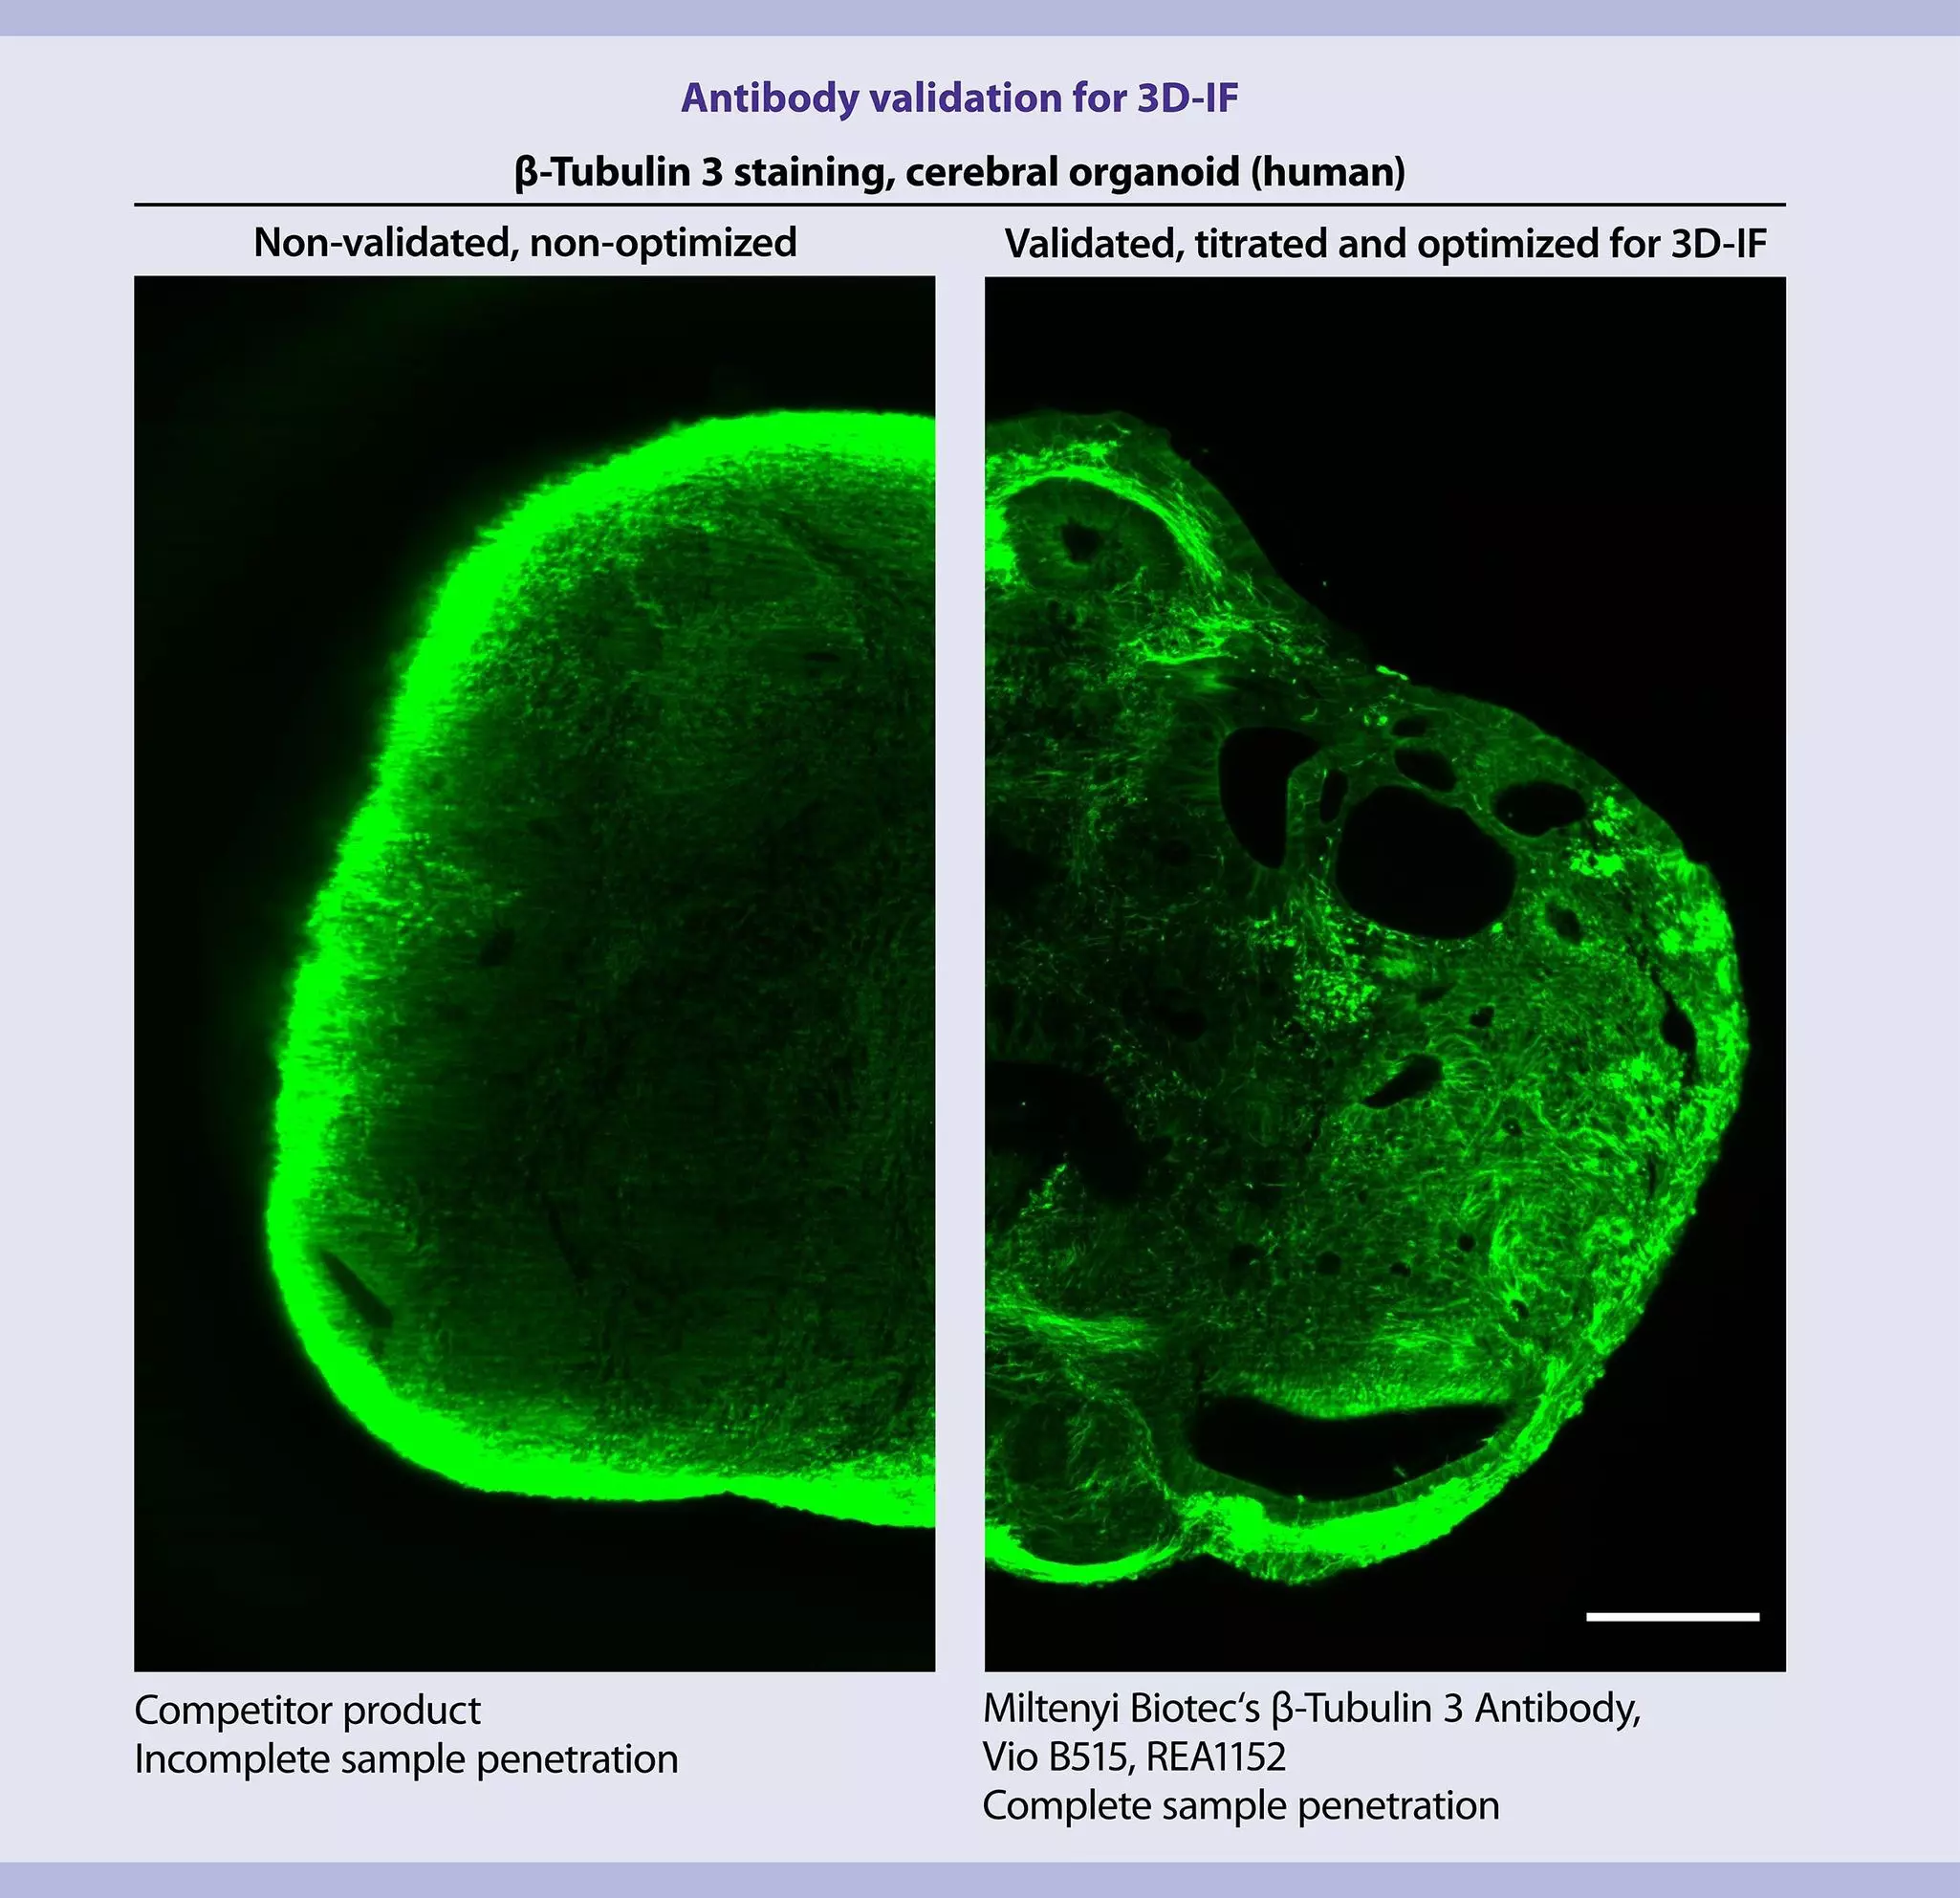
One of the biggest challenges in staining thick tissue sections or entire organs is achieving complete antibody penetration throughout the sample, without visible gradients. Non-validated antibodies often bind non-specifically to the outer surface, leading to unsatisfactory signals (Fig. 2, left). This necessitates screening most antibodies for compatibility and adapting protocols, resulting in lengthy validation processes and high costs. Therefore, finding a validated antibody for whole tissue labeling that is compatible with your chosen clearing method is essential.
The UltraMicroscope Platform offers primary antibodies (3D-immunofluorescence, 3D-IF) directly conjugated with photostable fluorochrome designed and validated specifically for 3D imaging of large samples, ensuring complete sample penetration (Fig. 2, right).
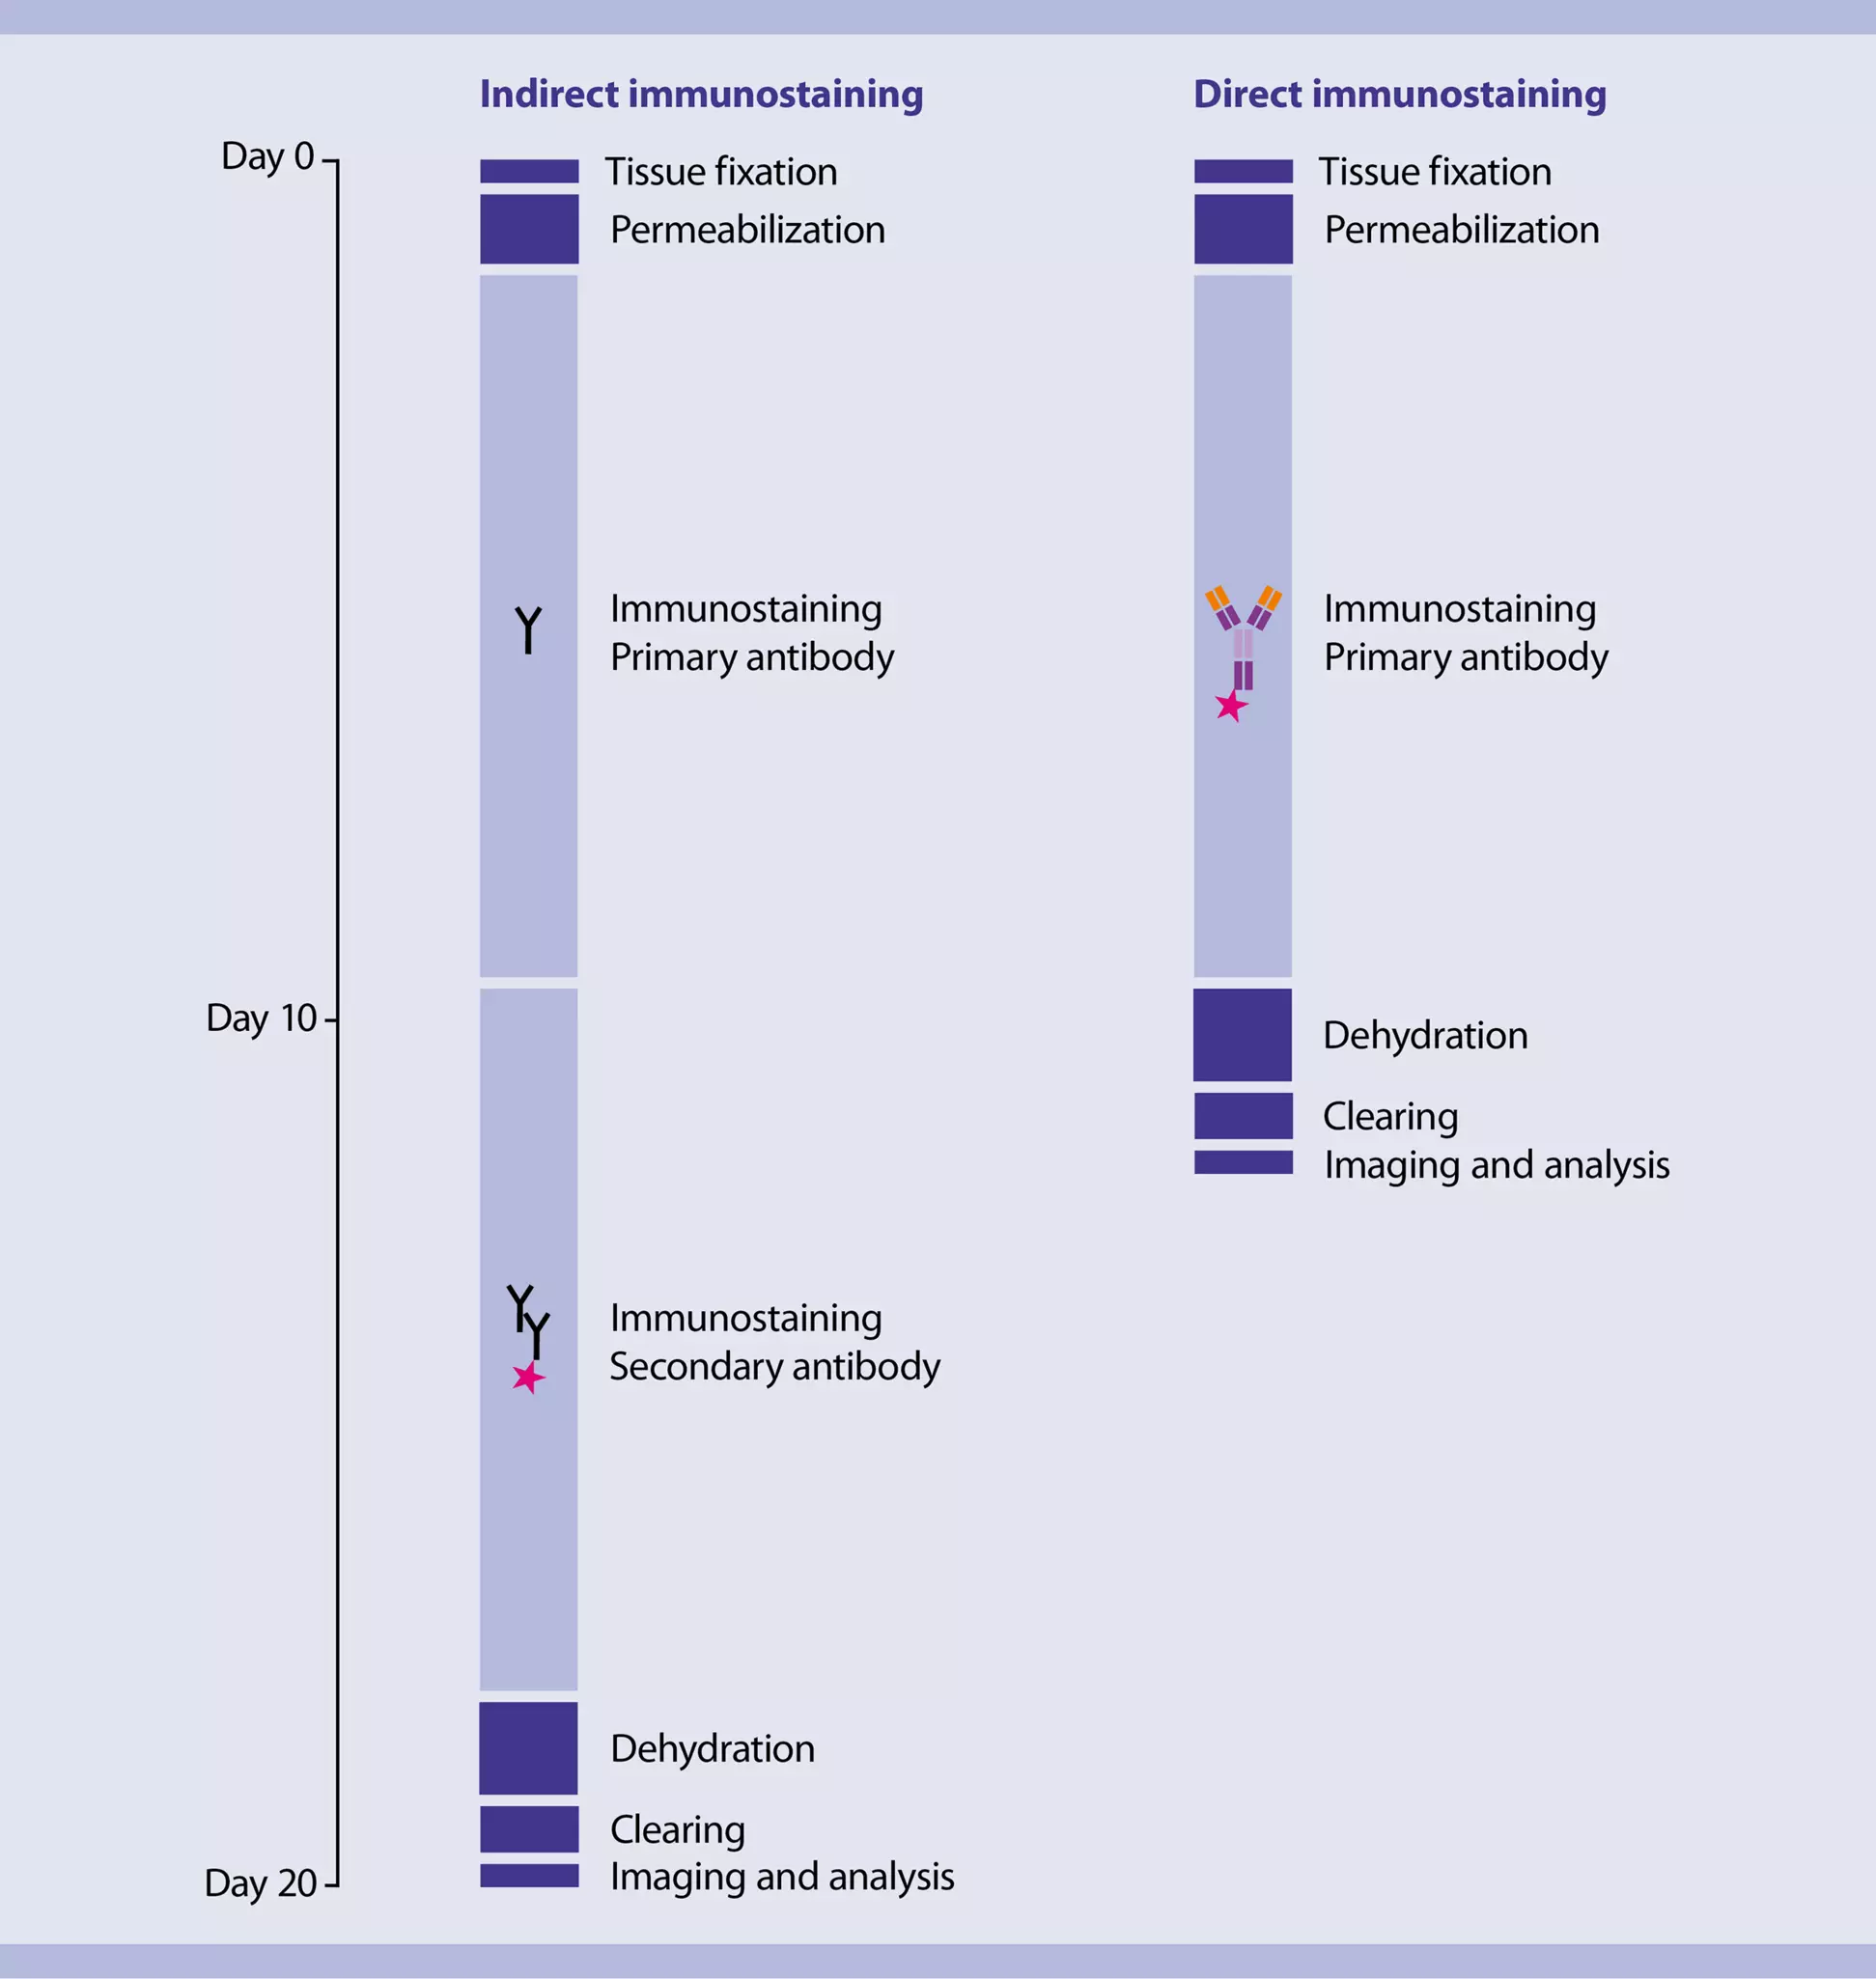
The immunostaining step is often the most time-consuming part of 3D-IF protocols for whole-mount samples. Indirect immunofluorescence staining, which uses secondary antibodies, can take up to 14 days for a mouse brain hemisphere. In contrast, direct staining with fluorochrome-conjugated primary antibodies can significantly reduce staining time to approximately 7 days, accelerating the overall imaging process (fig. 3).
Furthermore, indirect immunofluorescence can suffer from non-specific binding, leading to low signal-to-background ratios. Direct staining with primary antibodies conjugated to bright fluorochromes offers a more reliable and efficient approach, minimizing background noise and enhancing signal quality.
 Related content:
Related products:
3.3 Tissue clearing
Biological tissues are inherently opaque due to the scattering and absorption of light by their complex structure. They contain a complex network of cells composed of carbohydrates, proteins, lipids, and other pigmented molecules, each with unique optical properties. This opacity limits light penetration, hindering the visualization of internal structures. Historically, scientists have relied on sectioning and staining techniques, which can damage and distort tissue morphology.
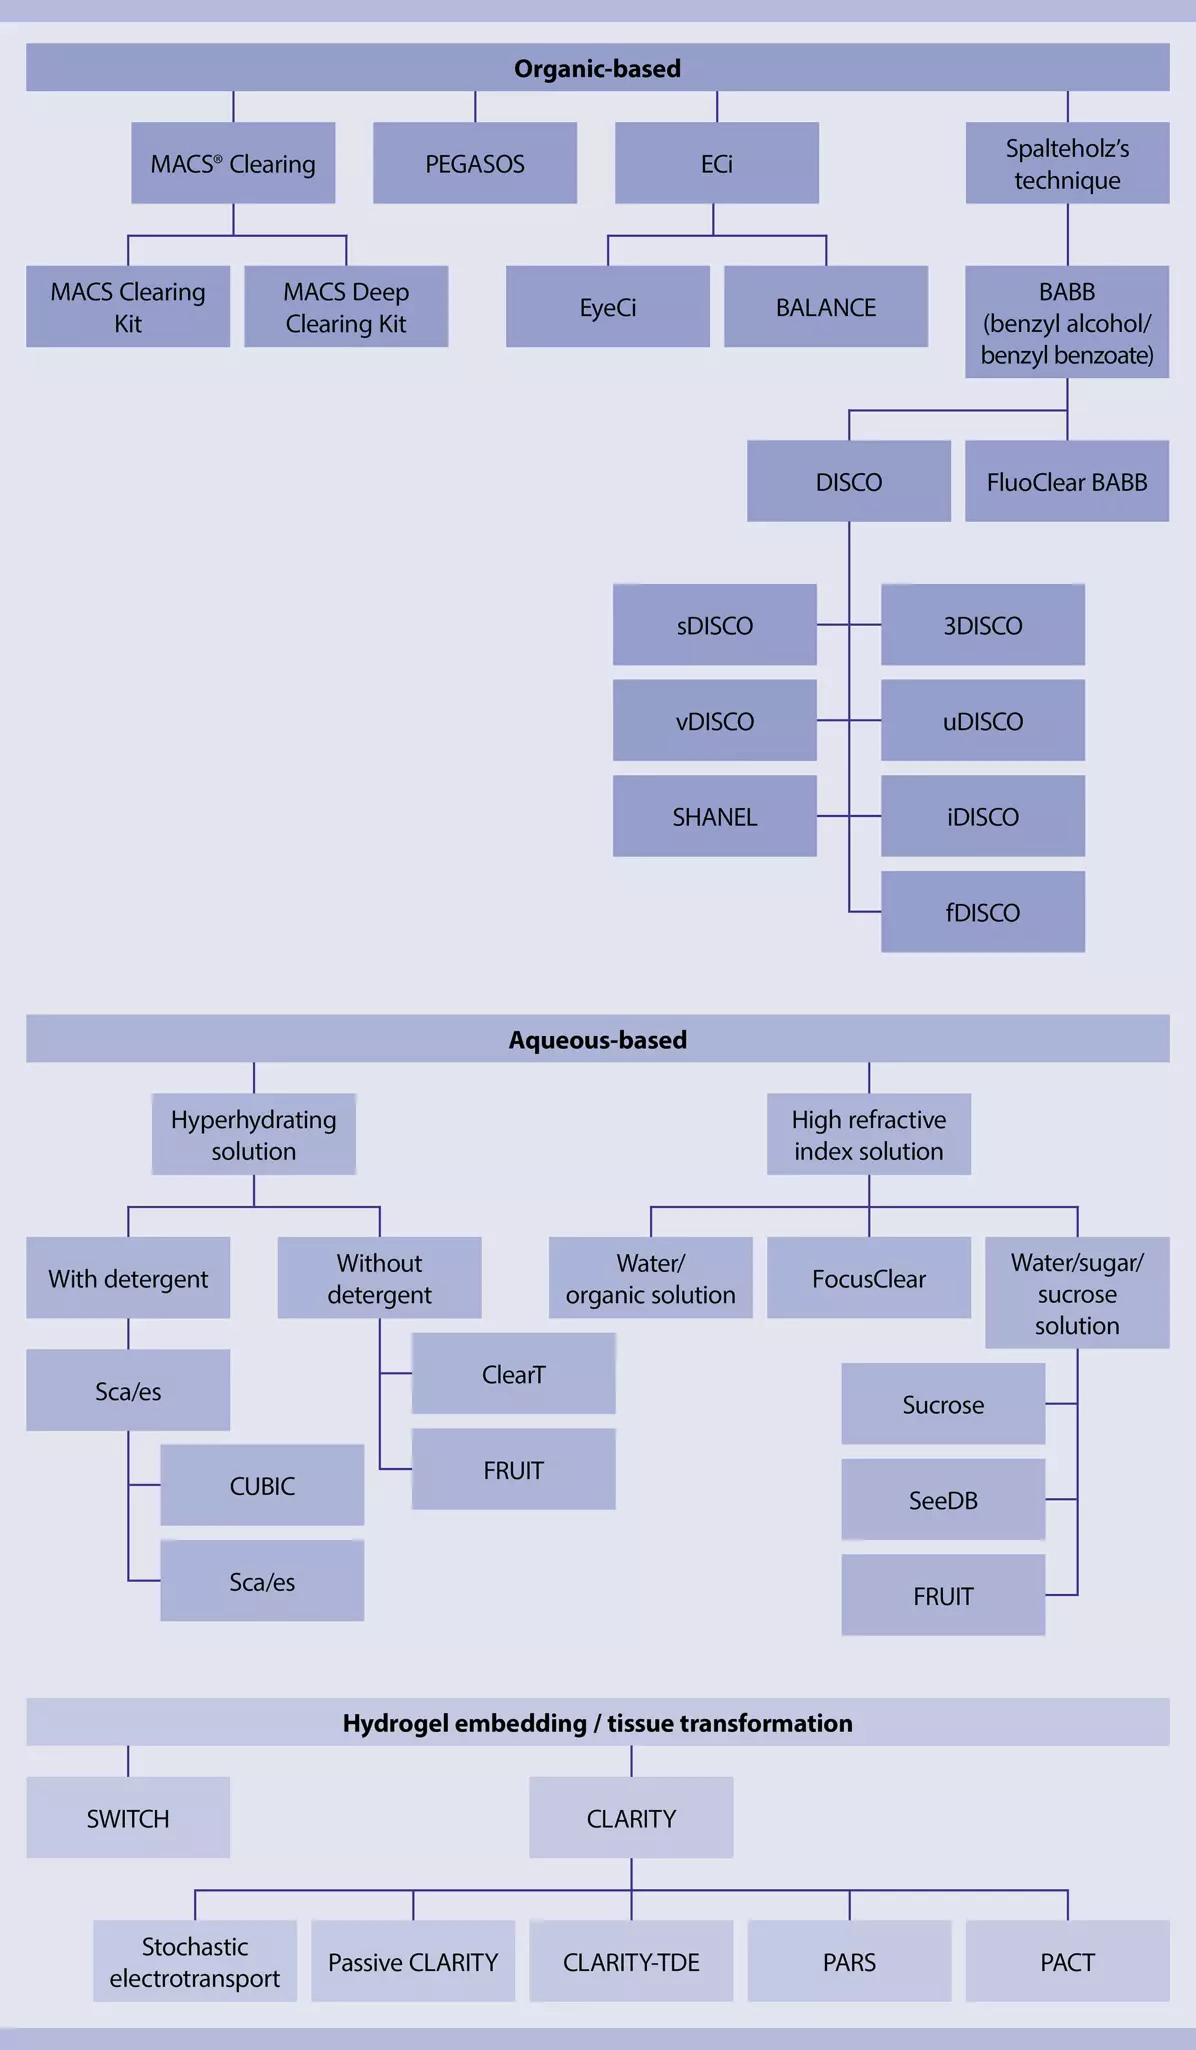
Tissue clearing offers a solution by rendering tissues transparent. This enables the visualization of 3D structures and interactions throughout the sample. However, choosing the right clearing method can be challenging, as various techniques are suitable for different tissue types and staining methods. The field of tissue clearing is rapidly evolving, with researchers continuously optimizing protocols to meet specific needs. Tissue clearing methods are broadly categorized into three main approaches (Organic solvent-based, aqueous-based, and hydrogel embedding:). Figure 4 provides an overview of well-established tissue clearing methods classified in these categories.
All tissue-clearing methods aim to achieve two primary goals: remove light-scattering or light-absorbing molecules from the tissue and homogenize the refractive index of the remaining molecules. Every tissue requires a delipidation process to solubilize and remove lipids. For pigmented tissues, such as the eye, a depigmentation step may be necessary. In the case of bone, decalcification is required. After these initial steps, the remaining protein infrastructure is incubated with a solution that homogenizes the proteins' refractive index to a uniform value.
A comparison of the three main approaches of tissue clearing is shown in in table 5.
Table 5: Comparison of tissue clearing approaches
| Approach | Description | Advantages | Disadvantages |
| Organic solvent-based | Uses organic solvents like alcohols and ethers for dehydration and delipidation, followed by refractive index matching. | Fast, efficient, inexpensive, and ideal for dense tissues. | Can be harsh on tissues, especially for delicate structures. |
| Aqueous-based | Utilizes water-soluble molecules for clearing and refractive index matching. | Gentle on tissues, compatible with various staining methods. | Can be time-consuming, requires careful optimization, and may lead to tissue swelling. |
| Hydrogel embedding | Embeds tissues in a hydrogel matrix to protect them during delipidation. | Preserves tissue integrity, compatible with various staining methods. | Requires specialized equipment, can be technically challenging. |
The optimal tissue clearing method depends on several factors, including:
- Tissue type: Dense tissues may benefit from organic solvent-based methods, while delicate tissues may be better suited for aqueous-based or hydrogel methods.
- Desired imaging technique: The choice of clearing method can influence the compatibility with different imaging modalities.
- Preservation of specific structures: Certain methods may be better suited for preserving specific cellular components or molecular markers.
By carefully considering these factors, researchers can select the most appropriate tissue clearing method to achieve their desired imaging goals.
The UltraMicroscope Platform offers a safe, rapid, and affordable solution for clearing diverse biological samples, including mouse brains, embryos, tumors (even blood-rich ones), organoids, and various internal organs. Leveraging non-toxic and user-friendly kits, the platform simplifies the clearing process into a single step, ensuring efficient tissue preservation and morphological integrity. The platform further provides tailored protocols for both pigmented and non-pigmented tissues, as well as a specialized protocol for maintaining endogenous protein signals.
3.4 Sample mounting
The three-dimensional nature of light sheet microscopy, combined with the separation of illumination and detection beam paths, necessitates specialized sample mounting methods. Depending on the characteristics of the sample, dedicated sample holders or specific embedding techniques may be required to securely position samples for optimal imaging.
Choosing an appropriate sample holder in light sheet microscopy is crucial, as it influences sample stability, imaging quality, and ease of handling. The holder should be designed to fit the sample dimensions precisely, minimizing movement that could compromise image quality. This stability is especially important for large or elongated samples where even minor shifts can affect imaging outcomes. For workflows that involve frequent sample exchanges, consider holders that allow for easy access without disrupting the microscope’s alignment or setup.
The UltraMicroscope Platform offers a selection of sample holders, providing versatility for different sample types, sizes, and numbers, supporting both high-quality imaging and streamlined workflow. Particularly noteworthy are the high-throughput sample holders and related workflows of the MACS® UltraMount Series that can accommodate up to 8 adult mouse brain-sized samples, up to 12/24 embryo-sized samples, or up to 48 organoid-sized samples. These holders enable batch processing for staining, clearing, and imaging of multiple samples with reduced overall hands-on time.
Related products:
4 Data acquisition in light sheet microscopy
4.1 Light sheet microscope setup
While the fundamental principle of light sheet microscopy is relatively simple, various adaptations have been developed over the years, particularly regarding light sheet generation and fluorescence detection. These advancements have led to a diverse range of systems available on the market.
4.1.1 Light sheet generation
There are static, scanning, mono, and bi-directional light sheets. Static and scanning laser light sheets differ in the way they illuminate the sample and acquire images.
Table 6: Advantages and challenges of different types of light sheets
| Type of light sheet | Principle | Advantages | Challenges |
| Static, single monodirectional | A thin sheet of laser light is generated and remains fixed in position. The entire plane is illuminated simultaneously. | Fast acquisition High robustness Low production and service costs | Uneven illumination Shadowing and striping artifacts |
| Static, multiple bidirectional | Additional static sheets with a different angle and/or direction are added. | Homogeneous illumination Fast acquisition High robustness Low production and service costs | Shadowing and striping artifacts |
| Scanned | A laser beam is focused into a thin line and then rapidly scanned across the sample in a sequential manner to create a virtual light sheet. | Mitigating scattering effects by optimizing the scanning pattern | Low speed Potential for higher phototoxicity due to sequential illumination High complexity |
The UltraMicroscope Blaze features triple bidirectional static light sheets (fig. 5), combining the fastest image acquisition with homogeneous illumination across large specimens.

4.1.2 Objective lenses for detection
Fluorescence emitted from the illuminated plane of interest is collected by objective lenses mounted in the detection path and projected onto digital cameras for image acquisition. Various optical elements, such as emission filters and additional magnification lenses, can be inserted along this path to ensure that only the desired photons reach the camera sensor.
Given the large size and three-dimensional nature of samples suitable for light sheet imaging, the ideal detection lenses should possess the characteristics summarized in table 7.
Table 7: Key features of objective lenses used in light sheet microscopy
| Feature | Description |
| Long working distance | Enables imaging deep within thick samples |
| Large field of view | Captures a wider area of the sample in a single image |
| High numerical aperture (NA) | Improves resolution and detail |
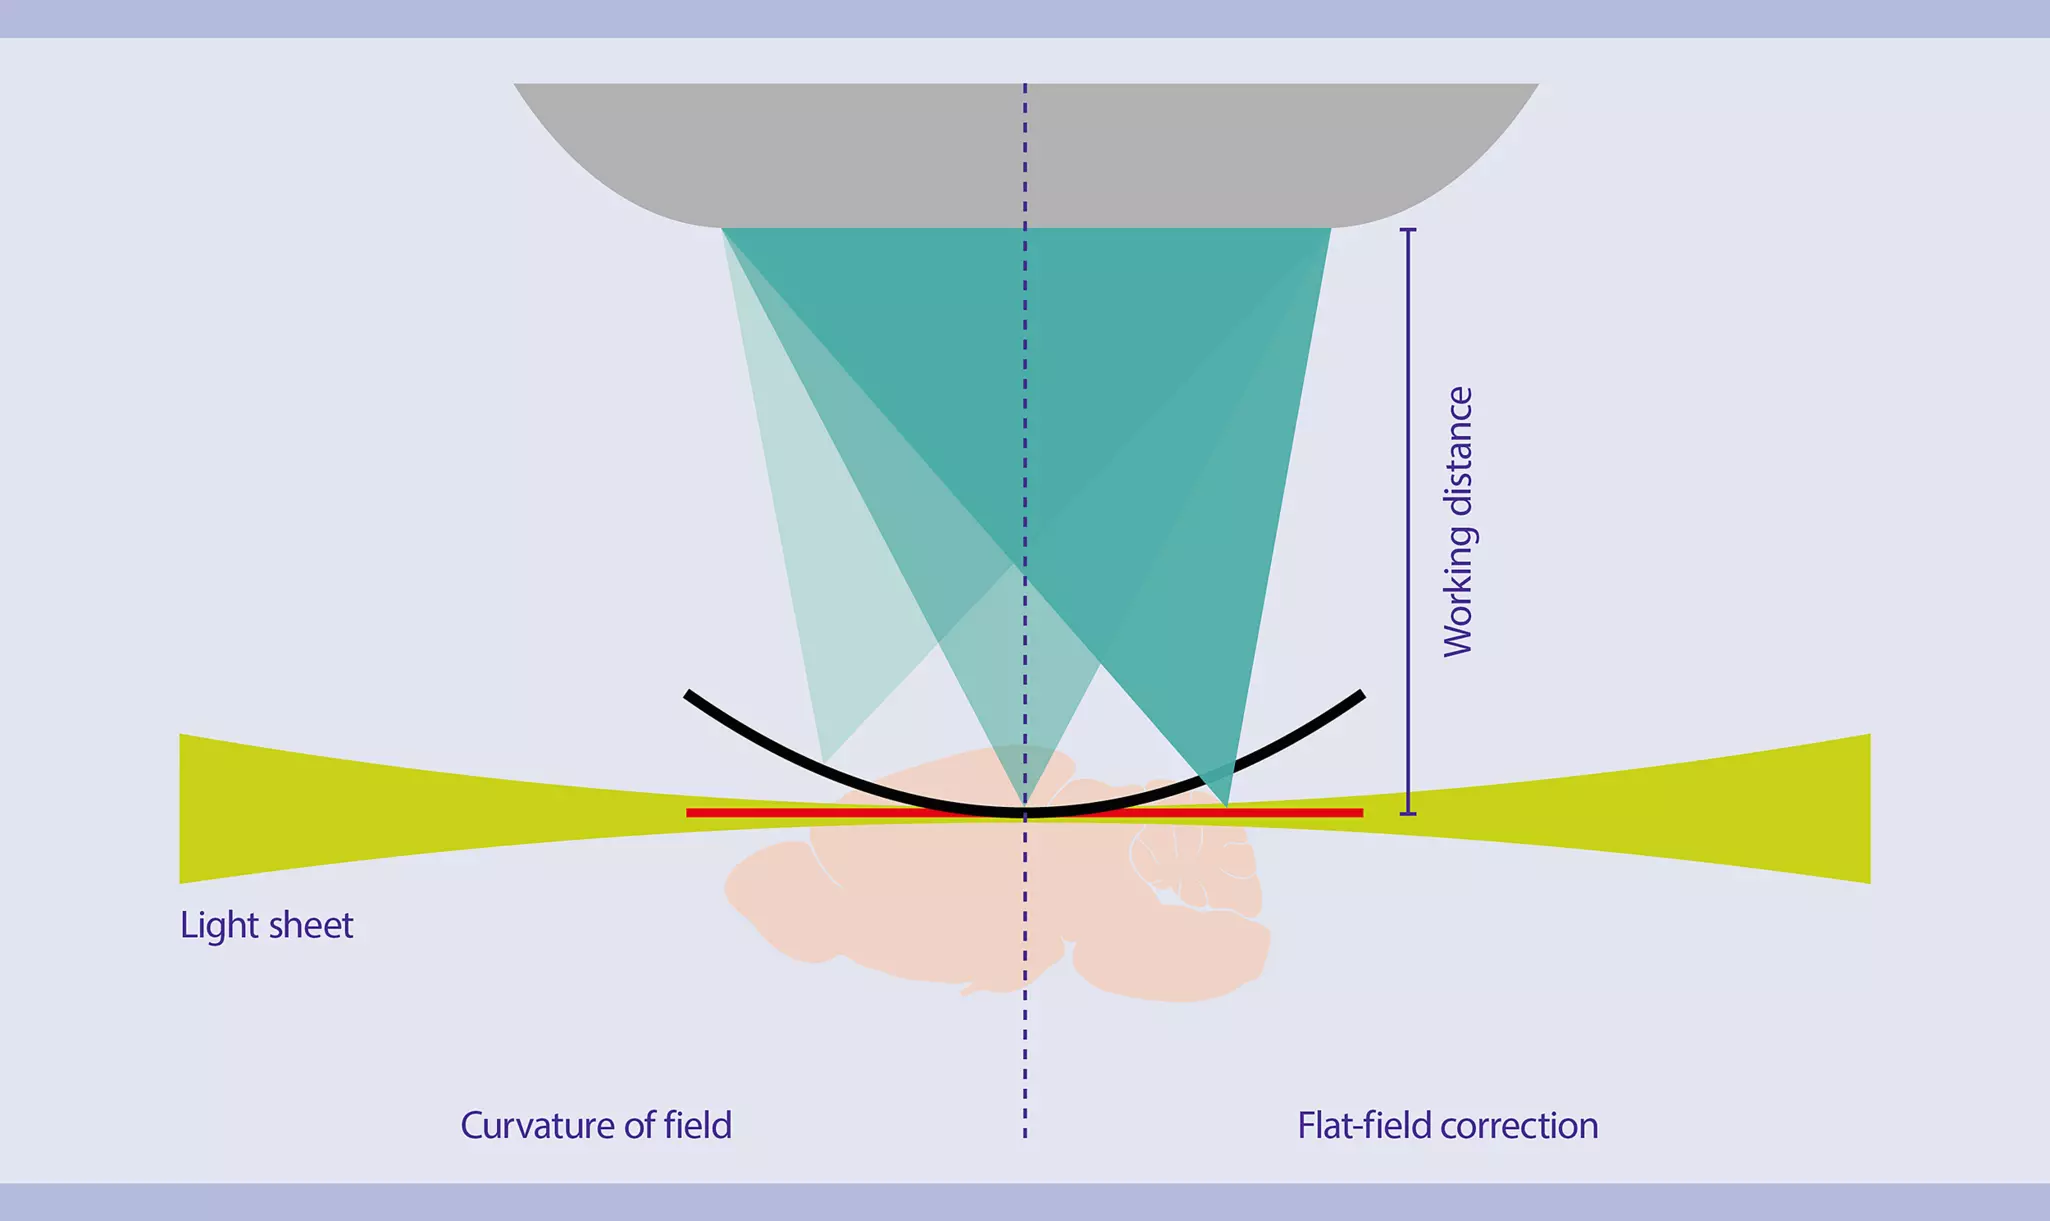
| Flat-field correction | Ensures uniform image quality across the entire field of view (fig. 6) |
| Multi-immersion capability | Adapts to various refractive indices, minimizing optical aberrations (fig. 7) |
A significant challenge in light sheet microscopy is the refractive index (RI) mismatch between the imaging medium and the air surrounding the objective lens. This mismatch can lead to various image quality issues:
- Spherical Aberrations: Distort the image, particularly at greater depths.
- Focal Shift: Displaces the focal plane, complicating multiplex acquisition and co-localization studies.
- Reduced Contrast and Resolution: Degrades image quality, especially under high NA conditions.
To mitigate the effects of refractive index mismatch, multi-immersion objectives have been developed. These objectives are equipped with correction collars or dipping caps that can be adjusted to match the refractive index of the imaging medium, ensuring optimal image quality (fig. 7).
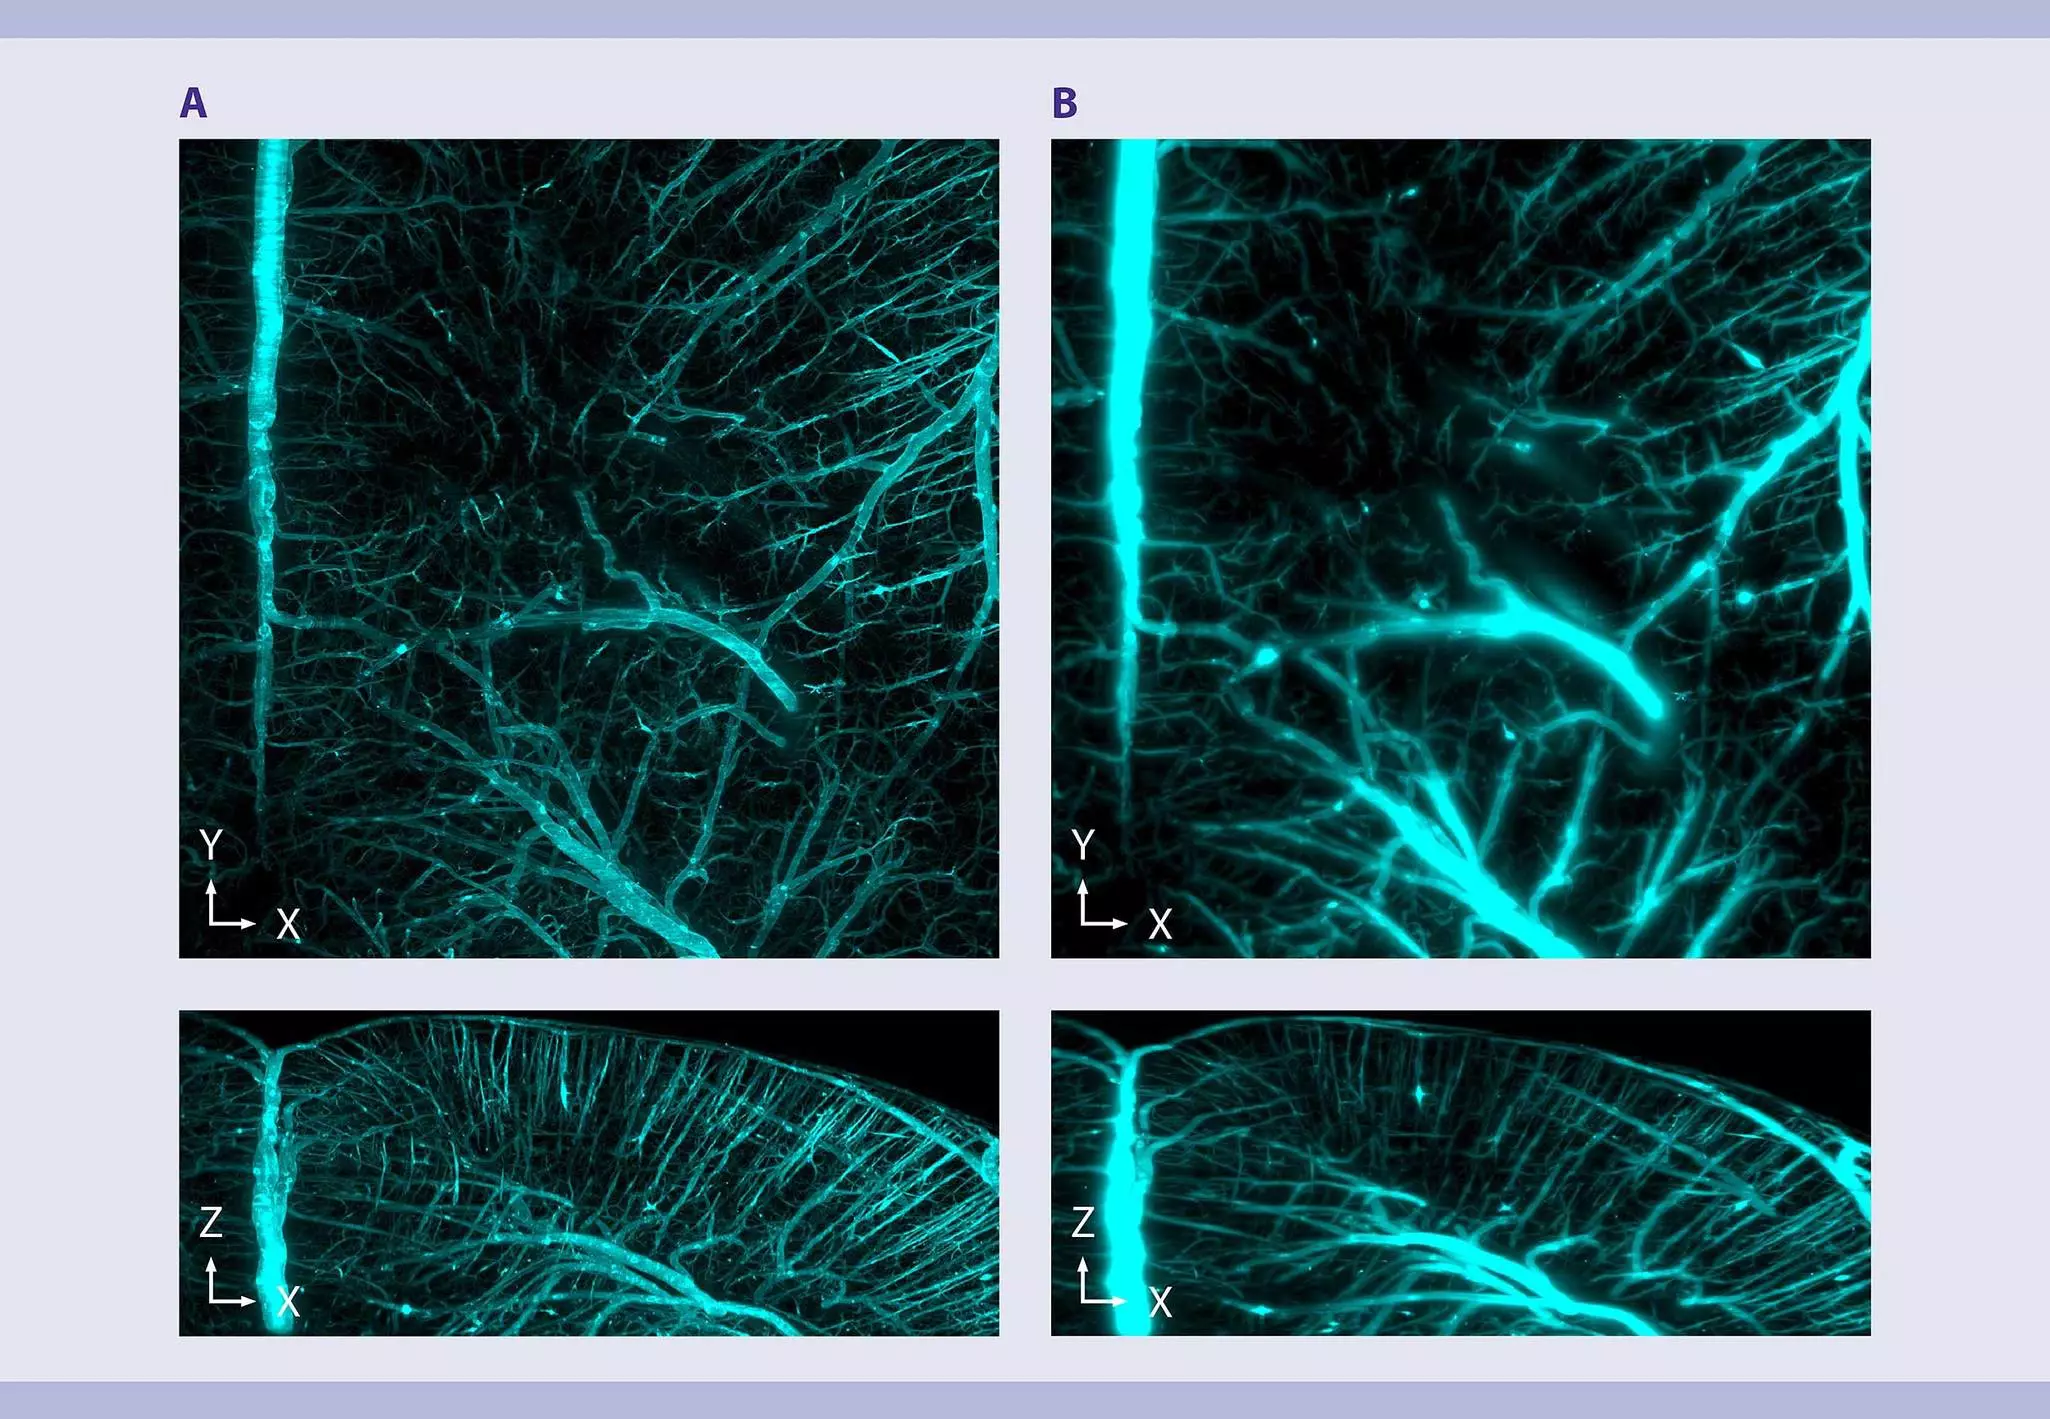
The UltraMicroscope Platform can be equipped with three proprietary multi-immersion objectives (MI-Plan; 1x, 4x, and 12x). These objectives are characterized by long working distances, large, flat fields of view, high numerical apertures (NA), and compatibility with various imaging media (refractive index range 1.33-1.56) through interchangeable dipping caps.
4.1.3 Cameras for detection
sCMOS cameras are ideal for light sheet microscopy due to their high sensitivity and low noise. Their large field of view allows for efficient imaging of large samples, reducing the need for multiple image stitching. sCMOS cameras offer a wide dynamic range, capable of capturing both bright and dim signals within a single image. Additionally, sCMOS cameras offer high frame rates, allowing for rapid image acquisition.
The UltraMicroscope Platform is equipped with an sCMOS camera to detect weak fluorescence signals from large, optically sectioned samples at high speed with minimal phototoxicity.
4.2 Light sheet microscopy image acquisition settings
The optimal imaging parameters for light sheet microscopy are highly dependent on the specific biological question being investigated. However, a crucial prerequisite for successful imaging is proper sample preparation, including clearing and labeling. Even the most advanced imaging techniques cannot fully compensate for suboptimal sample quality.
4.2.1 Key parameters to consider
First of all, determine what needs to be visualized or measured. Are you aiming to create a detailed 3D model of an organ, or is the goal to quantify specific cell types in a large sample? Once you have a clear idea, select the appropriate accessories and adjust the parameters (table 8) to optimize your light sheet microscopy experiment.
Table 8: Key parameters for light sheet microscopy image acquisition
| Parameter | Description | Impact on image quality | What to do |
| Immersion medium | Surrounds the sample in the imaging chamber | The better the immersion medium matches the refractive index of the sample and the objective lens, the better the resolution is and the lower the light scattering is. | Select the appropriate immersion medium to match the refractive index of the sample and the microscope objectives. When using samples cleared with the MACS Clearing Kit or MACS Deep Clearing Kit, use MACS Imaging Solution to enable the acquisition of exceptionally sharp images. |
| Objective lens | Collects the fluorescence light emitted from the illuminated plane of interest | The objective lens determines magnification, numerical aperture (NA), and working distance. | Choose an objective lens with appropriate magnification and NA to achieve the desired resolution and field of view. |
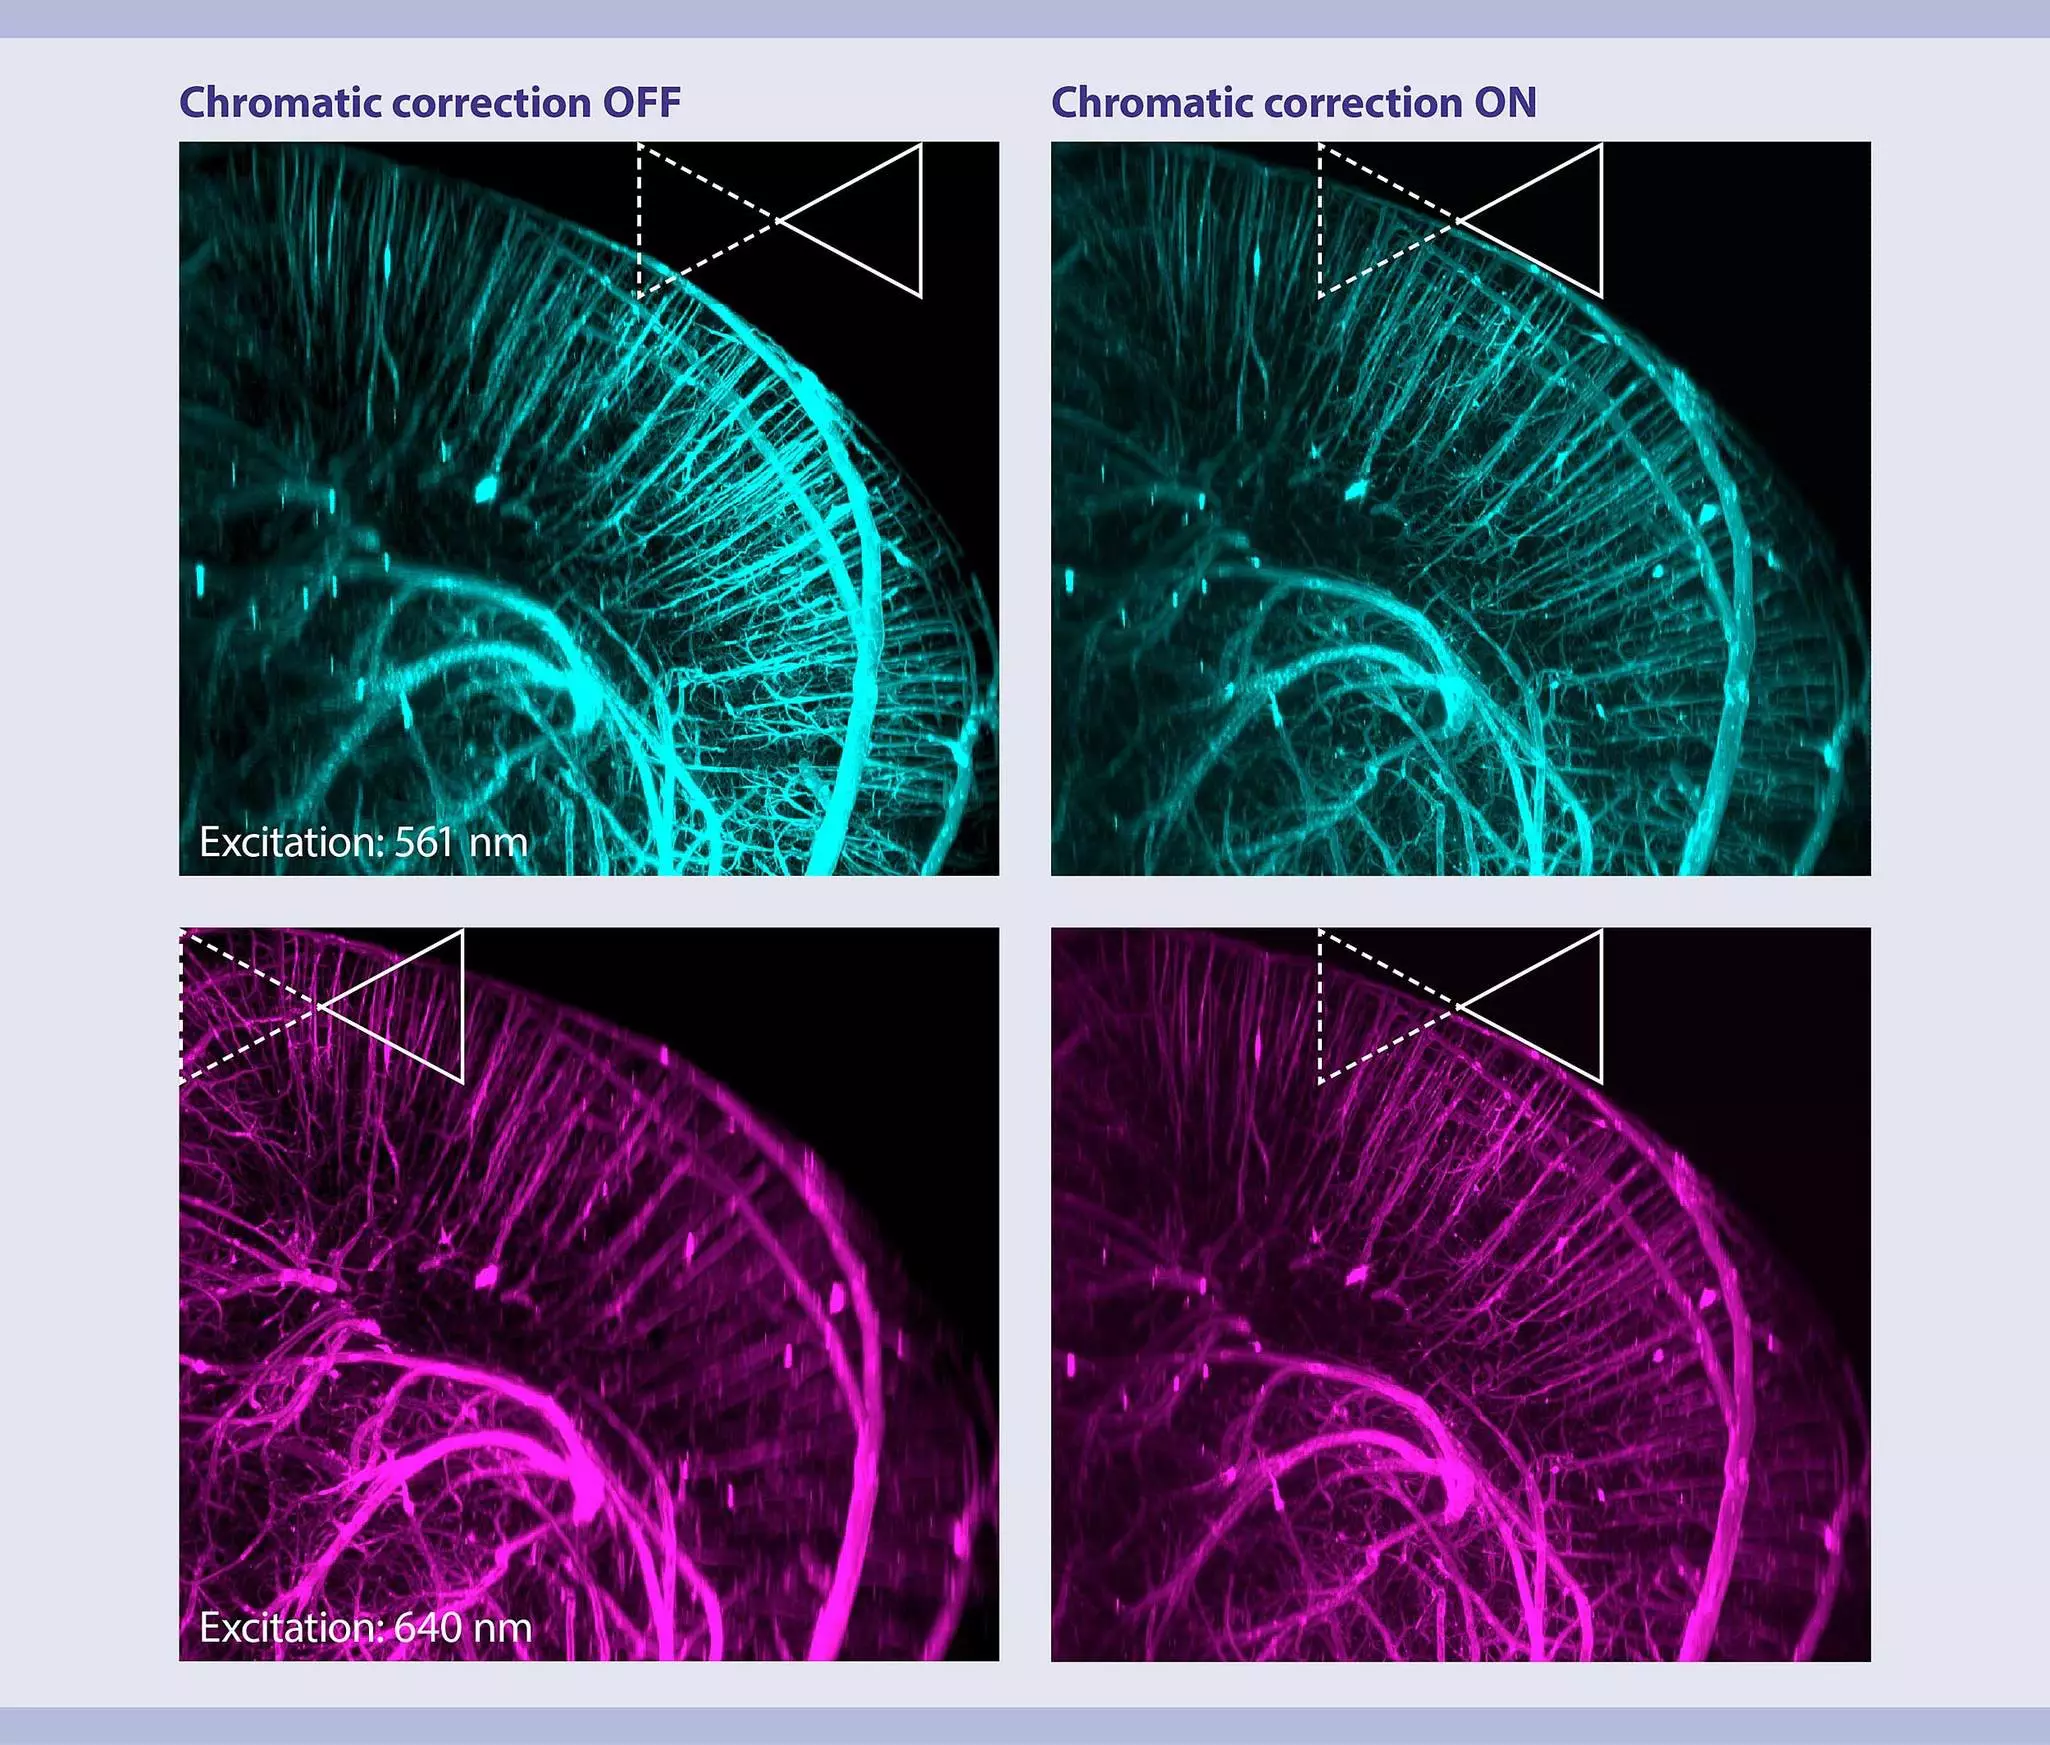
| Focus | Ensures accurate focus for each color channel. | Proper focus is essential for sharp, co-localized images, especially in multi-channel imaging. Different wavelengths of light can have slightly different focal planes due to chromatic aberration or minor variations in the optical path, even in well-aligned systems. This can result in some colors being slightly out of focus compared to others, leading to blurry or misaligned images in multichannel imaging (Fig X.) | Adjust manually with careful monitoring, or use automatic features like the UltraMicroscope Platform's automated focusing and chromatic correction functions. Autofocus ensures that all channels are in sharp focus, and chromatic correction compensates for shifts in the light sheet focus among channels, allowing for accurate colocalization and high-quality composite images (Fig. 8). |
| Light Sheet Width | Controls the laser power distribution along the Y-axis, following a roughly Gaussian profile. | Narrow widths focus power in the center of the field of view (FOV), while wider widths spread it more evenly. Wider settings can cause shadows by illuminating objects outside the field of view, which block or scatter light, leading to shadows, reflection or they become unnecessarily bleached. Narrower settings can reduce these issues but may lead to uneven illumination. | Adjust the width to balance the signal and minimize shadows or bleaching. The ideal width depends on sample size, magnification, and the number of sheets used. A good rule of thumb is to use the smallest sheet width that keeps intensity variation within 10% between the center and edges of the sample. |
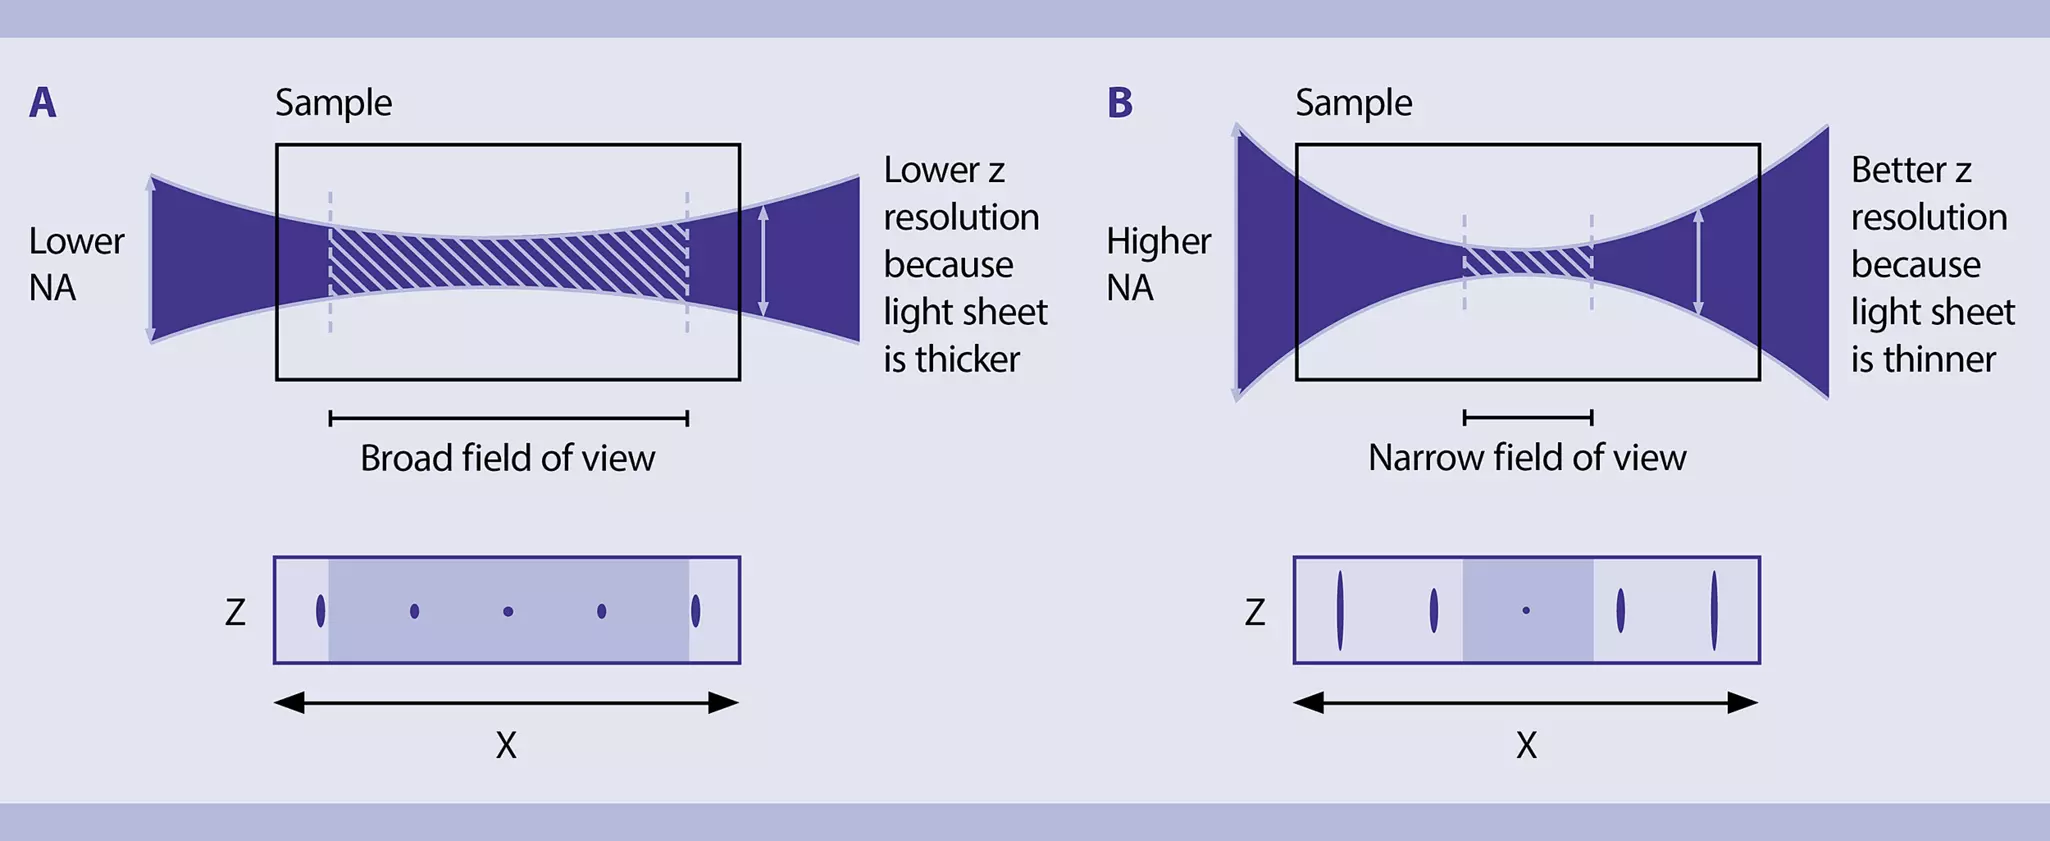
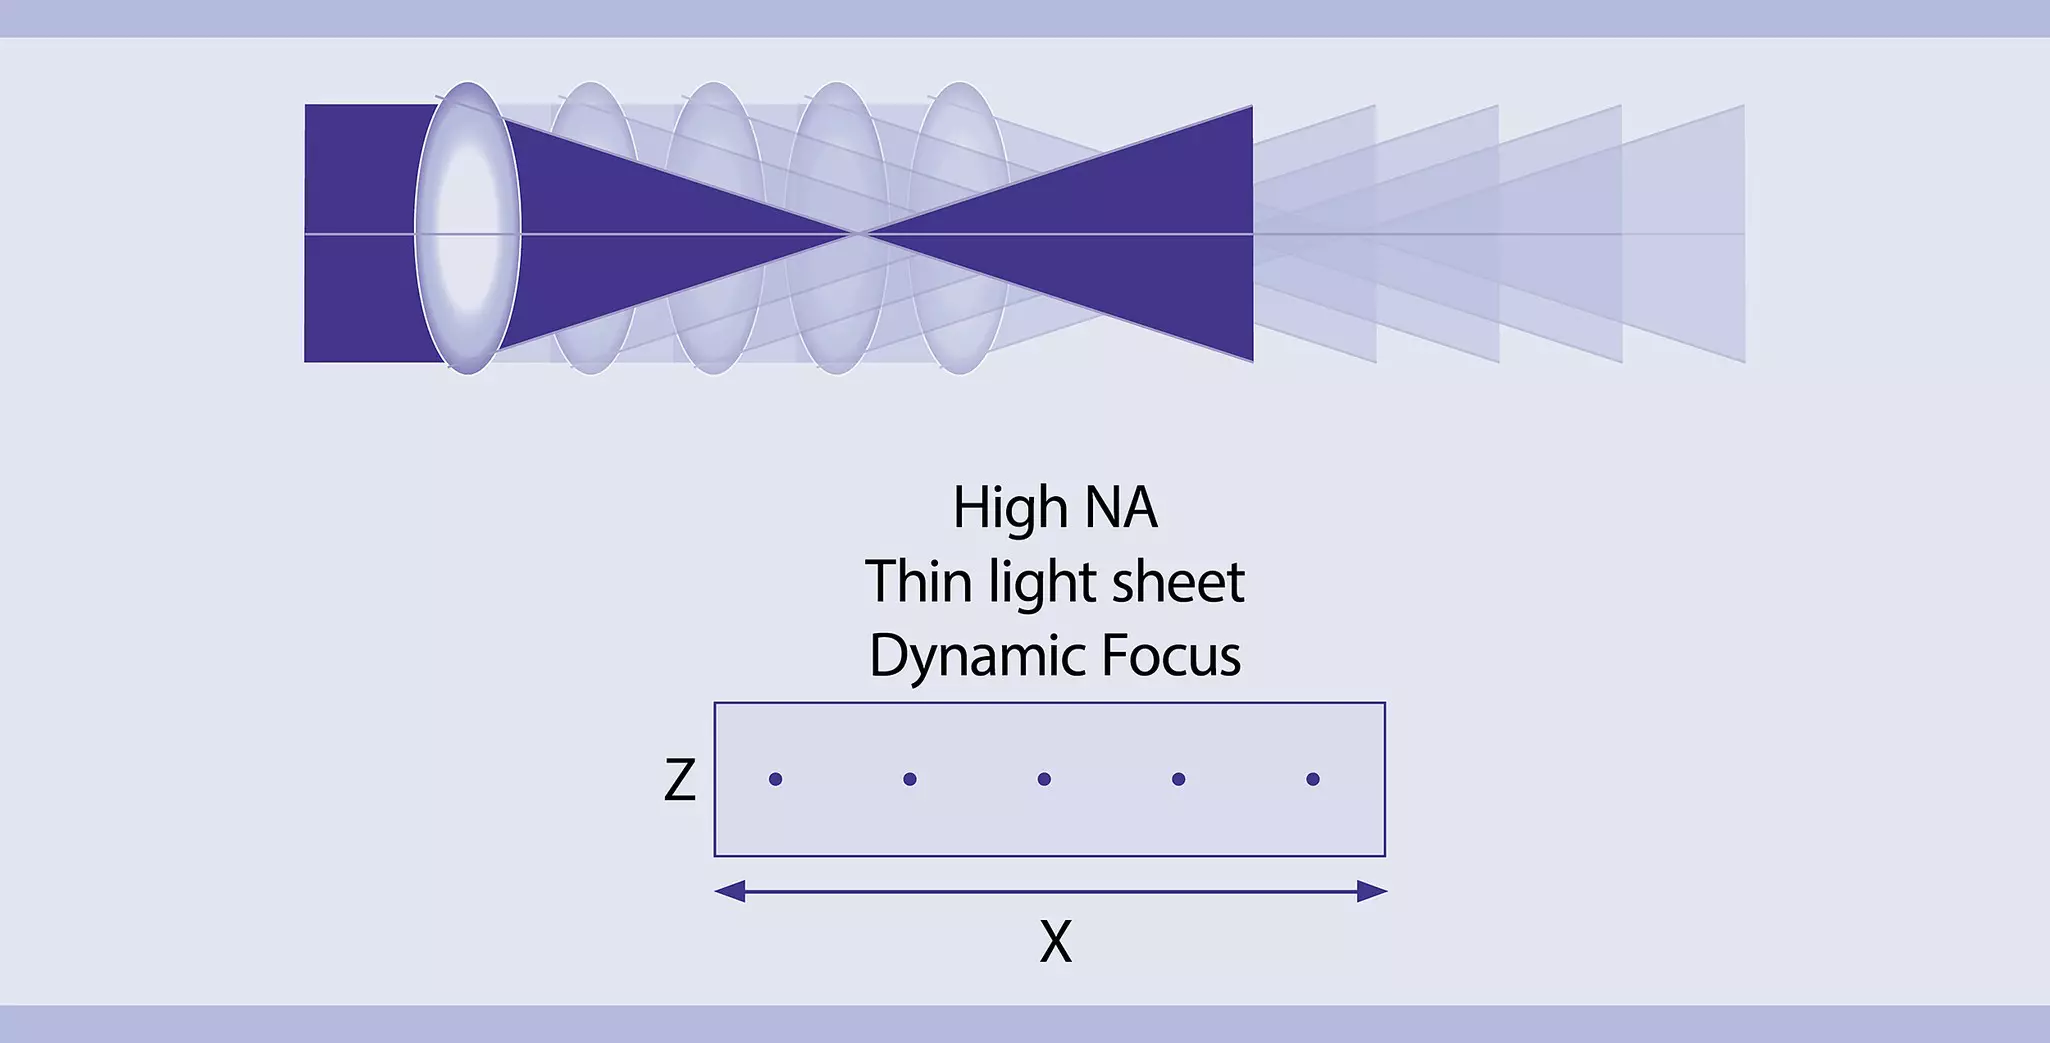
| Light Sheet Numerical Aperture (NA) | Determines the thickness and shape of the light sheet along the Z-axis. | The light sheet is thinnest at its "waist", where the Z thickness is minimal, and gradually thickens along the X-axis. The sheet’s thinnest point is determined by the numerical aperture (NA) of the optics producing it. A higher numerical aperture (NA) enhances resolution, particularly along the Z-axis, but results in a reduced Rayleigh length, leading to a narrower region of sharp focus. Conversely, a lower NA produces more uniform illumination across the image but sacrifices resolution. | Choose an NA that balances resolution and depth of field (fig. 9). To capture high-resolution images over a larger field of view, utilize features like the UltraMicroscope Platform's Dynamic Focus (fig. 10). For screening applications requiring higher speeds, utilize features like the UltraMicroscope Platform's Fast Tiling Scan. This mode accelerates image acquisition by replacing time-consuming light sheet optic movements with stage movement, while the sample remains stationary beneath a fixed camera ROI. |
| Illumination power | Controls the amount of light delivered to the sample. | Balanced settings optimize signal-to-noise ratio and minimize photobleaching. | Carefully balance laser power and exposure time based on the staining method used. Aiming for a minimum of 10,000 counts is recommended to ensure a favorable signal-to-noise ratio, which is essential for reliable data interpretation. To achieve optimal results, consider utilizing the option for individual exposure times for each color channel. This allows you to tailor the settings specifically to the characteristics of each fluorophore or staining reagent, as different dyes may have varying brightness levels and photostability. Additionally, when speed is a critical factor, it is advisable to keep exposure times as short as possible. |
| Z-step size | Determines the distance between consecutive Z-planes. | By using a step size smaller than the full thickness of the light sheet, the imaging system captures more detail along the Z-axis, which is particularly important for producing high-resolution 3D reconstructions. On the other hand, using a step size much smaller than half the light sheet thickness can result in excessive data collection, leading to longer acquisition times and larger file sizes without significant improvements in image quality. | Determine the appropriate z-step size to capture the desired resolution and avoid missing details. A good rule of thumb is to set the step size to half the thickness of the light sheet for optimal Z resolution. This ensures that the sample is imaged with sufficient overlap between successive slices, minimizing gaps in data collection. |
| Vibration isolation | Determines external influence of vibrations | The more isolated the microscope, the more image blurring and motion artifacts are prevented. | Minimize vibrations to ensure image quality. |
| Temperature Control | Maintains a stable temperature | A stable temperature prevents sample drift and thermal expansion. | Use temperature-controlled chambers, if necessary. |
4.2.2 Automation
All the technologies and features discussed so far aim to ensure the highest optical quality in a light sheet microscope. However, integrating all these capabilities can result in a significantly complex system, limiting its accessibility to experts or highly trained users. This complexity could hinder adoption by less microscopy-focused researchers or users in fields like pathology and preclinical studies, where ease of use and robustness are paramount. Ease of use is also crucial for systems in shared facilities, where multiple users with varying levels of expertise need to access the technology daily.
To address this challenge, the most advanced light sheet microscopes incorporate multiple automated features that enhance operational efficiency and simplify user interaction. These features reduce the need for manual adjustments, minimizing user-induced errors and streamlining workflows. Common automation includes:
- Automatic exchange of illumination and detection optics
- Motorized filter wheels
- Autofocus algorithms
- Tools for simplifying sample mounting and replacement during imaging sessions
Some systems even support batch measurements and automated processing pipelines, critical for high-throughput and reproducible applications.
While all these features might be overlooked by experienced microscopists, they are crucial for expanding the accessibility of light sheet microscopy and accelerating scientific discoveries across various fields.
The UltraMicroscope Blaze offers numerous automated functions, including motorized detection lens exchange, filter and post-magnification wheel control, single or multi-channel autofocus, chromatic correction in both illumination and detection, and the ability to execute batch measurements and processing workflows. These functions can be easily controlled through the intuitive instrument control software. Additionally, the Blaze features a convenient sample release mechanism, simplifying the sample exchange process.
4.2.3 Imaging speed
Speed is a critical factor in light sheet microscopy, especially for:
- Large-scale imaging: Acquiring extensive datasets covering larger volumes.
- High-throughput screening: Efficiently imaging numerous samples in rapid succession.
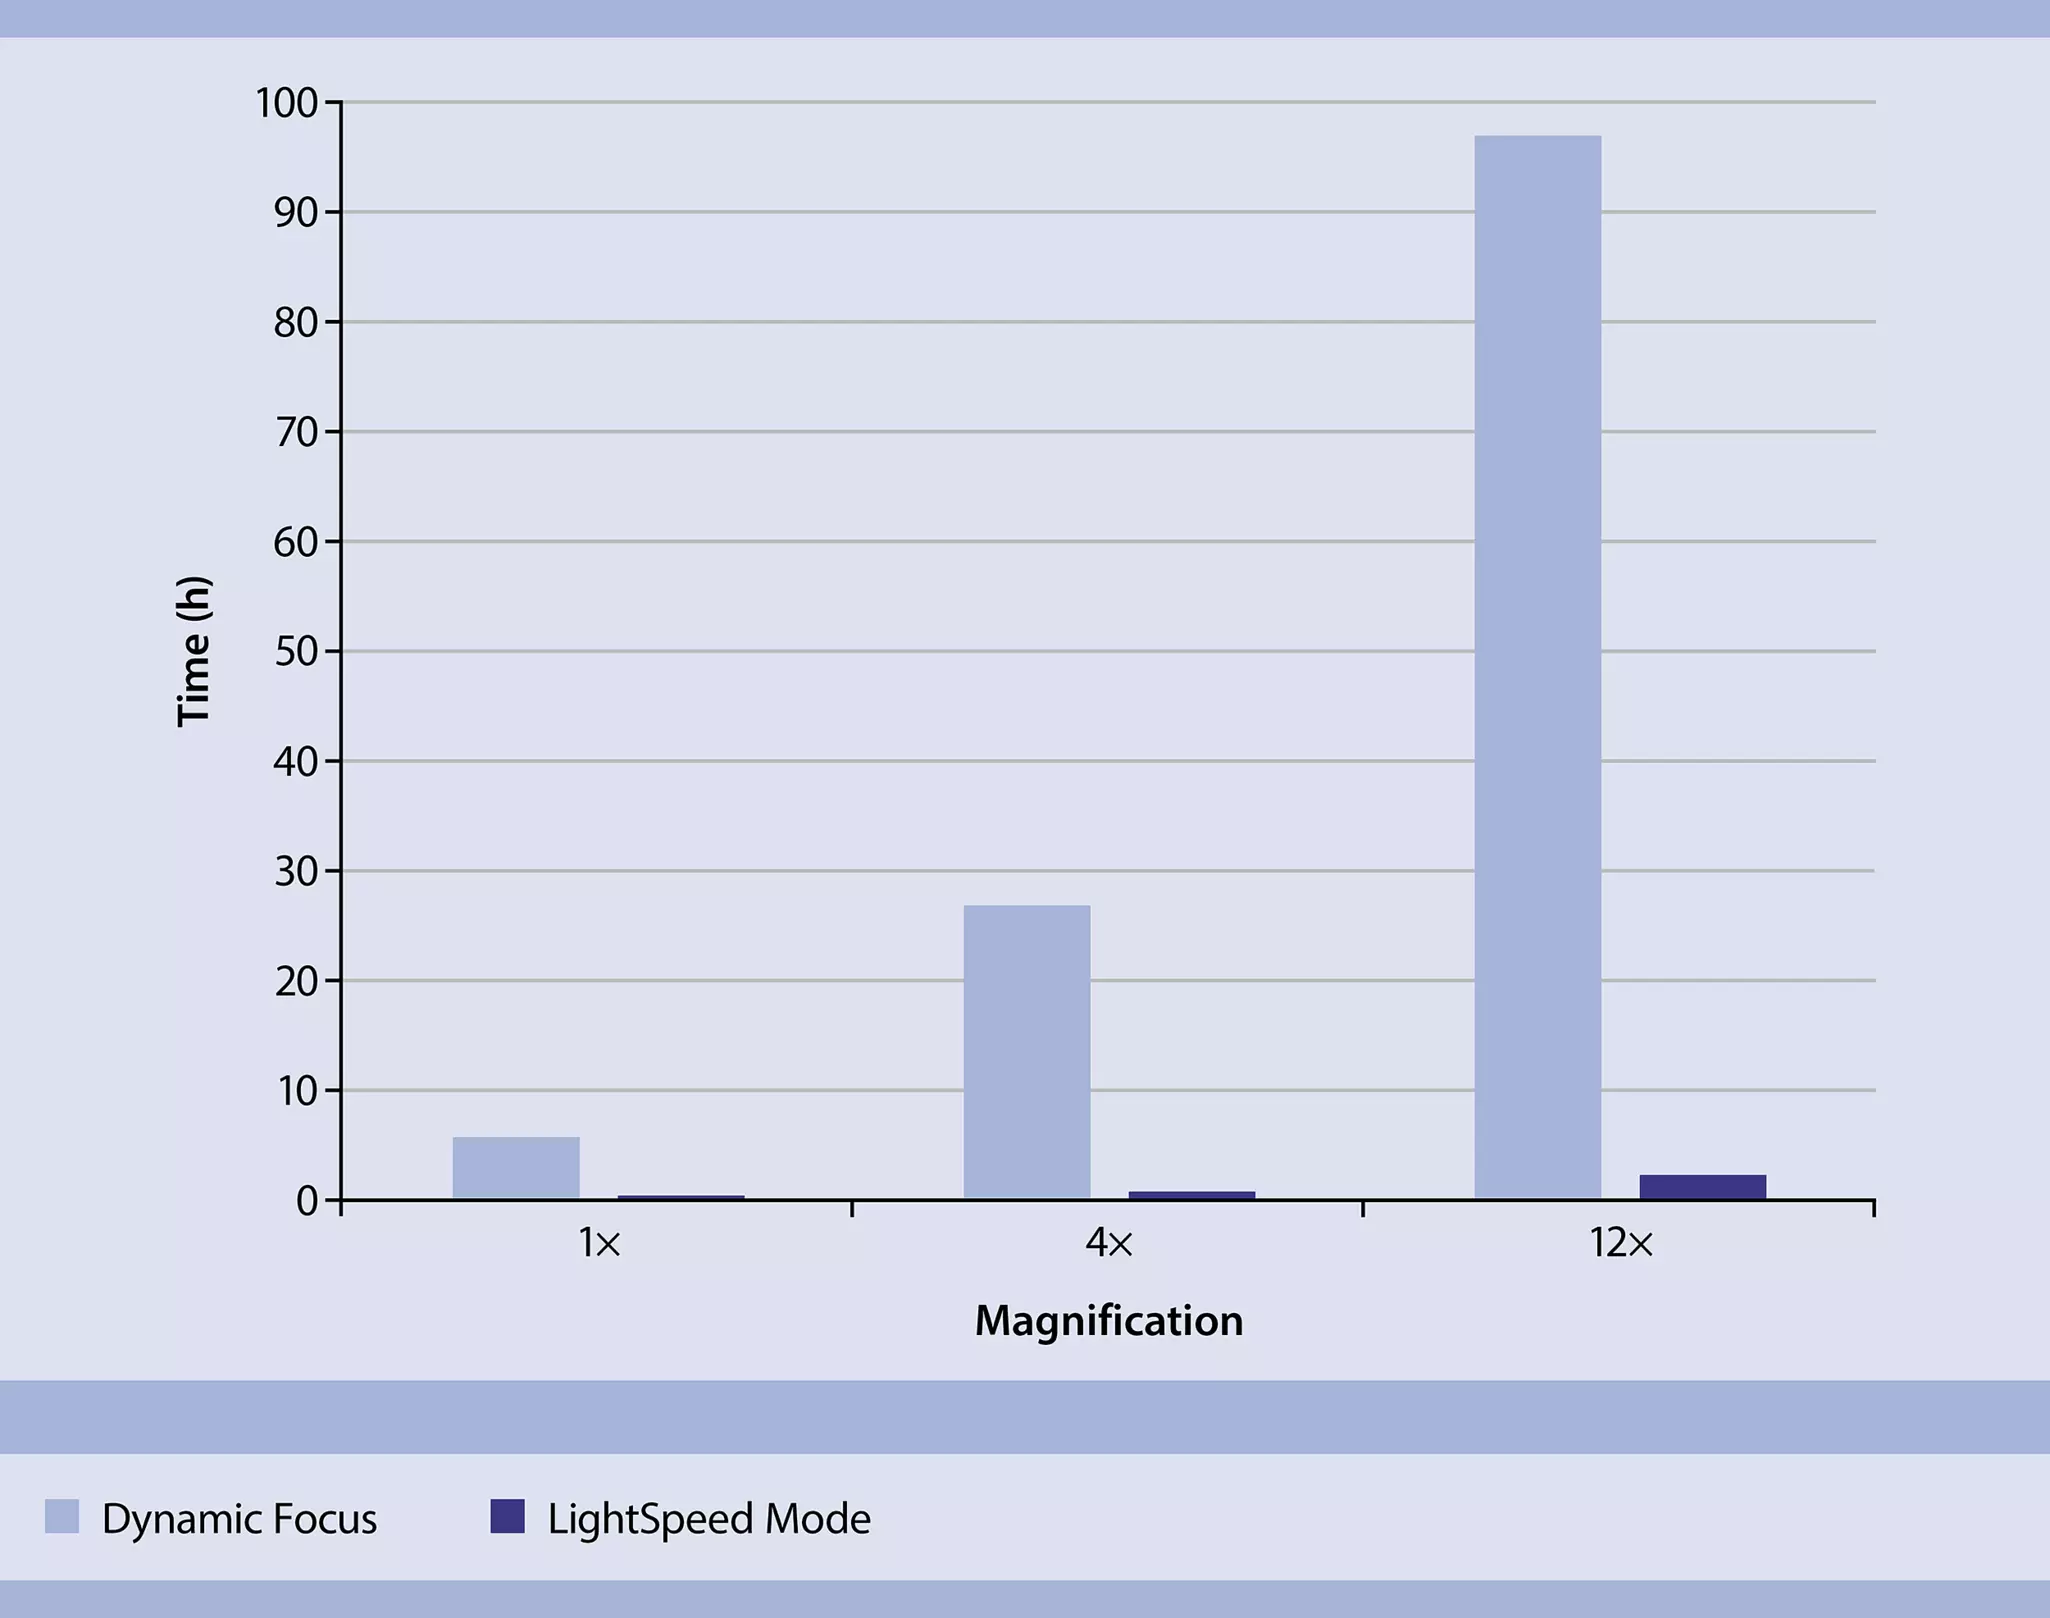
The UltraMicroscope Platform offers a specialized imaging mode, the LightSpeed Mode, designed to accelerate image acquisition compared to traditional z-stack methods. This mode can be employed in any scenario requiring z-stack acquisition and is particularly effective when combined with Fast Tiling Scan. Unlike conventional 'stop-and-stare' z-stack acquisition, where the stage pauses at each z-plane for image capture, LightSpeed enables continuous stage movement in the z-direction while simultaneously acquiring images (fig. 11). This innovative approach significantly reduces acquisition time, making it the fastest imaging method available on the UltraMicroscope Platform.
5 Image processing in light sheet microscopy
Light sheet microscopy generates large, multidimensional datasets that require specialized image processing techniques. These techniques are essential for extracting meaningful biological insights from the raw data. Typical challenges for image processing are:
- Stitching together large mosaic datasets
- Eliminating striping artifacts
- Improving low axial resolution.
Related PDFs:
Related products:
5.1 Image processing techniques for light sheet microscopy-generated data
Analyzing the large, complex datasets generated by light sheet microscopy requires sophisticated image processing techniques to extract meaningful insights effectively and accurately (table 9).
Table 9: Image processing techniques for light sheet microscopy-generated data
| Function | Description |
| Cropping | To manage the large datasets generated by light sheet microscopy, you can use cropping to define a region of interest (ROI) along the X, Y, and Z axes, which reduces file size and speeds up processing. |
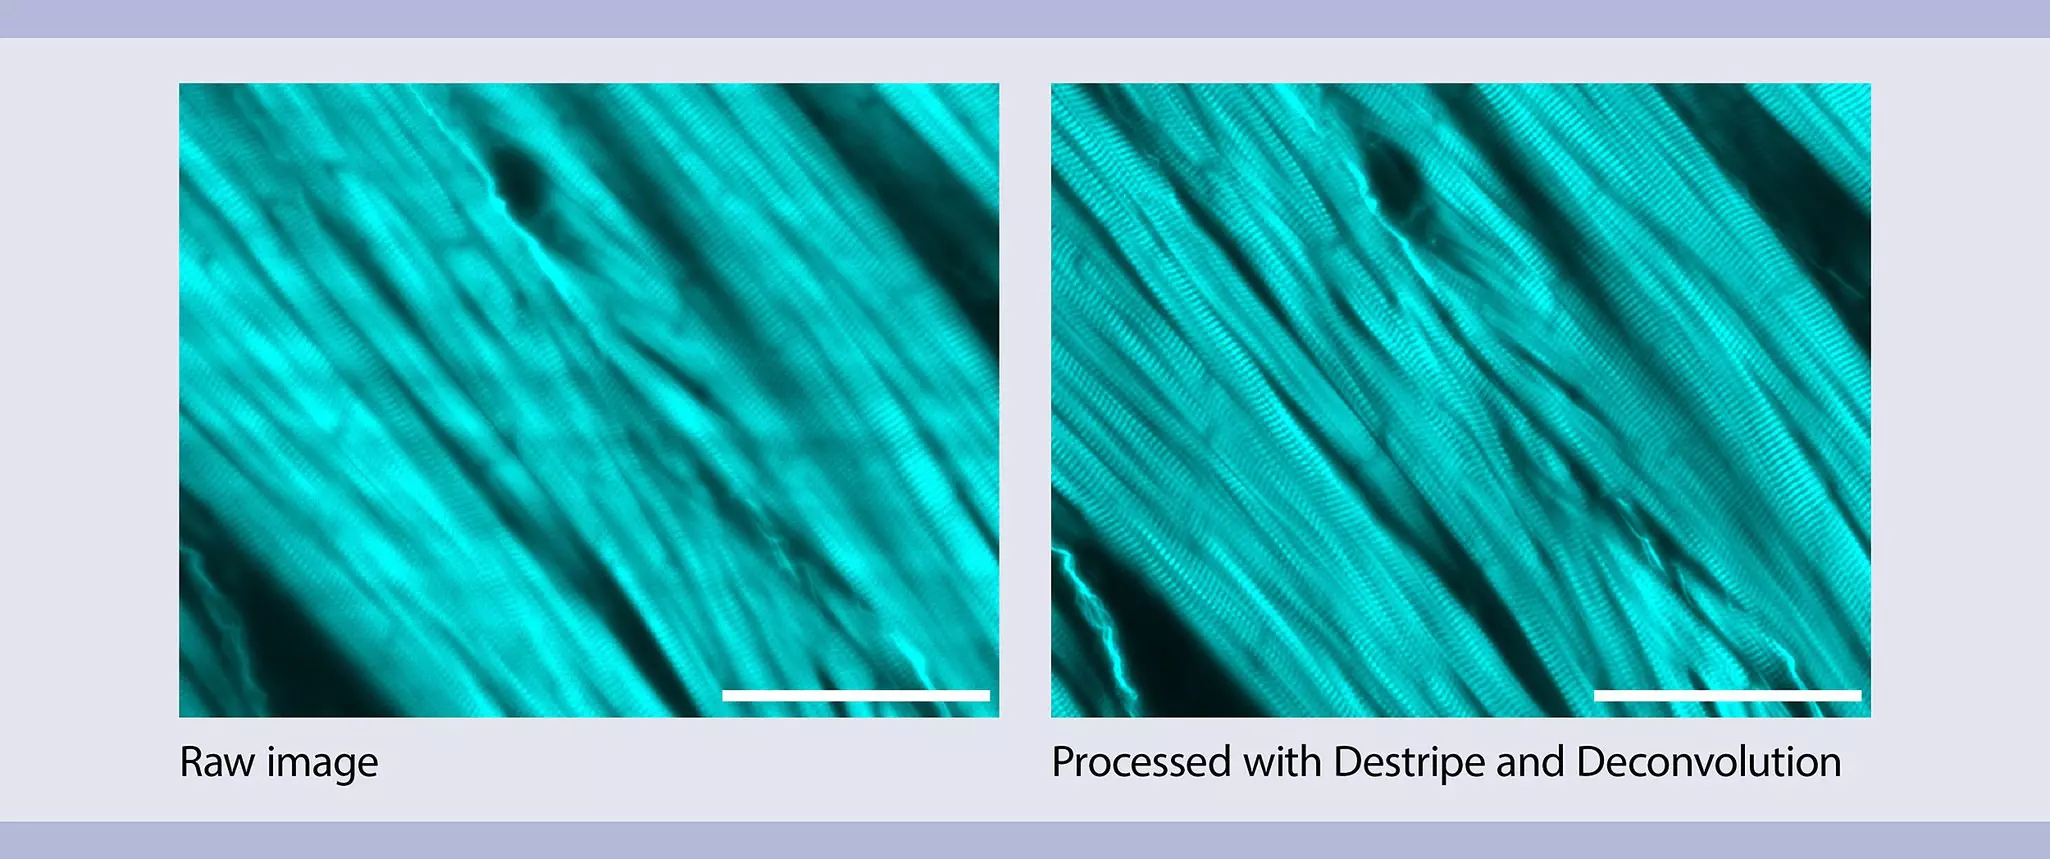
| Destriping | Light sheet microscopy can produce stripe artifacts due to light scattering or absorption by small structures. Destriping effectively identifies these artifacts and eliminates them while preserving the genuine sample features. |
| Denoising | Denoising reduces noise in the image while preserving fine details. By considering the specific noise characteristics of fluorescence microscopy, this method improves image quality and enables visualization of weak signals. |
| Deconvolution | Deconvolution enhances image resolution, particularly along the Z-axis, by correcting optical distortions and blurring caused by the light sheet thickness and the objective lens's point spread function (PSF). This process reveals hidden details, improving the scientific value of processed images and enabling precise spatial measurements, such as diameter and volume. |
| Stitching | Stitching combines overlapping 3D mosaic image tiles into a single, seamless, high-resolution 3D stack, enabling the visualization of large samples such as entire organs or organisms. |
| Contrast Compression | Contrast compression allows for visualization of both bright and dim structures in a single image. Contrast compression adjusts pixel brightness values individually while preserving the image's structure and topology. |
Options to access image processing techniques include open-source software, commercial software, and custom-built solutions leveraging programming libraries (compared in table 10).
Table 10: Options to access image processing techniques
| Access Option | Advantages | Challenges |
| Open-source software | Open-source software is free to use and highly customizable. It often comes with extensive plugin libraries developed by the scientific community. There are active user communities that share protocols and troubleshooting advice, making it ideal for researchers on limited budgets. | These tools can have a steep learning curve, particularly for users without programming experience. Customization options may be limited by the software's inherent framework, and while plugins are numerous, they are not always well-documented or regularly updated. This can sometimes lead to compatibility issues, especially when handling large datasets typical of light sheet microscopy. |
| Commercial software | Commercial software is often optimized for performance and equipped with user-friendly interfaces. It includes robust technical support, documentation, and training, which can significantly shorten the learning curve. | The software may lack specific processing techniques required for unique or highly specialized research. Licensing costs can be prohibitive, and customization is generally limited, meaning users may not be able to modify or add new functions easily. |
| Programming libraries | Using programming libraries allows researchers to design highly specialized pipelines tailored to specific research needs. | Building a custom solution requires programming expertise, particularly in image processing and machine learning. Developing a pipeline from scratch is time-intensive and can demand significant computational resources and specialized knowledge, which may not be available in all labs. Debugging and maintaining custom code can be challenging without dedicated support or experience. |
The UltraMicroscope Platform offers a dedicated software solution for processing images acquired with the UltraMicroscope Platform, MACS iQ View 3D Large Volume (fig. 12).
A unique feature of the software is the integration of the processing techniques mentioned above (Crop, Destripe, Denoise, Deconvolution, Stitching, and Contrast Compression) into a unified workflow. This allows users to process their images straightforwardly and efficiently. Additionally, the software allows you to see the unprocessed and processed data side-by-side to experiment with different settings and combinations of algorithms to find the best fit for your data.
The software supports batch processing, allowing users to queue and initiate various workflows across multiple datasets. This feature proves especially valuable when dealing with extensive datasets and imaging multiple samples, resulting in time savings and increased productivity.
6 Applications of light sheet microscopy
Light sheet microscopy, particularly when paired with tissue clearing techniques, revolutionizes 3D imaging of complex biological samples. The UltraMicroscope Platform is specifically engineered to deliver high-resolution imaging of very large, cleared samples, as well as high-throughput imaging of smaller ones.
Here, we delve into the pivotal applications of this technology and its significance in diverse clinical and pharmaceutical domains.
6.1 Thick or large cleared samples
6.1.1 Whole animal models (e.g. whole mouse)
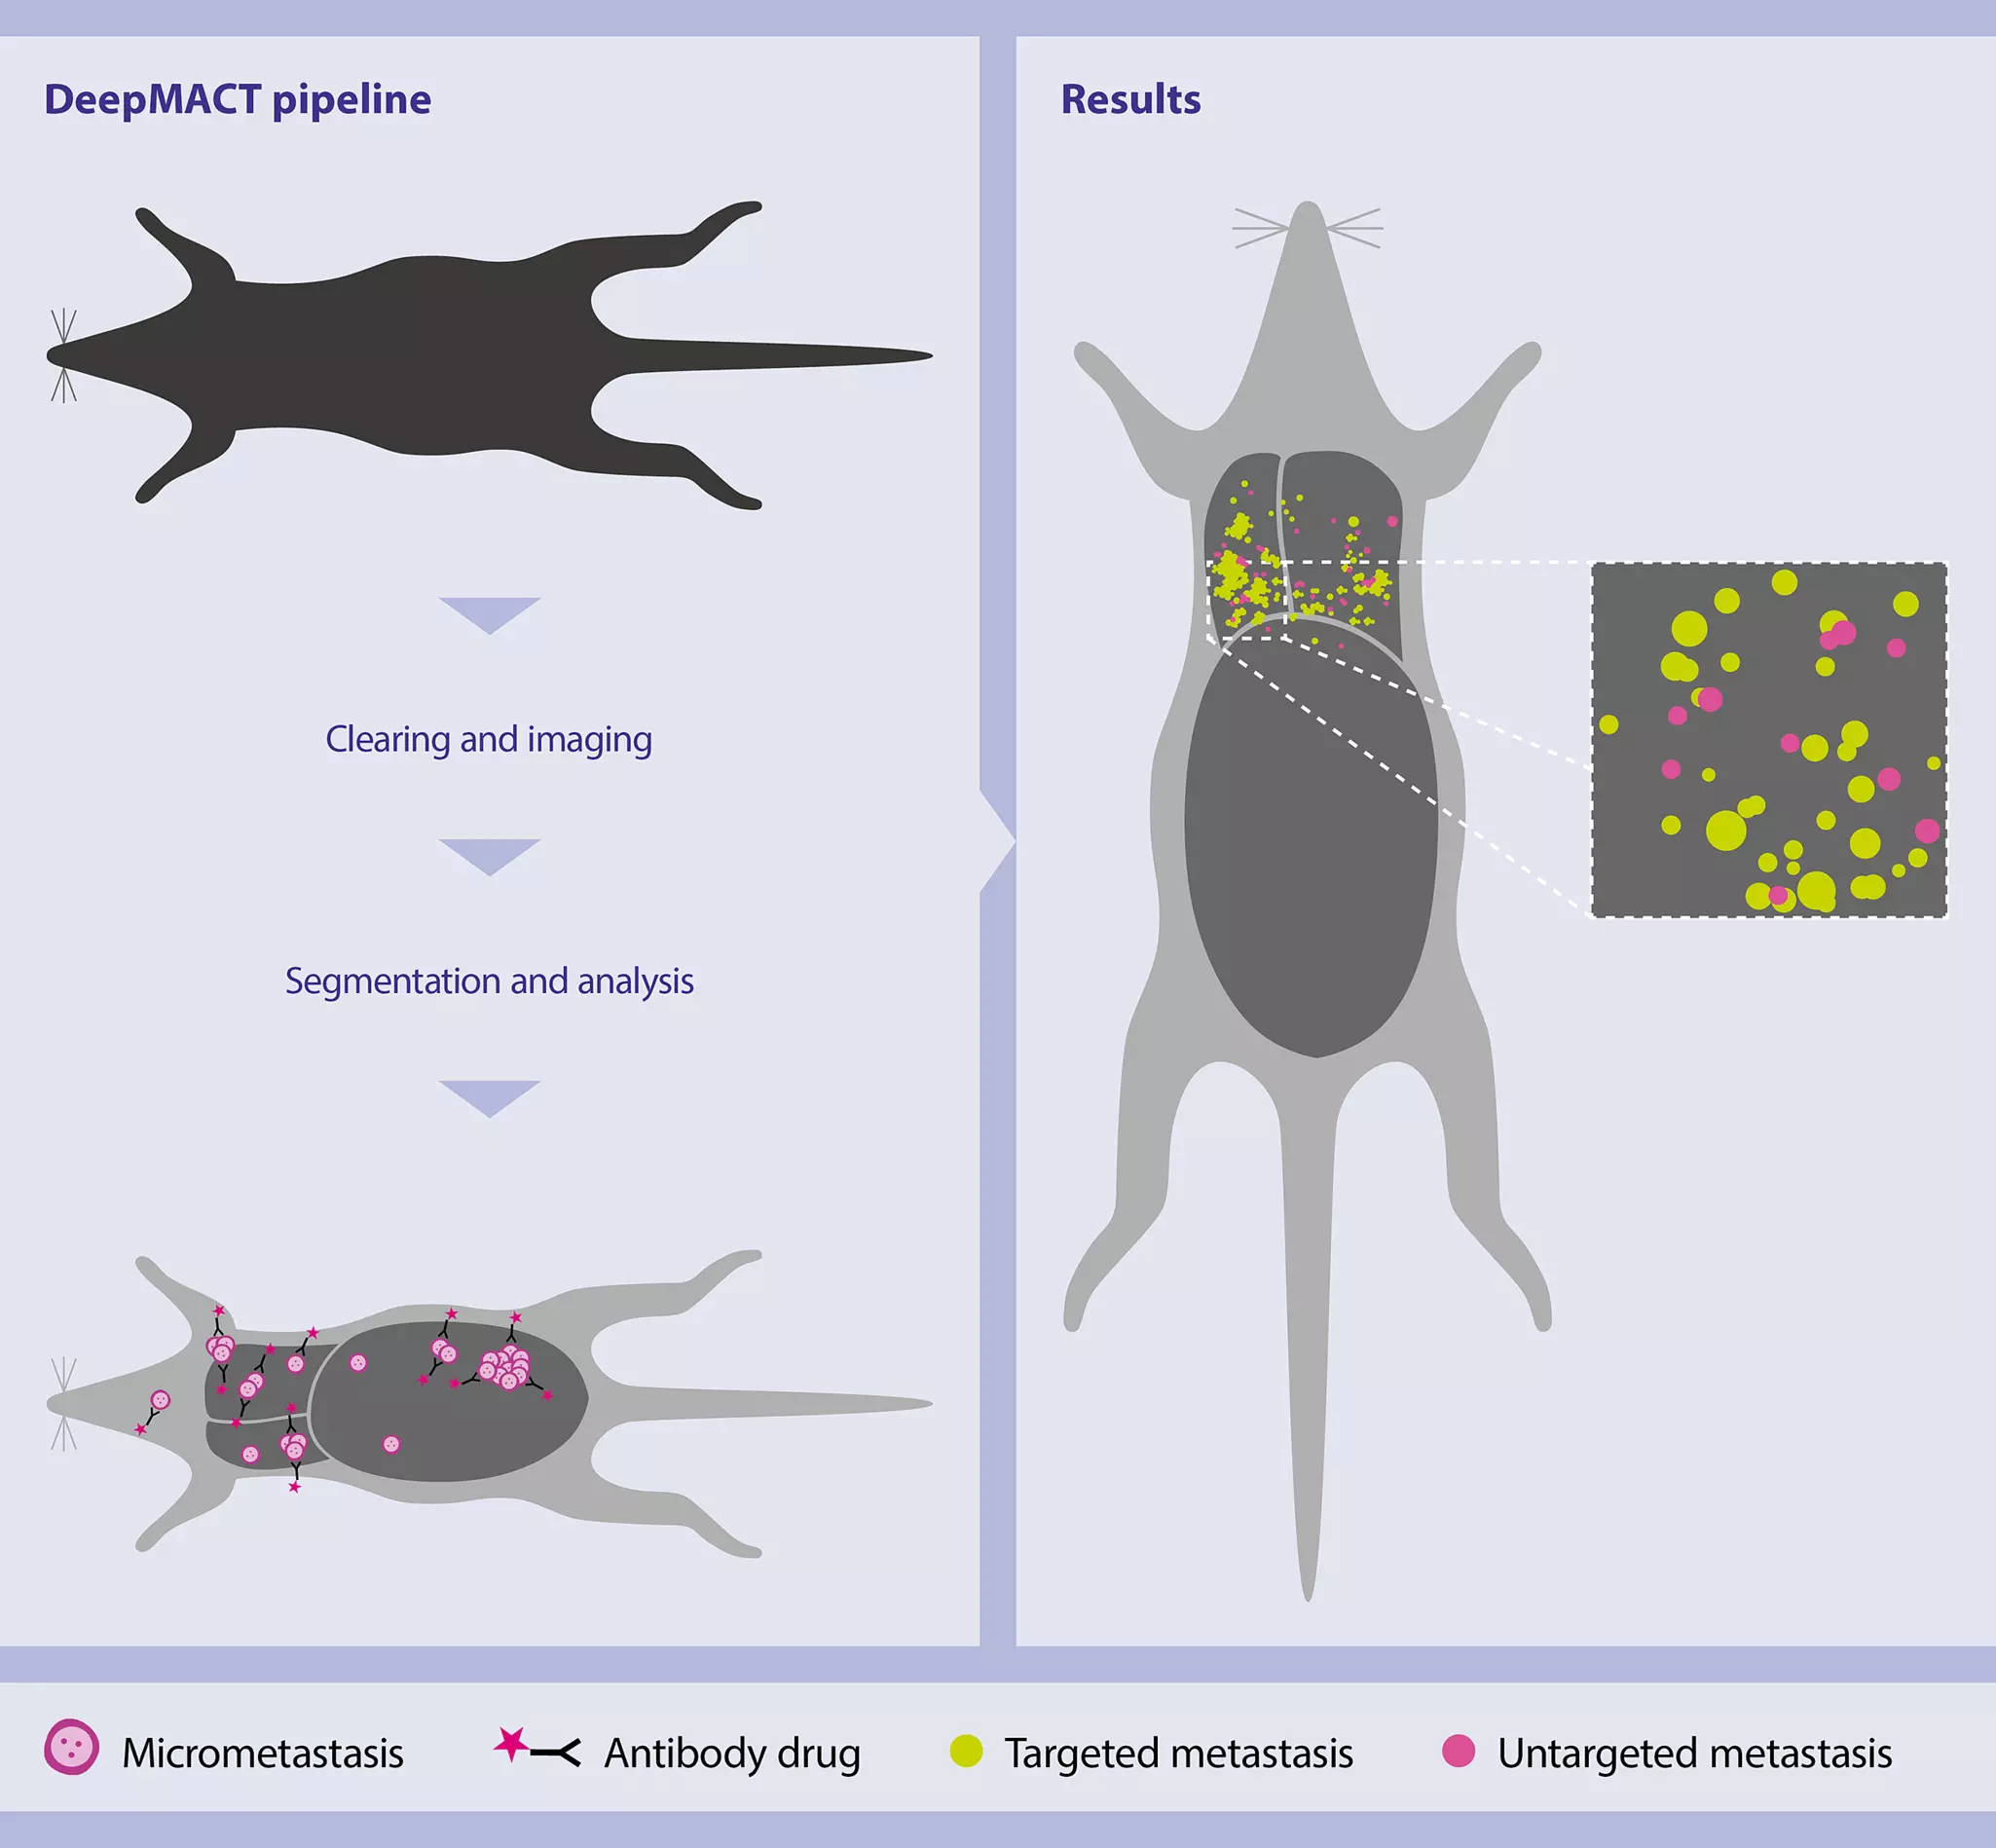
3D imaging of an entire mouse is critical for a holistic understanding of biological processes and disease dynamics. This approach provides an uninterrupted view of how cells, tissues, and pathologies are distributed across the intact animal. Whole-mouse imaging with light sheet microscopy[1] allows for detailed visualization of physiological and pathological changes[2], including developmental processes, cancer metastasis, and systemic drug responses, without the need for dissection or physical sectioning (fig. 13).
Preclinical drug discovery:
The lack of resolution and sensitivity in traditional preclinical studies often hinders efficient drug testing for diseases and cancer treatments, especially in cases involving multi-organ pathologies. Whole-body 3D analysis at single-cell resolution improves the identification and development of more effective drug candidates, increasing the success rate and reducing the costs of clinical trials.
By obtaining high-resolution and high-sensitivity 3D datasets, researchers can optimize pre-clinical studies and save costs through an unbiased approach. This is crucial for accelerating drug discovery and development.
6.1.2 Human organs
While imaging entire human organs presents greater challenges due to their size, light sheet microscopy, when combined with tissue clearing techniques, can still be applied to large organs such as the human heart, kidney, lung, and pancreas[3]. The UltraMicroscope Platform enables high-resolution 3D reconstruction of cellular and subcellular structures within these organs.
Human pathology and biopsy studies:
Imaging cleared human organs offers a comprehensive view of healthy and diseased tissue architecture, aiding in research on organ-specific diseases like cancer, liver cirrhosis, and cardiovascular conditions. This is particularly valuable for:
- Precisely defining tumor margins
- Studying organ development and regeneration
- Personalizing treatments based on individual organ structure
By providing detailed insights into tissue morphology and cellular interactions, light sheet microscopy empowers researchers to unravel the underlying mechanisms of disease and develop innovative therapeutic strategies.
6.1.3 Whole mouse brain and spinal cord
The central nervous system (CNS) is a complex organ system that has been extensively studied in neuroscience. 3D imaging is crucial for visualizing its intricate neural networks. Light sheet microscopy offers detailed reconstructions of brain and peripheral structures, including neuronal circuits, blood vessels, and glial cells, without the need for tissue sectioning (fig. 14).
Brain anatomy and pathology:
Understanding brain anatomy and pathology in its full 3D context is essential for:
- Identifying mechanisms underlying developmental and neurodegenerative diseases like Alzheimer's[4] and Parkinson's[5].
- Mapping of neural connections and circuits[6], essential for understanding brain function.
- Drug discovery and development by providing a comprehensive view of drug efficacy and potential side effects on brain tissue.

6.1.4 Whole mouse organs and tumors
Light sheet microscopy enables comprehensive imaging of individual organs[7], such as the liver, kidneys[8], and lungs, as well as thick tissues like lymph nodes[9] or solid tumors. This technique provides detailed information on their complete structures at cellular resolution. This is particularly important when analyzing highly heterogeneous tissues like cancer[10], where cellular identities can vary significantly across different regions, potentially leading to biased results in region-specific approaches (fig. 15).
Drug development:
Whole-organ imaging provides critical insights into how drugs interact with different organs and helps in identifying off-target effects in drug development. It is crucial in:
- Evaluating drug toxicity.
- Studying organ-specific diseases (e.g., liver fibrosis, kidney disease).
- Tracing the effects of therapeutic interventions in animal models.

6.2 High-throughput 3D imaging
High-throughput 3D imaging is essential for accelerating scientific discovery and drug development. Light sheet microscopy enables the rapid and efficient analysis of large numbers of samples.
6.2.1 3D imaging of organoids and spheroids
Organoids, 3D miniaturized versions of human organs grown from stem cells, are powerful models for studying organ development, disease processes, and drug responses. The UltraMicroscope Platform, combined with MACS® UltraMount 48 Sample Holders, enables high-throughput imaging of multiple organoids simultaneously, allowing researchers to monitor their development and structure over time (fig. 16).
Drug discovery and screening:
Organoids are revolutionizing personalized medicine by providing a platform for testing drugs on patient-derived cells, leading to more tailored and effective treatments. In clinical research, organoids mimic human tissue function and disease states, making them ideal for testing the efficacy and toxicity of drugs in a high-throughput manner. This accelerates drug discovery and reduces the need for animal models, offering a more ethical and relevant alternative. Additionally, high-throughput imaging of organoids allows for rapid screening of large numbers of drug compounds, facilitating faster identification of potential therapies for various diseases.

6.2.2 3D imaging of xenografts
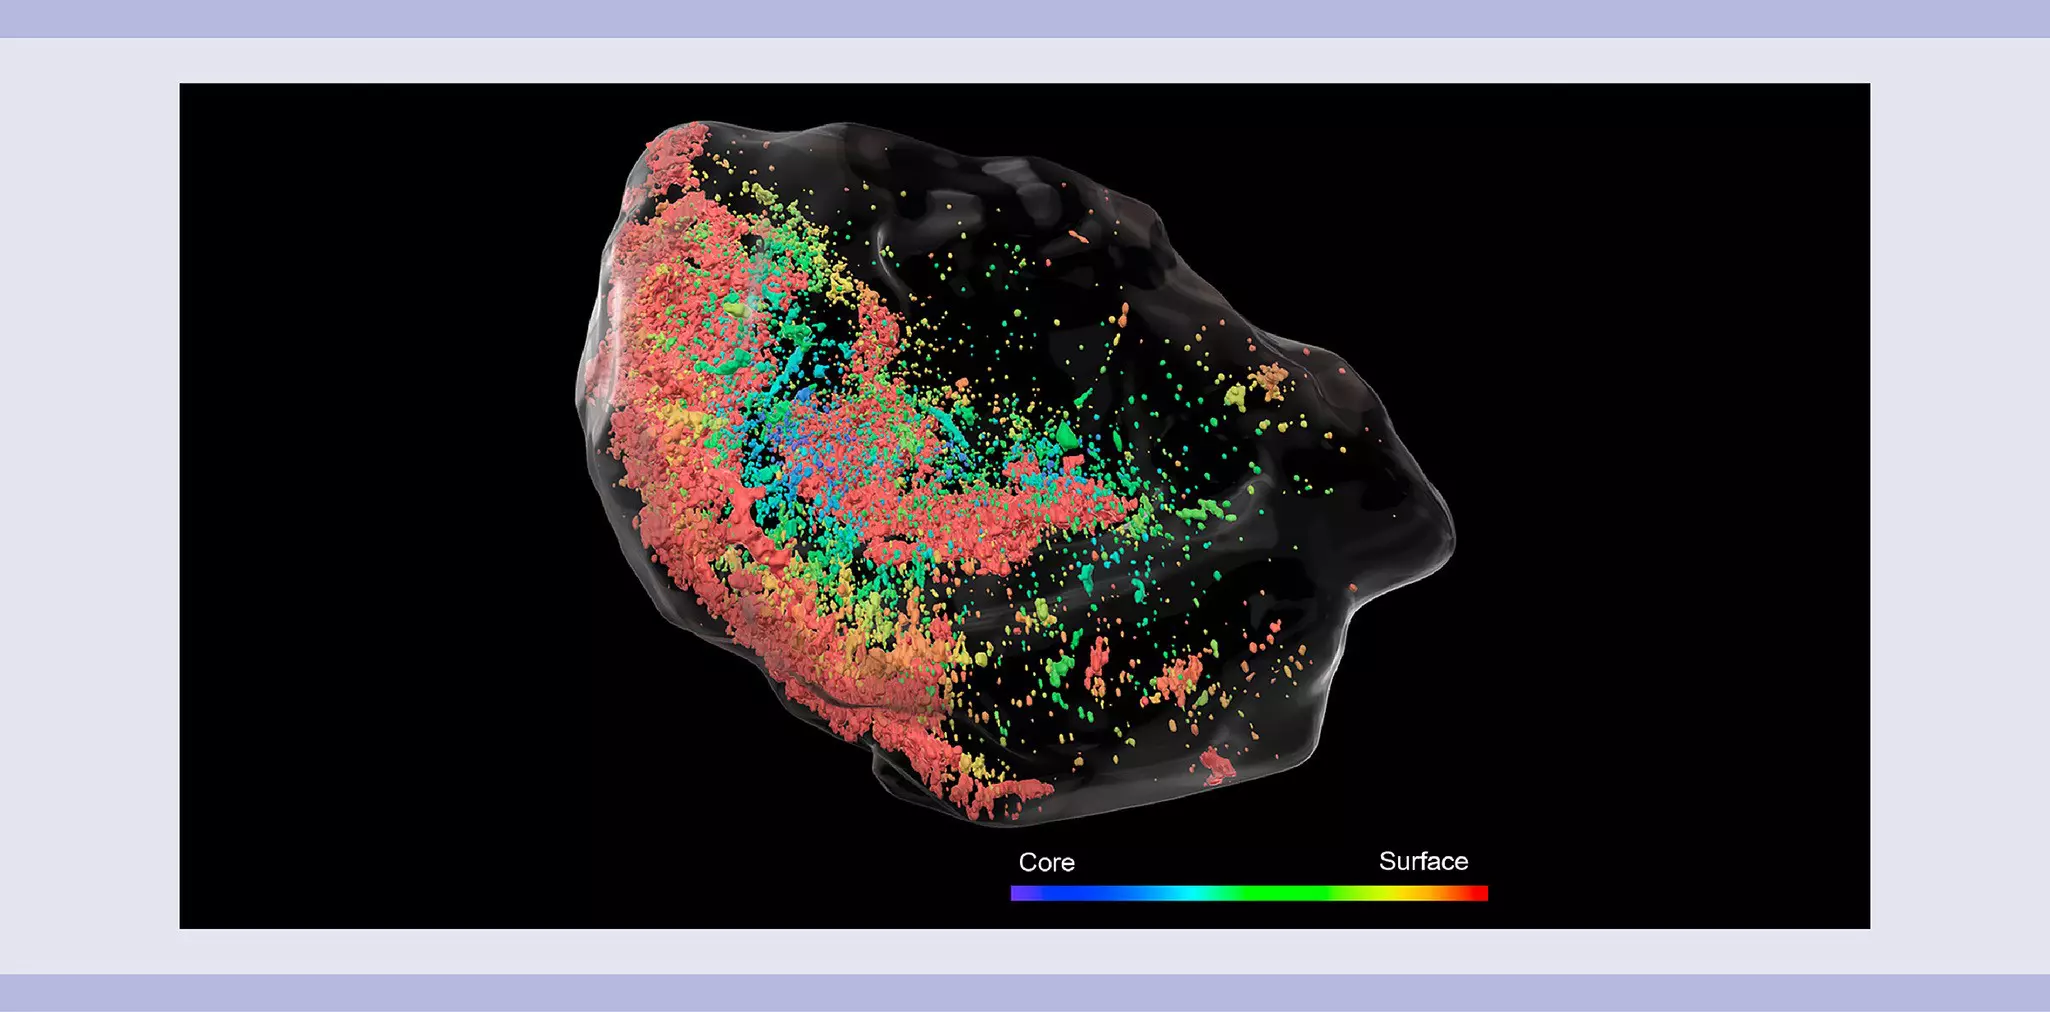
Xenografts involve implanting human tumor cells into animal models, typically mice, to study tumor biology and evaluate new cancer therapies. Light sheet microscopy offers a unique advantage by providing 3D imaging of multiple xenografts in a single imaging session, revealing the tumor's structure, growth, and interactions with surrounding tissues. The UltraMicroscope MACS® UltraMount 12 accommodates up to twelve xenografts in one run, streamlining the imaging process (fig. 17).
Drug development in cancer research:
Xenograft models are a cornerstone in cancer research, allowing scientists to test the efficacy of new drugs and study tumor behavior in a living system. High-throughput 3D imaging of xenografts enables researchers to:
- Assess how tumors respond to treatments[11].
- Monitor metastasis.
- Investigate changes in the tumor microenvironment, such as angiogenesis and immune infiltration[12].
This detailed imaging accelerates the evaluation of cancer therapies, supporting faster clinical translation and more personalized approaches to cancer treatment.
6.2.3 Multiple mouse brains
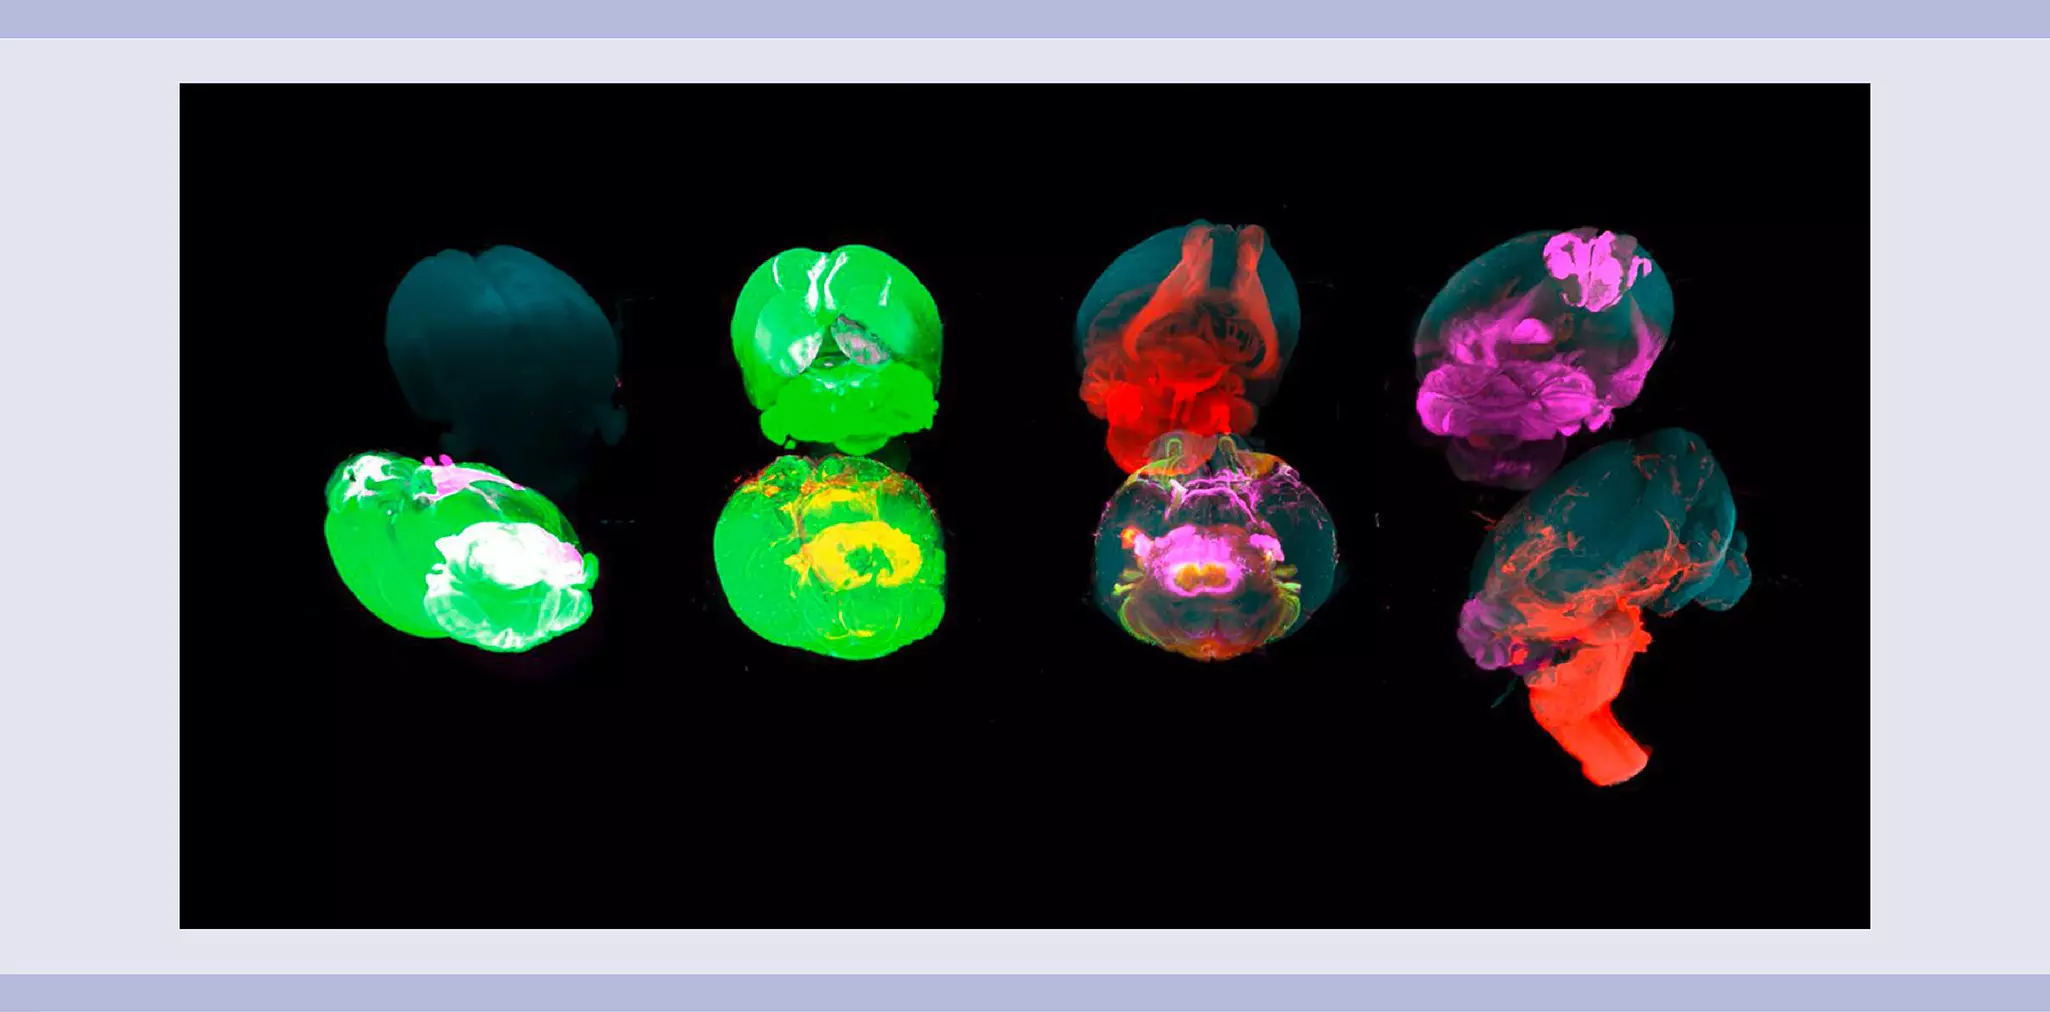
Advanced sample holders like the UltraMicroscope MACS UltraMount 8 Sample Holders allow light sheet microscopy to accommodate and image up to eight mouse brains simultaneously. This capability is particularly advantageous for studies requiring analysis of a large number of brain samples. The generated 3D images provide detailed insights into brain structure, neural connectivity, and potential pathological changes (fig. 18).
Large-scale studies:
Imaging of multiple mouse brains is pivotal for large-scale studies of neurodegenerative diseases, brain injuries, and psychiatric disorders. Researchers can rapidly and efficiently compare brain structures across different experimental conditions or treatment groups. For instance, in Alzheimer's research, imaging multiple brains helps identify subtle changes in brain regions, such as hippocampal atrophy or amyloid plaque deposition, across various treatment protocols. This accelerates the discovery of potential drug candidates by providing robust data on how experimental therapies impact brain health and function, ultimately supporting the development of more effective treatments for neurological diseases.
6.3 Light sheet microscopy as complementary approach to spatial biology
Spatial biology is an emerging field that studies the spatial organization of cells and molecules within tissues to better understand complex biological processes. Current spatial biology platforms often rely on a limited number of thin tissue sections, potentially missing critical contextual information present beyond the chosen sections. Identifying the optimal tissue plane to define regions of interest is particularly challenging, especially in complex tissue samples like tumors with heterogeneous cellular compositions and spatial arrangements.
Light sheet microscopy offers a promising complementary approach to spatial biology, termed light sheet guided histology. By first acquiring a full 3D view of the specimen, researchers can identify target regions and then selectively section the tissue for downstream spatial analysis (fig. 19). This approach allows for:
Overview of complex large samples[9]: Gaining a comprehensive understanding of the tissue's overall structure.
Targeted selection of regions of interest[13]: Focusing on specific areas within the sample.
In-depth analysis with multiple markers[11]: Performing detailed analysis on carefully selected regions using advanced spatial profiling techniques.
This integrated approach maximizes the value of each precious sample, enabling a more comprehensive and accurate understanding of complex biological systems.

Related products:
You have previously chosen International as your location.
What do you want to do?