RNAsky® FFPE Sample Preparation Guide: RNA detection on the MACSima™ System
This protocol describes step-by-step the preparation and mounting of tissue sections derived from formalin-fixed, paraffin-embedded (FFPE) tissue samples before an RNAsky Assay. The RNAsky Assay enables sensitive and specific detection of RNA targets in their spatial context using the MACSima System. The MACSima System is a fully automated instrument capable of same-section, high-plex protein and RNA detection using the MACSima Imaging Cyclic Staining (MICS) technology.
Protocol
100 min
Tissue sectioning and mounting
60 min
Deparaffinization
20 min
Antigen retrieval
10 min
MACSwell™ Assembly
Protocol

2.1 Tissue sectioning and mounting
- To ensure optimal RNA quality and reliable assay performance, always prepare fresh tissue sections immediately before starting the RNAsky protocol. Avoid using pre-mounted or stored sections, as RNA degradation may compromise the results.
- Wipe all surfaces and work areas with RNase AWAY®. Let dry completely.
- Set the incubator to +60 ºC in preparation for the next steps.
- Fill a water bath with Milli-Q® water and heat to +42 °C.
▲ Note: This is the recommended temperature that applies to most tissue blocks. Specific tissue types might require temperature optimization. - Take the FFPE tissue block. If the block is new, trim back paraffin in 15 µm sections until all edges of the tissue are clearly visible, and a representative section can be cut. If the block has been previously cut, proceed immediately to step 5.
- Place tissue sample cassette wax side down in +4 ºC Milli-Q® water for 10–30 min to rehydrate the tissue. Any clean plastic container (e.g. tip box lid) wipped with RNAse AWAY® can be used to place the sample cassette for rehydration.
▲ Note:The rehydration time is tissue type-dependent, as different tissues will soak up water at varying rates. Tissue blocks should be monitored throughout the process. Start with the minimum soaking time and prolong rehydration if necessary. Once sufficiently hydrated, the tissue surface will appear glossy and smooth. - Once the tissue has been rehydrated, gently place the cassette face down in ice for five minutes to re-chill the sample.
- Tissue sectioning on the microtome: Wipe the blade with absolute ethanol before loading the blade into the blade holder. Always use new blades for sectioning to avoid cross-contamination of samples.
▲ Note: For safety reasons, please follow the instructions of the microtome blade. - Place the blade in the holder, ensure it is secure, and set the clearance angle according to the microtome manufacturer’s instructions.
- Place the rehydrated cassette in the specimen holder and align it with the blade.
- Cut sections to the desired thickness. For optimal results, 5 µm is recommended.
- Use tweezers and/or a brush to pick up the section or ribbon of sections. Gently float them on the surface of the water bath to flatten out. If necessary, use forceps to separate sections. Using a water slide filled with Milli-Q® or nuclease-free water to transfer sections into the water bath might facilitate the slide transference.
- Mount the required number of sections onto a MACSwell HighRes Slide as described below.
▲ Note: Always use the MACSwell HighRes Slide positioning template which indicates the optimal position of the tissue sections on the slide.
▲ Note: Assure that the lettering on the MACSwell HighRes Slide is legible and facing upwards as the sample needs to be positioned on the flat side.
▲ Note: The selection of the MACSwell Imaging Frame depends on the sample size and experiment design. If a MACSwell Four Imaging Frame is selected, the tissue sections can only be placed on the two middle wells. The MACSwell HighRes Slide only allows the use of the two middle wells of the MACSwell Four Imaging Frame. - Submerge the MACSwell HighRes Slide correctly aligned with the positioning template into the water bath with the floating tissue sections (figure 2A). Alternatively, use the positioning template to precisely draw the imaging area where the tissue section should be mounted according to the selected MACSwell Imaging Frame on the back of the MACSwell HighRes Slide.
▲ Note: Always use the positioning template supplied with MACSwell HighRes Slides to precisely mount the tissue section within the MACSima Imaging area. Refer to the data sheet of MACSwell HighRes Slides for more information.
▲ Note: Tissue repositioning should be avoided. - Use tweezers and/or a brush to gently position the tissue section on the precise area that corresponds to the selected MACSwell Imaging Frame (figure 2B).
- Slowly raise the slide from the water bath (figure 2C) and ensure that the tissue slide is correctly mounted as indicated on the positioning template (figure 1, figure 2D).
- Incubate the MACSwell HighRes Slides with the sections for 1 hour in an incubator at +60 °C.
▲ Note: If the tissue shows a tendency to detach, extend the incubation time at +60 ºC (not exceeding 24 hours).
▲ Note: Make sure that the incubator holds the temperature accurately and consistently. - Immediately proceed to the next step 2.3 or alternatively store the samples as recommended in section 2.2.
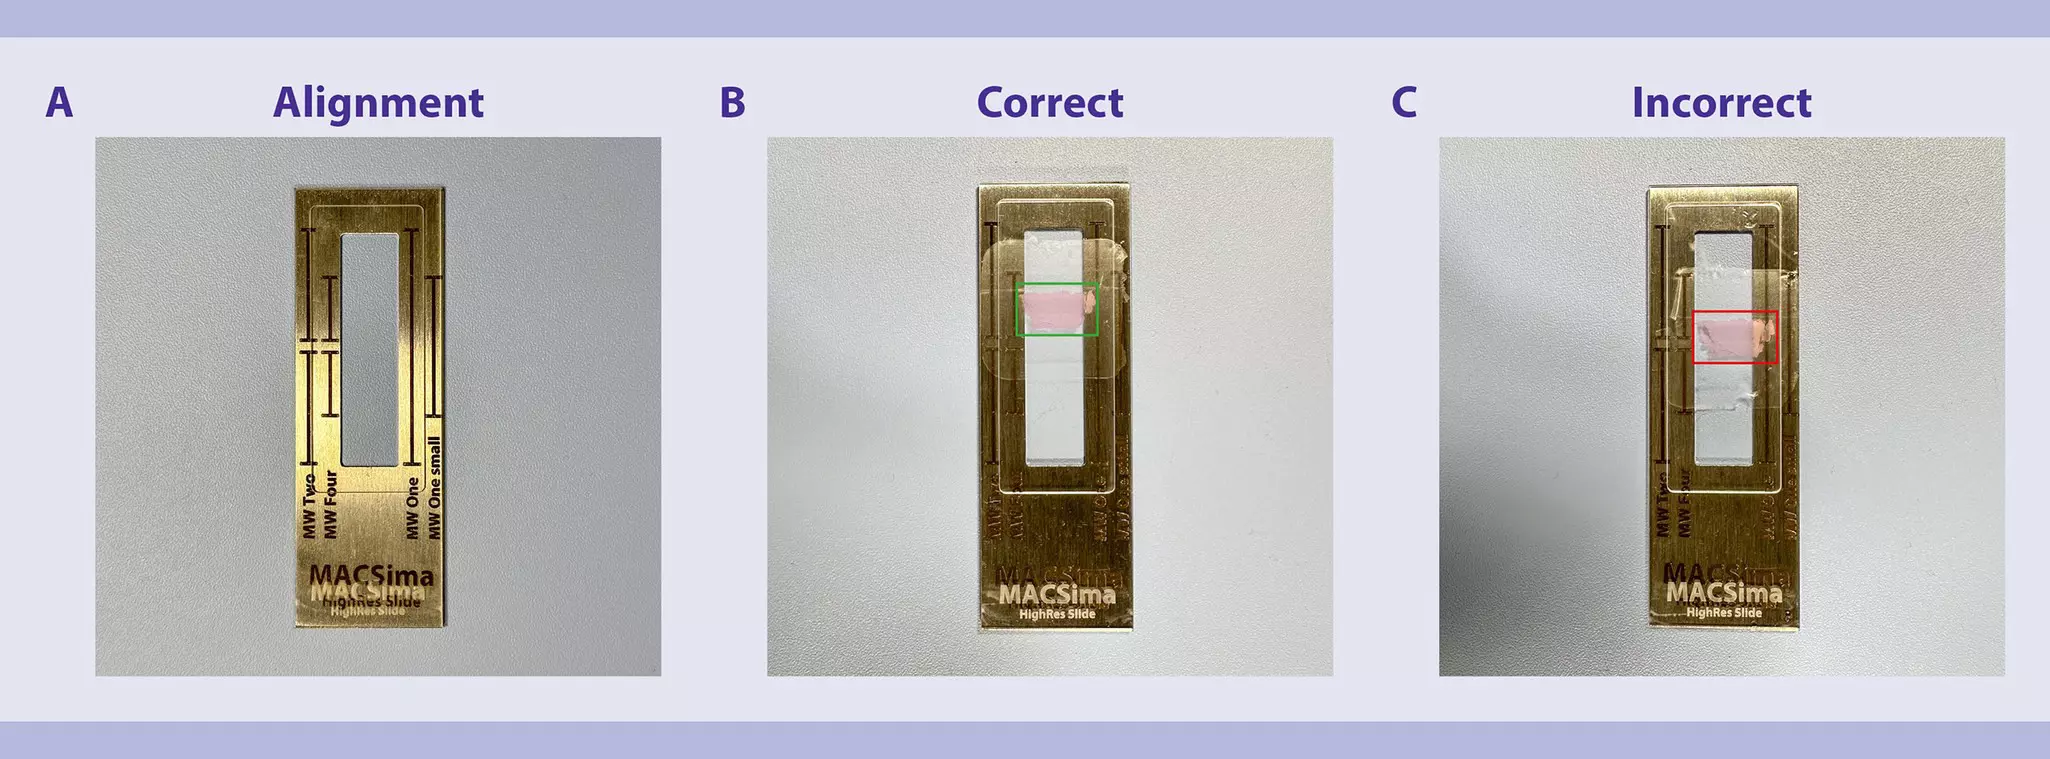
 View details
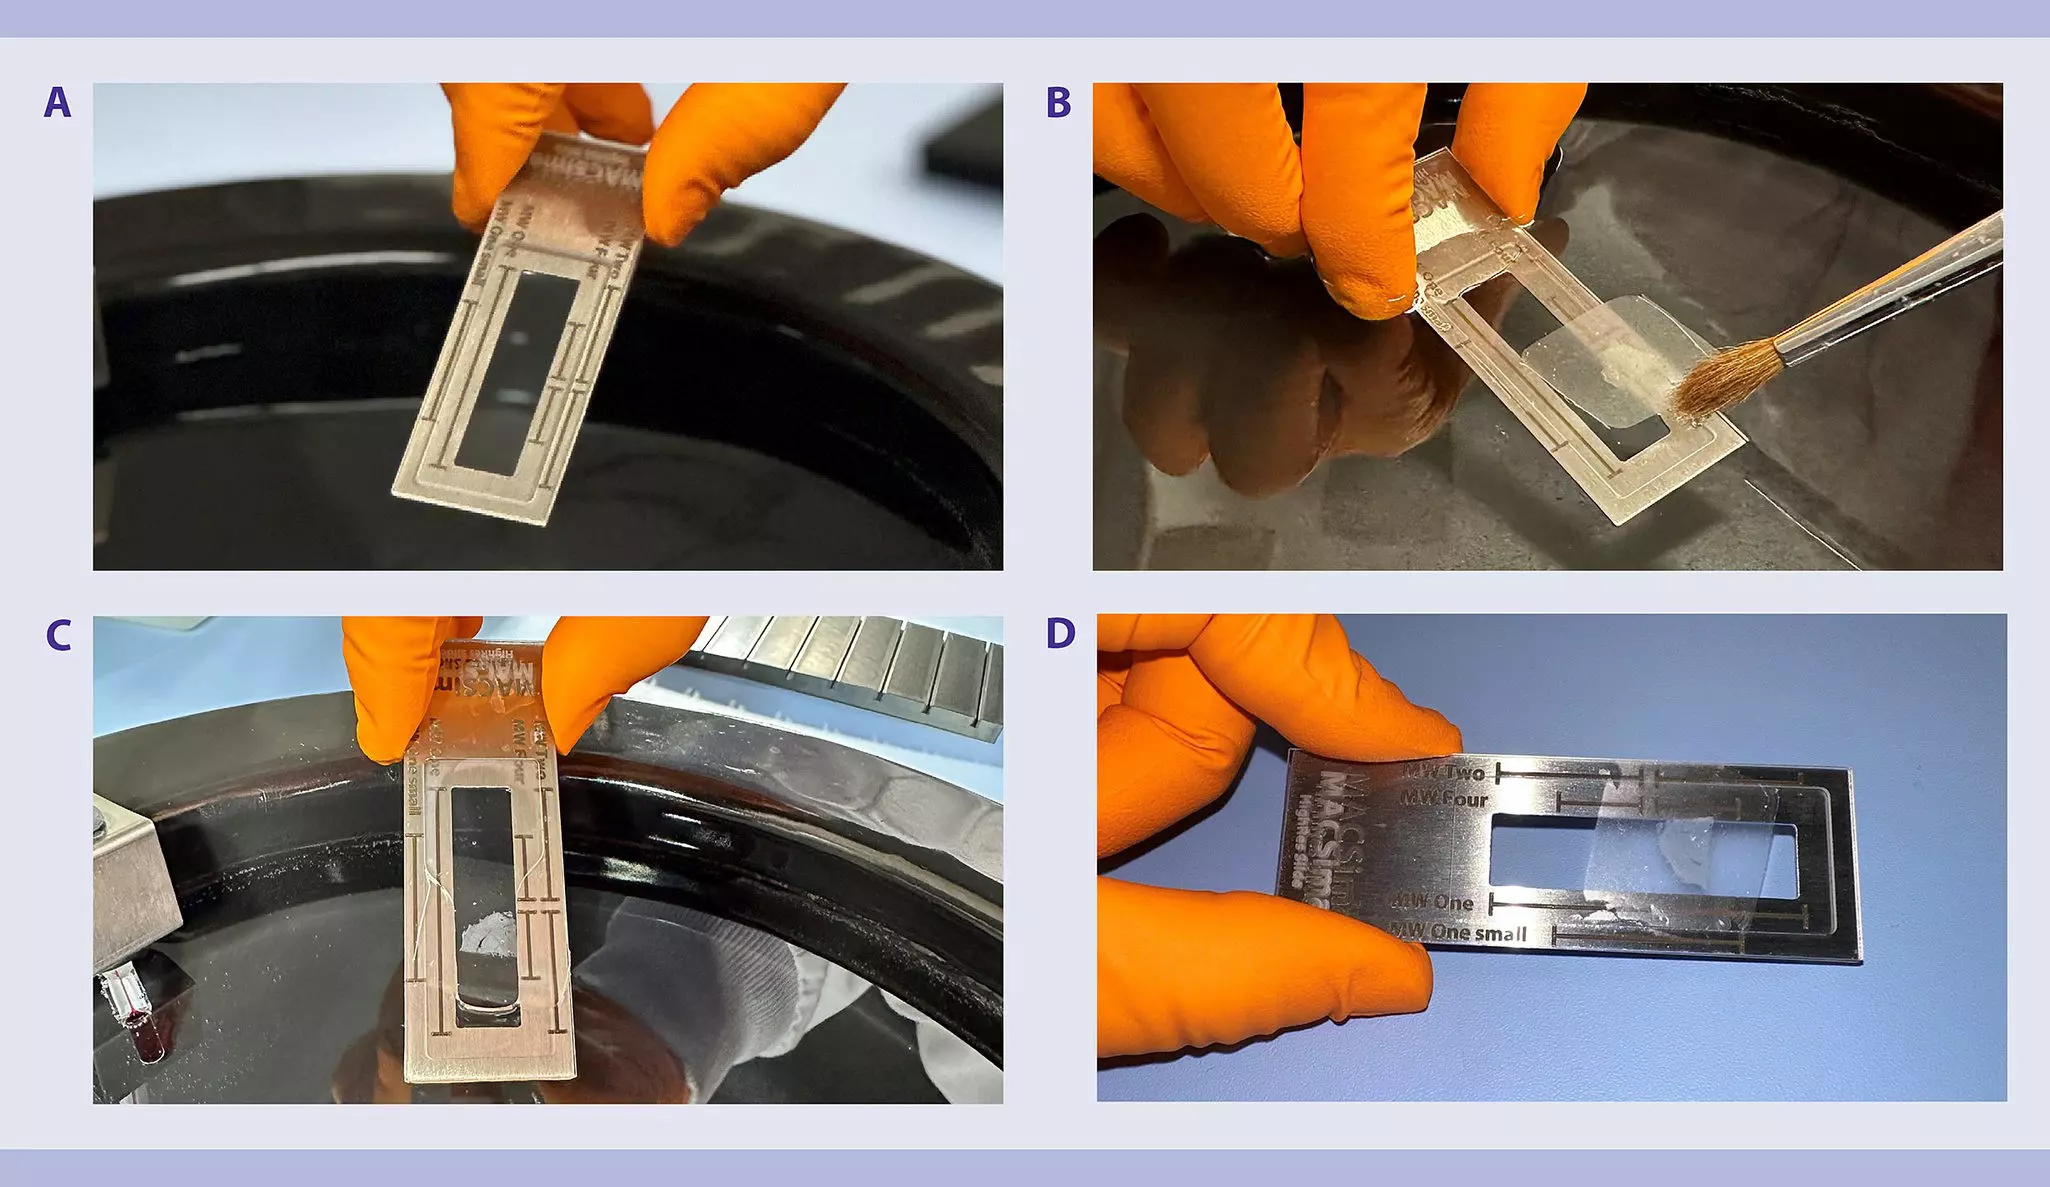
2.2 Tissue section storage protocol
- Tissue sections may be stored at –20°C for up to 2 weeks. For optimal preservation, store slides in a slide box that can hold at least 25 slides. Do not use slide mailer or 50 mL tube for storage.
- Place the tissue section slides on one side of the slide box.
- Insert a 1mm blank spacer slide behind the tissue section slides to prevent direct contact with the desiccant.
▲ Note: Ensure the desiccant does not touch the tissue sections. - Place a small desicant packet (0.5~1g Silica Gel) on the opposite side of the slide box.
- Close the slide box and seal it securely with parafilm.
- Place the sealed slide box into a plastic Ziploc bag.
- Store at –20 °C for up to 2 weeks before. After storage, immediately continue with the next step.
2.3 Deparaffinization
- Deparaffinization may be performed using Histo-Clear® II or xylene. The use of other deparaffinization methods may affect assay performance.
- Prepare appropriate amounts of deparaffinization solutions to cover tissues according to tables 1 or 2. Use Milli-Q® water or nuclease-free water and molecular biology–grade ethanol when preparing solutions.
- Perform deparaffinization and rehydration according to tables 1 or 2. Transfer the slides into the defined solutions and make sure there are no visible streaks on the slides when transferring them between solutions.
- The final incubation will occu in nucelase free water. After immersing slides in water, immediatley proceed to the next step.
Table 1: Deparaffinization and rehydration using Histo-Clear® II
| Solution | Time (min) |
| Histo-Clear® II | 5 |
| Histo-Clear® II | 5 |
| Histo-Clear® II | 5 |
| 10% ethanol, 90% Histo-Clear® II | 5 |
| 100% ethanol | 5 |
| 100% ethanol | 5 |
| 95% ethanol | 5 |
| 80% ethanol | 5 |
| 70% ethanol | 5 |
| Nuclease free water | 0.5 |
Table 2: Deparaffinization and rehydration using xylene
| Solution | Time (min) |
| Xylene | 20 |
| 100% ethanol | 1 |
| 95% ethanol | 1 |
| 80% ethanol | 1 |
| 70% ethanol | 1 |
| 50% ethanol | 1 |
| Nuclease free water | 0.5 |
2.4 Antigen retrieval
Antigen retrieval reverses epitope masking and enhances antibody binding. Heat-induced epitope retrieval (HIER) at basic conditions (pH 9) is recommended for Miltenyi Biotec’s pre-tested antibodies. The optimal antigen retrieval conditions may vary from the standard depending on combinations of antibodies and tissues and might need to be optimized empirically. Precise temperature and time control is critical for successful antigen retrieval. For this protocol it is strongly recommended using an automatic pre-treatment module (PT module) for optimal results. Alternatively, a temperature-controlled steamer may be used. However, using other methods or failing to maintain precise temperature control may negatively impact assay performance.
- If you choose to use a food steamer for antigen retrieval, please contact our technical support for protocol recommendations.
2.4.1 Preparation of TEC buffer
Prepare 1.5 L of 1× TEC buffer as specified below. This volume is calculated to fill the solution container of a PT module.
10× TEC buffer
Prepare a 1 L of 10× TEC buffer, pH 9 by following the recipe below. The 10× stock solution can be stored at +4 °C for up to 3 months.
- 2.5 g Trizma® Base
- 5.75 g EDTA disodium salt dihydrate
- 3.2 g sodium citrate tribasic dihydrate
- Dissolve chemicals in a final volume of 1 L of Milli-Q® water.
- Use 10 M NaOH to adjust pH to 9.
- Use 10× TEC buffer, pH 9 to prepare 1.5L of 1× TEC buffer, pH 9.
1× TEC buffer
- Do not store. Always prepare freshly before use.
- Prepare 1× TEC buffer, pH 9 by diluting 10× TEC buffer, pH 9 1:10 with Milli-Q® water, e.g., add 150 mL of 10× TEC buffer to 1350 mL Milli-Q® water.
- Verify pH and adjust to pH 9 if necessary.
2.4.2 Preparation of 1× PBST (0.05% v/v TWEEN® 20)
Prepare 100 mL of 1× PBST (0.05% v/v TWEEN® 20) by following the recipe below. This solution will be used in different steps of the protocol.
▲ Note: An amount of 20-30 mL will be required for one well of a MACSwell One Small or two wells of a MACSwell Four.
- 10 mL 10× PBS, pH 7.4 RNase free
- 90 mL nuclease-free water
- 50 µL TWEEN® 20
- Dilute 10× PBS in nuclease-free water.
- Add 50 µL of TWEEN® 20 and mix well.
- Store 1× PBST (0.05% v/v TWEEN® 20) at room temperature. Use within 2 weeks.
2.4.3 Antigen retrieval
- The following steps are performed using the PT module.
- The timing and temperature of antigen retrieval is critical for optimal results. Samples should be removed promptly from the PT module upon completion of antigen retrieval.
- Wipe the stainless container with RNase AWAY®.
- Add 1.5 L of 1× TEC buffer to the container.
- Preheat the container with the added 1× TEC buffer to +98 °C.
- Place slide into a heat resistant slide rack and submerge them into the buffer.
▲ Note: To avoid touching the antigen retrieval buffer, always use the handle of the slide rack or forceps when putting slides into the container. - Incubate at +98 °C for 20 minutes.
▲ Note: It is critical not to exceed exactly 20 minutes, even if mild temperature fluctuation occurs when placing slides into the PT module.
▲ Note: The PT module can produce steam. Use caution when opening lid. To avoid touching the antigen retrieval buffer, always use the handle of the slide rack or forceps when putting slide into or taking slides out of the container. - Immediately remove the slides from the PT module and continue promptly with step 7.
▲ Note: The PT module can produce steam. Use caution when opening lid. To avoid touching the antigen retrieval buffer, always use the handle of the slide rack or forceps when putting slide into or taking slides out of the container. - Wash the slides by submerging them for 2 minutes in nuclease-free water.
- Repeat wash for an additional 2 minutes with fresh nuclease-free water.
- Immediately proceed to the next step.
2.5 Assembly of MACSwell Imaging Frames with MACSwell HighRes Slides
- RNAsky is only compatible with MACSwell Four Imaging Frames and MACSwell One Small Imaging Frames.
- Without letting the sample dry, wipe the edges of the slide with a clean Kimwipes™ Delicate Task Wipers or similar to remove excess liquid.
- Carefully and gently assemble the MACSwell HighRes Slide with the sample with the selected MACSwell Imaging Frame as specified below.
- Remove frame including the lid from the sliding frame. Turn the frame upside down. The sealing is now on top (figure 3A).
- Gently angle the MACSwell HighRes Slide with the sample on the sealing of the frame. The sample should be oriented to the sealing. Align the edges of the MACSwell HighRes Slide with the edge of the chamber slide. Lower the MACSwell HighRes Slide gently. (figure 3B).
▲ Note: Ensure that the sample is not placed underneath the sealing. - Place the sliding frame on the frame. Start inserting the sliding hooks in the wider spot of the gaps, away from the MACSima Logo (figure 3C).
▲ Note: Make sure the sliding hooks of the sliding frame are correctly inserted in the gaps of the frame. - Adjust the sliding frame in the direction of the MACSima Logo. The end position is defined by the stopping edge on the sliding frame. Stop when the sliding frame cannot be shifted anymore without applying too much pressure to avoid breakage. Avoid touching and applying pressure in the middle of the slide when assembling the frames.
- Turn the MACSwell Imaging Frame back up (figure 3D).
- Immediately add 1× PBST to the sample to prevent it from drying. For MACSwell Four Imaging Frames, add 500 µL per well, for MACSwell One Small Imaging Frames, add 1000 µL per well.
- Immediately proceed with the molecular preparation of the mounted samples as specified in the RNAsky User Guide.
▲ Note: Samples cannot be stored after this step to ensure sample quality.
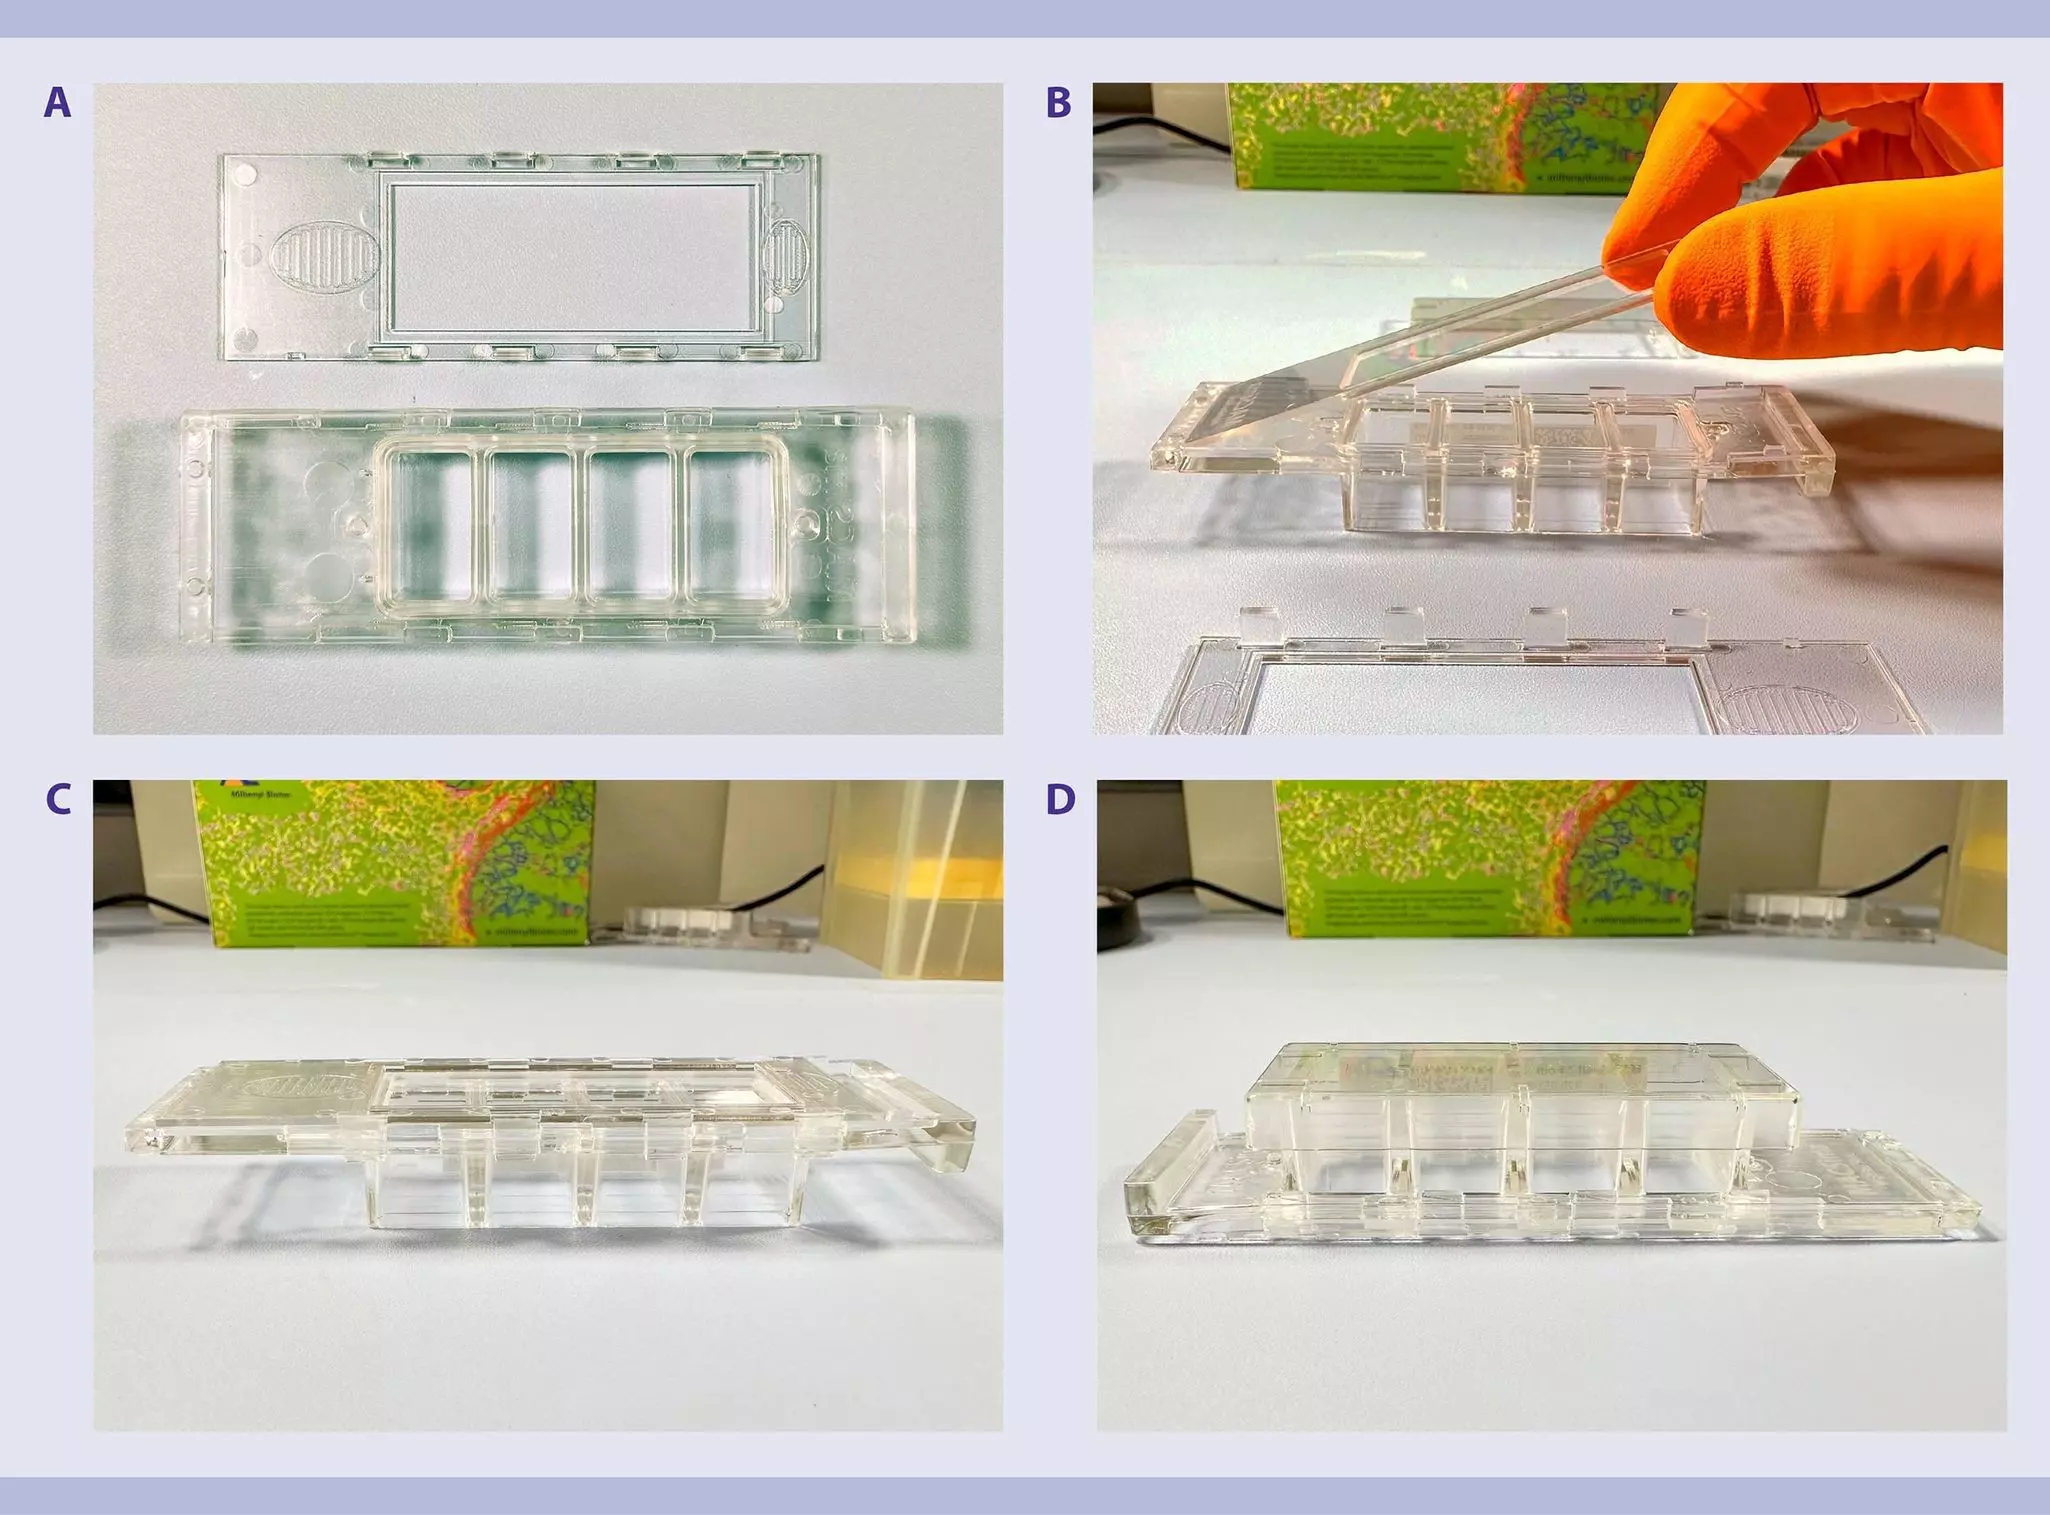

You have previously chosen International as your location.
What do you want to do?