- Always freshly prepare reagents. Failure to do so may lead to suboptimal results.
Immunostaining and clearing of organoids for 3D imaging using MACS® UltraMount 48 - immunostaining after tissue embedding
This application protocol describes step-by-step the immunostaining after tissue embedding and clearing of organoids and spheroids using the MACS UltraMount 48 and the MACS Clearing Kit for downstream 3D imaging on the UltraMicroscope Blaze™ Light Sheet System. The MACS Clearing Kit enables the immunostaining and clearing of up to 4×48 samples of <2 mm in diameter.
▲ Note: Preliminary assessment suggests that the MACS® Deep Clearing Kit (order no. 130-136-470) is compatible with this protocol, when using the corresponding solutions and incubation times. For better results, user-side optimization may be required.
Please use Deep Antibody Staining Solution (8x) instead of 10x Antibody Staining Solution, Deep Permeabilization Solution instead of Permeabilization Solution, and Deep Clearing Solution instead of Clearing Solution.
Protocol
Immunostaining and clearing of organoids and spheroids for 3D imaging analysis using the MACS UltraMount 48 Sample Holder
20 min
Fixation
O/N
Permeabilization
1.5 h
Embedding
5 days
Immunostaining
3 h
Washing
22 h
Dehydration
12 h
Clearing
O/N = overnight
Preparation of PFA buffer
- All steps that include paraformaldehyde (PFA) must be performed under a fume hood.
- The protocol describes the preparation of 500 mL of 4% PFA buffer. For higher or lower volumes scale the amounts of the components accordingly.
- Do not use ready-to-use PFA solutions.
- Add 20 g of PFA powder to 400 mL of PBS and stir the mixture at +60 °C under a fume hood until it is dissolved.
▲ Note: Do not boil!.
▲ Note: PFA powder does not dissolve instantly. - Add 0.2–0.4 g of NaOH and continue stirring at +60 °C until the solution clears up. This may take 2–3 hours.
- Adjust the pH to 7.2–7.4 with HCl and NaOH.
- Adjust the volume to 500 mL with PBS.
- Filter the solution using a 0.22 µm filter.
- PFA buffer can be stored at +4 °C for one week. For long-term storage prepare aliquots and store at –20 °C. Avoid repeated freeze/thaw cycles.
Preparation of 1× Antibody Staining Solution of the MACS® Clearing Kit
- If precipitation occurs due to storage of the 10× Antibody Staining Solution at low temperature, mix well before preparation of 1× Antibody Staining Solution.
- 10× Antibody Staining Solution from the MACS Clearing Kit needs to be diluted 1:10 with sterile distilled water before use, e.g., by diluting 1 mL of 10× Antibody Staining Solution with 9 mL of sterile distilled water. Adjust the volume of 1× Antibody Staining Solution according to the number of samples to be cleared.
▲ Note: When using MACS Deep Clearing Kit, Deep Antibody Staining Solution (8×) needs to be diluted 1:8 with PBS before use. Prepare Deep Antibody Staining Solution (1×) by diluting 1 mL of Deep Antibody Staining Solution (8×) with 7 mL of PBS. Adjust the volume of Deep Antibody Staining Solution (1×) to the amount of tissue to be cleared. - Always use freshly prepared 1× Antibody Staining Solution.
Preparation of ethanol/Tween® 20 dilutions for dehydration
- The following solutions are needed:
- Ethanol 50%/Tween® 20
- Ethanol 70%/Tween® 20
- Absolute (≥99.8%) ethanol/Tween® 20
- Prepare ethanol dilutions of 50% and 70% in water. Use absolute ethanol (≥99.8%) and sterile distilled water to prepare the dilutions. Add Tween® 20 to each dilution for a final concentration of 2%.
▲ Note: Make sure to use fresh absolute ethanol (≥99.8%) that does not contain water residues.
Preparation of Clearing Solution from the MACS Clearing Kit
- Clearing Solution is ready-to-use, but may freeze when stored at +2 to +8 °C. Therefore, it is recommended to prepare aliquots and store at +2 to +8 °C. Bring aliquots to room temperature (+20 to +25 °C) before proceeding to clearing of samples.
▲ Note: Use polypropylene tubes for preparation of aliquots. Other plastics might not be compatible with the Clearing Solution.
- For details on the reagents of the MACS Clearing Kit refer to the respective data sheet.
- Use tweezers or wide pipette tips to handle the samples.
2.1 Fixation
- Gently transfer samples into a tube using wide or cut pipette tips.
- Wash samples 3× in PBS at +2 to +8 °C to remove residual medium.
- Discard PBS and add PFA buffer.
▲ Note: Make sure all samples are fully immersed in PFA buffer.
▲ Note: It is recommended to incubate the samples under slow, continuous rotation using the MACSmix™ Tube Rotator in a PFA volume that is at least 10 times higher than the volume of the samples. - Incubate for 20 minutes at room temperature (+20 to +25 °C).
▲ Note: In order to avoid autofluorescence, do not extend the incubation time. - Wash samples 3× in PBS.
▲ Note: If not immediately processed for clearing, samples can be stored at +2 to +8 °C in PBS/azide for several weeks.
2.2 Embedding
- In this protocol, embedding is performed using MACS UltraMount 48, the dedicated sample holder for high-throughput imaging of organoids and spheroids. Refer to the user manual for more information on the use of MACS UltraMount 48.
- For gel preparation dissolve 1.5% agarose in double-distilled water or 1% Phytagel™ in tap water by heating it up in a microwave.
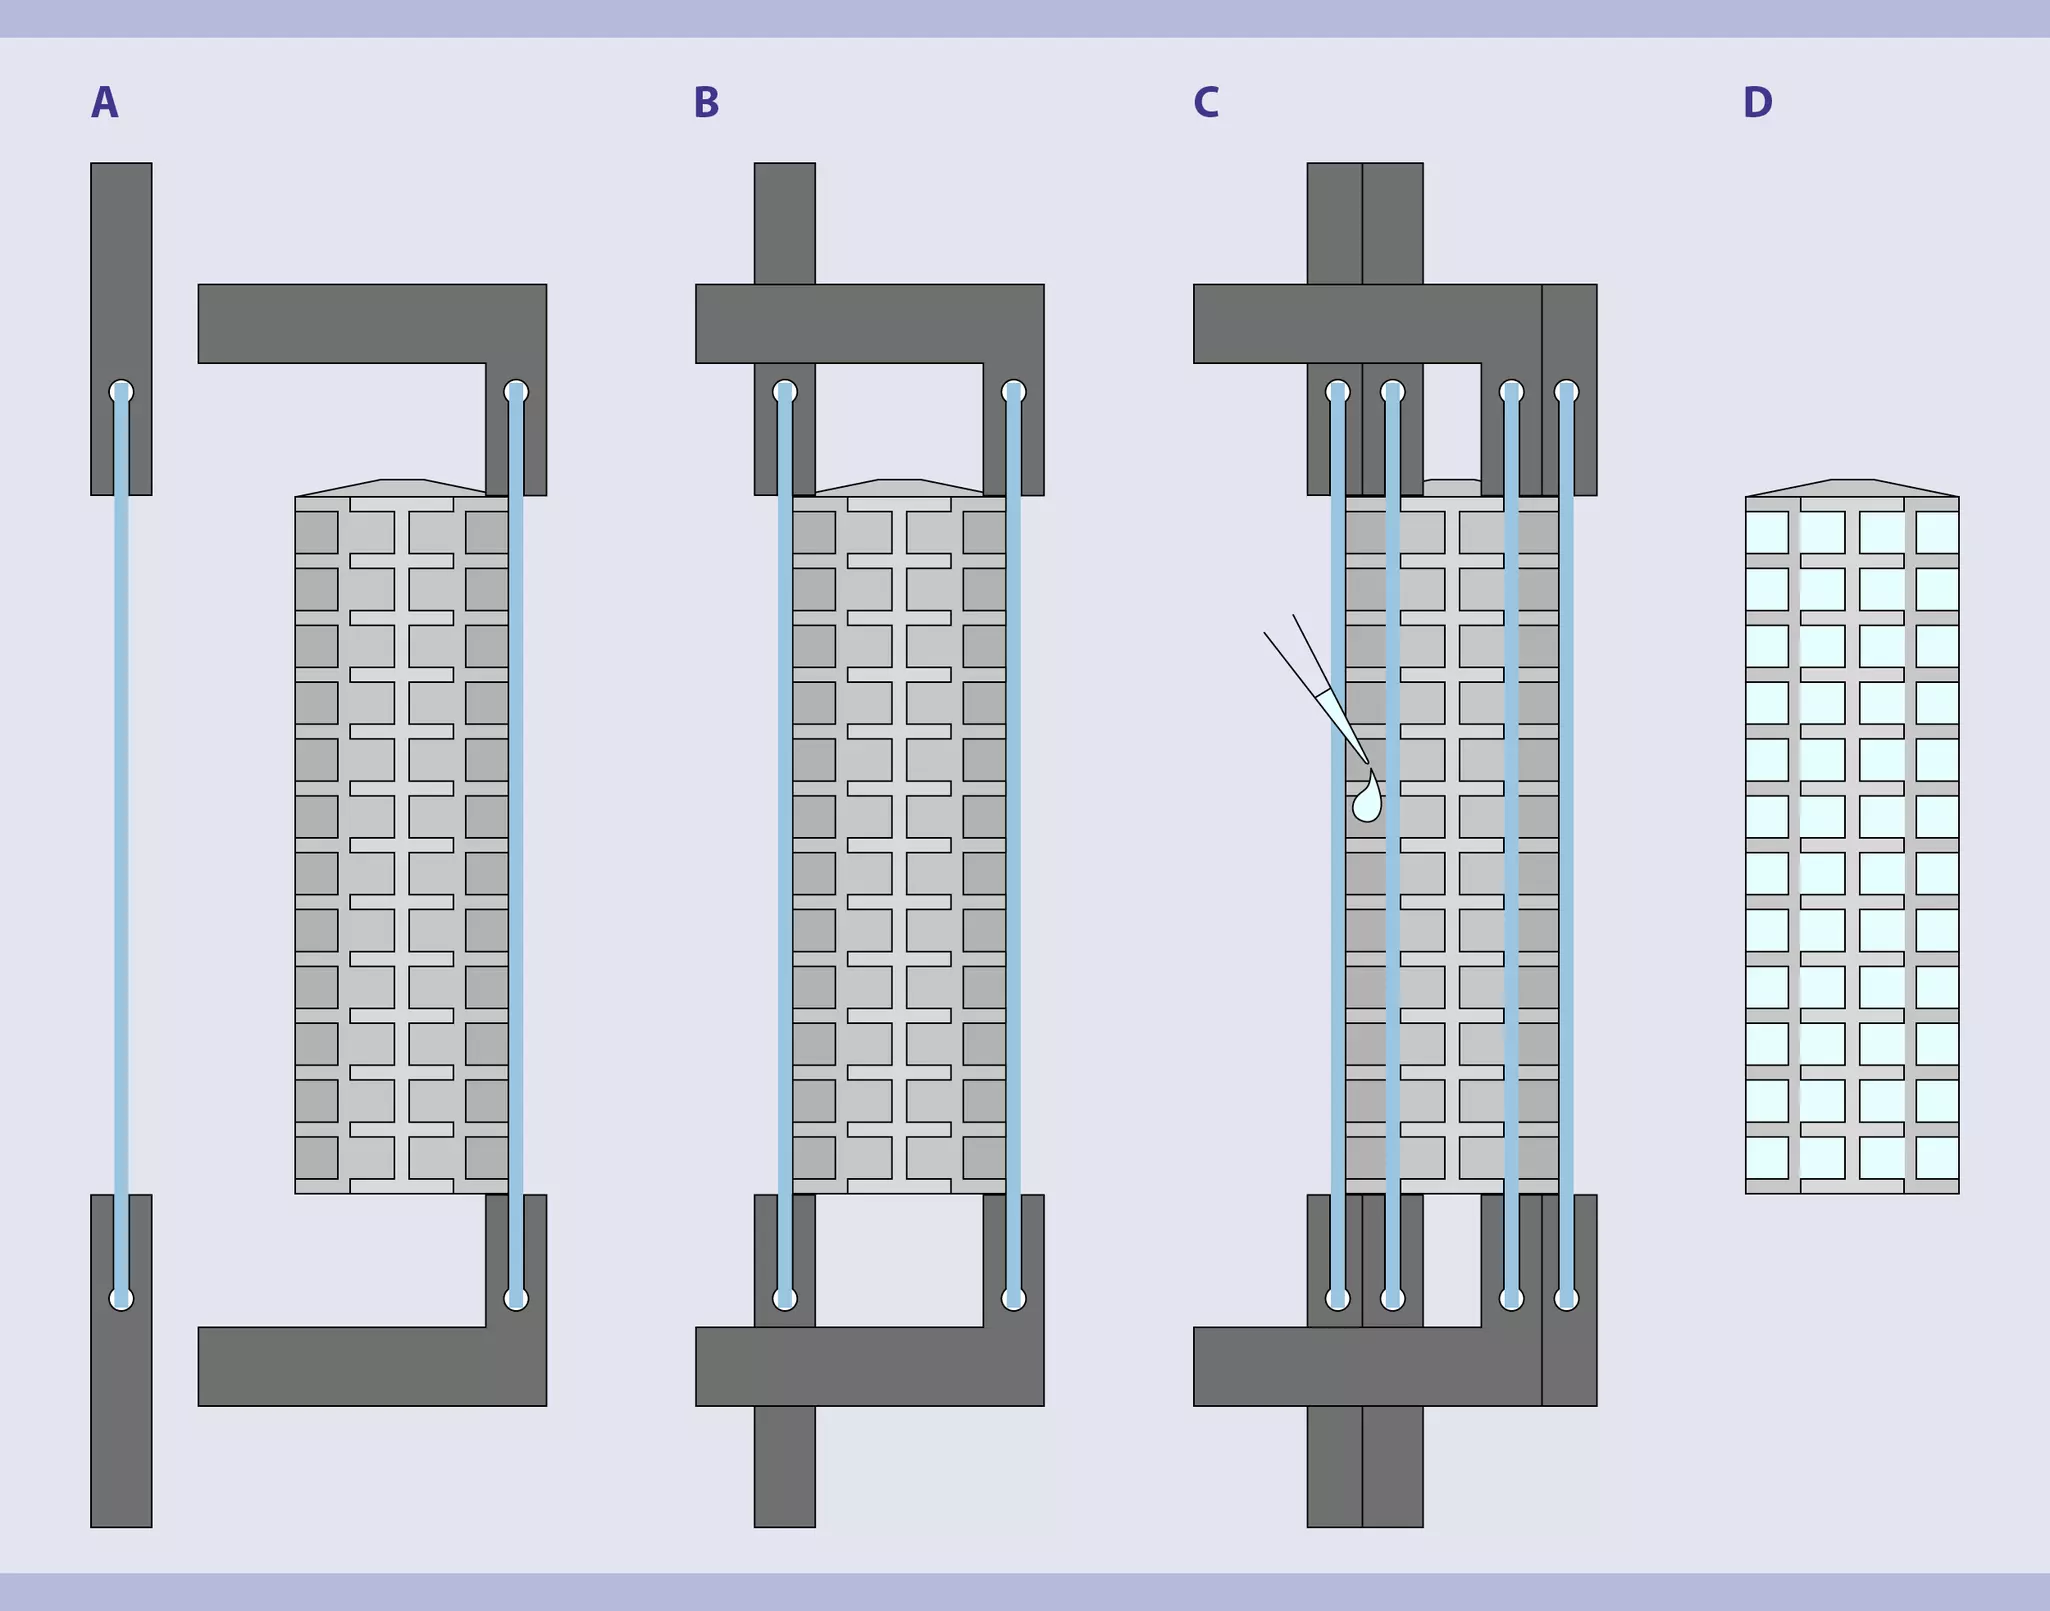
- To create straight walls of agarose during embedding, which are essential to get the best optical quality achievable during imaging, each MACS UltraMount 48 is delivered with a dedicated filling aid tool.
- Place the sample holder on a flat surface and mount the filling aid tool as shown in figure 1.
- Depending on the sample, either transfer the sample to the wells and fill them up with 1.5% agarose or 1% phytagel™ or premix the sample with approx. 30 µL of 1.5% agarose or 1% Phytagel™ before transferring one sample after the other into the holder.
- When the agarose has hardened (15–20 minutes), cut off any excess on the upper side to get a straight surface.
- Remove the filling aid tool carefully and vertically upward. Take special care that the agarose is not sticking to the glass. If it does, take forceps and apply a bit of pressure along the top of the wells. Once the tool is completely removed, proceed with permeabilization.
▲ Note: The sample holder is compatible with use of the MACS Clearing Kit.
▲ Note: The plastic components of the filling aid tool are made of PLA and are not compatible with the MACS Clearing Kit.
2.3 Permeabilization
- The volume of Permeabilization Solution needed to fill the tube depends on the positions occupied within the sample holder. 25 mL volume will cause the tube to overflow. Avoid air bubbles in the tube.
- For permeabilization, place the sample holder with the embedded samples in a 25 mL tube containing Permeabilization Solution overnight at room temperature (+20 to +25 °C) under slow, continuous overhead rotation using the MACSmix™ Tube Rotator.
▲ Note: For initial tests, rather incubate longer to ensure penetration is sufficient for the application.
2.4 Immunostaining and washing
- The volume needed to fill the tube depends on the positions occupied within the sample holder. 25 mL volume will cause the tube to overflow. Avoid air bubbles in the tube.
- Perform all incubation steps protected from light.
- The following protocol has been optimized for fluorochrome-conjugated primary antibodies from Miltenyi Biotec. Refer to the respective Miltenyi Biotec antibody conjugate data sheet or product page for indicated dilution. When using other antibodies refer to manufacturer´s recommendations for antibody dilution, incubation temperature and duration of incubation.
- Dilute the primary antibody in a final volume of 10 mL of 1× Antibody Staining Solution.
- Add the antibody dilution to the 25 mL tube containing the embedded and permeabilized sample.
- Incubate MACS UltraMount 48 with the samples in the solution and agitate mounted horizontally on a horizontal, a tilted, or an orbital shaker. Position the holder upside down in the antibody solution so that the embedded tissue is in constant contact with the solution. If this is not possible with the available equipment, use a higher volume to cover the holder at any time. When using Miltenyi Biotec antibodies, incubate sample for up to 5 days at +37 °C, depending on the sample.
▲ Note: Incubation for 5 days is recommended. Shorter incubation time might be feasible and would need further optimization. - Washing step 1: Discard antibody solution and add 25 mL of 1× Antibody Staining Solution into the 25 mL tube.
- Washing step 2: Incubate sample under slow, continuous rotation for 4 hours at room temperature (+20 to +25 °C) using the MACSmix Tube Rotator.
- Washing step 3: Repeat steps 4–5 two times.
- If working with fluorochrome-conjugated primary antibodies, continue with section 2.5 Dehydration. If performing indirect staining, follow steps 8–10.
- Dilute the secondary antibody in a final volume of 10 mL of 1× Antibody Staining Solution. Remove 1× Antibody Staining Solution and add secondary antibody dilution into the 25 mL tube containing the embedded and permeabilized sample.
▲ Note: Refer to manufacturer´s recommendations for optimal antibody dilution. - Incubate samples in secondary antibody dilution with gentle shaking using the MACSmix Tube Rotator as described above.
▲ Note: Refer to manufacturer´s recommendations for incubation temperature and duration of incubation. - Proceed with washing steps above (steps 4–6).
2.5 Dehydration
- Perform all incubation steps protected from light.
- 25 mL tubes must be completely filled up with the corresponding ethanol/Tween® 20 dilution.
- Dehydrate the whole MACS UltraMount 48 including the embedded samples with a series of ethanol dilutions in a 25 mL tube at room temperature (+20 to +25 °C) under slow, continuous rotation using the MACSmix Tube Rotator.
▲ Note: All 2 hours incubation steps can be extended to overnight incubation.
- Incubation in 50% ethanol/ Tween® 20 for 2 hours
- Incubation in 70% ethanol/ Tween® 20 for 2 hours
- Incubation in absolute (≥99.8%) ethanol/Tween® 20 overnight
- Incubation in absolute (≥99.8%) ethanol/Tween® 20 for 2 hours
2.6 Clearing
- Perform all incubation steps protected from light.
- Add 25 mL of Clearing Solution of the MACS Clearing Kit into a 25 mL amber polypropylene tube.
▲ Note: Always use polypropylene tubes to incubate sample with the Clearing Solution of the MACS Clearing Kit. - Transfer MACS UltraMount 48 including the embedded and dehydrated samples into this tube.
- Incubate at room temperature (+20 to +25 °C) under slow continuous rotation for 6 hours using the MACSmix Tube Rotator.
- Replace Clearing Solution with refracting index matching solution (e.g. MACS Imaging Solution) after 6 hours and continue incubation for at least an additional 6 hours.
- Discard the solution and continue with downstream image acquisition and analysis.
▲ Note: Cleared samples can be stored at room temperature in 25 mL polypropylene or glass tubes filled with MACS Imaging Solution for several months.
▲ Note: Do not store cleared sample at +2 to +8 °C, otherwise freezing artefacts and tissue damage may occur. - (Optional) If image acquisition is performed immediately after clearing, load MACS UltraMount 48 containing the cleared samples onto the dedicated UltraMicroscope Blaze™ Stage Arm. Fill the imaging chamber with MACS Imaging Solution and proceed with image acquisition.
4 products found
|
For research use only
450 mL
(excl. tax)
For research use only
1 kit
(excl. tax)
For research use only
You have previously chosen International as your location.
What do you want to do?