Engineering of CAR NK cells for research use
Depletion of donor T cells, enrichment of donor NK cells, in vitro activation, transduction, expansion, phenotyping, and functional analysis.
CAR NK cells have to be developed, optimized, and validated in a pre-clinical setting by small-scale benchtop experiments. This application protocol describes a complete workflow for the engineering of CAR NK cells for research use. It includes depletion of donor T cells, enrichment of donor NK cells, followed by activation, gene transfer of the CAR construct, and CAR NK cell expansion as well as the phenotyping and analysis of the final CAR NK cell product.
Protocol
Engineering of CAR NK cells for research use
Day 1
PBMC isolation
Depletion of CD3+ T cells
Enrichment of CD56+ NK cells
Activation of NK cells using NK MACS Medium and MACS Cytokines
Day 3
Lentiviral transduction of activated NK cells with a CAR gene construct
Day 4–15
Expansion of CAR NK cells in NK MACS Medium with MACS Cytokines
Flow cytometric analysis of transduced NK cells
Day 15
Phenotyping of CAR NK cells
Examination of CAR NK cell functionality and antigen specificity
Protocol

This protocol includes detailed instructions for preparing necessary reagents and materials and then carrying out each step.
Supplement NK MACS Medium with 5% AB serum and MACS Cytokines Human IL-2, premium grade (500 U/mL), and Human IL-15, premium grade (140 U/mL).
▲ Note: Make sure to freshly add Human IL-2, premium grade and Human IL-15, premium grade to the NK cell medium for effective NK cell expansion.
Standard wash and dilution buffer
Prepare buffer by diluting the MACS BSA Stock Solution 1:20 with autoMACS® Rinsing Solution or PBS/EDTA.
▲ Note: Keep buffer cold (2−8 °C). Degas buffer before use, as air bubbles could block the column.
Antibody panels
Freshly prepare the following master mixes for each sample.
▲ Note: Store master mix in the dark in the refrigerator (2–8 °C) until use. Do not store for extended periods.
Table 1: Staining cocktail for NK cell count antibody panel.
| Reagent | Volume (µL) |
| CD45-VioBlue® | 2 |
| 7-AAD Staining Solution | 10 |
| FcR Blocking Reagent, human | 10 |
| Buffer | 58 |
Table 2: Staining cocktail for NK cell composition antibody panel.
| Reagent | Volume (µL) |
| CD45-VioBlue | 2 |
| CD14-VioGreen™ | 2 |
| TCRa/b Antibody-FITC | 2 |
| CD3-PE | 5 |
| CD56-APC | 2 |
| CD19-APC-Vio® 770 | 2 |
| 7-AAD Staining Solution | 10 |
| FcR Blocking Reagent, human | 10 |
| Buffer | 65 |
Table 3: Staining cocktail for NK cell transduction antibody panel.
| Reagent | Volume (µL) |
| CD45-VioBlue | 2 |
| CD14-VioGreen | 2 |
| Biotin Antibody-Vio Bright B515 | 2 |
| CD3-PE | 5 |
| CD56-APC | 2 |
| 7-AAD Staining Solution | 10 |
| Buffer | 77 |
On day 15: Preparation of the standard of MACSPlex Cytokine 12 Assay
- Reconstitute and dilute the standards with MACSPlex Buffer or use the same medium as used for the dilution of the sample.
- Only use freshly prepared standard solutions. Do not store or reuse reconstituted or diluted standards.
- Use polypropylene or polystyrene reagent tubes. Do not use glass vials. The generation of standard curves requires eight samples: Seven samples of the standard and one blank control. These samples will be measured as duplicates. For details refer to respective data sheet.
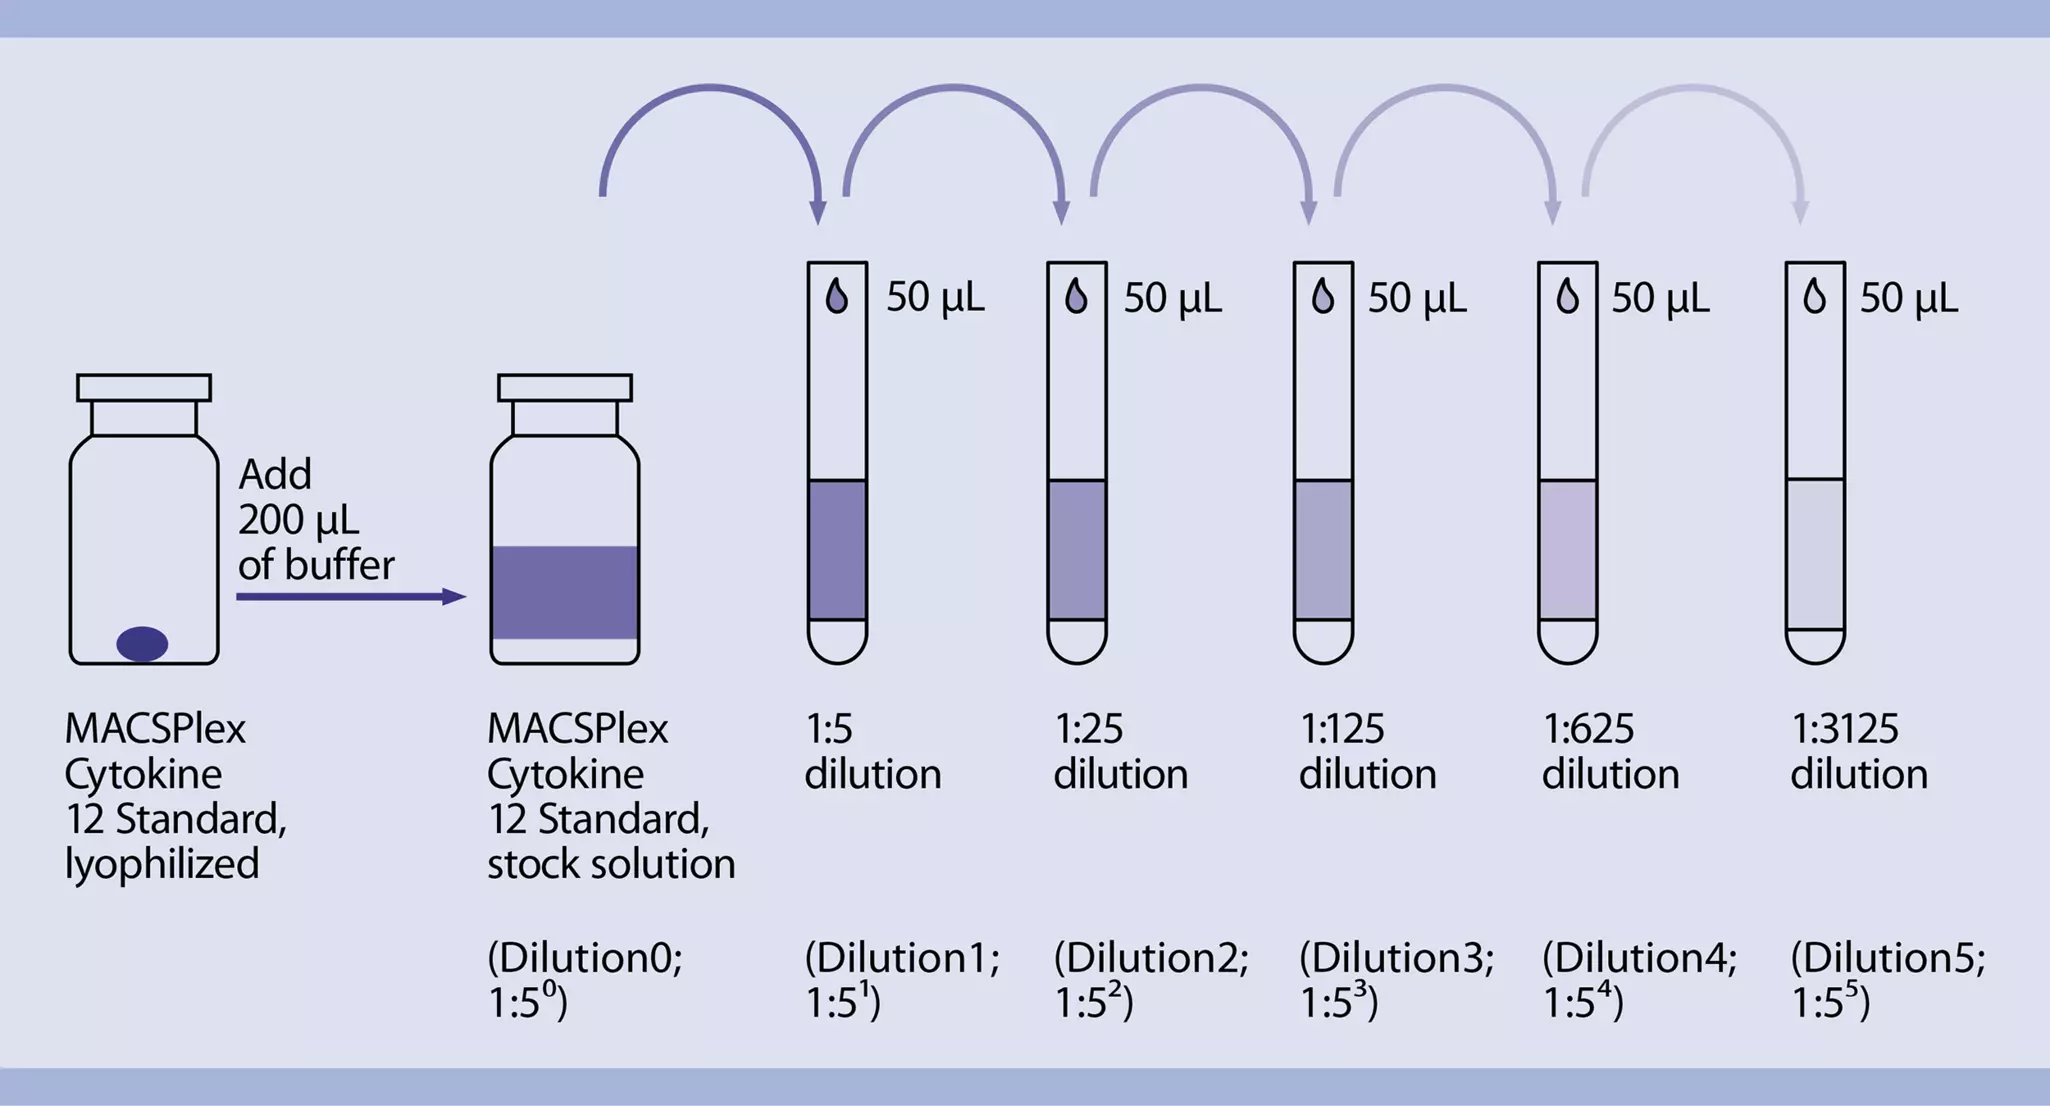
- Thaw one vial containing the lyophilized MACSPlex Cytokine 12 Standard.
- Open the vial and add 200 μL of MACSPlex Buffer or medium to the pellet and mix gently. This is the stock solution (10,000 pg/mL).
- Label six reagent tubes and arrange them in the following order:
a. 1:5 (1:51; 2,000 pg/mL)
b. 1:25 (1:52; 400 pg/mL)
c. 1:125 (1:53; 80 pg/mL)
d. 1:625 (1:54; 16 pg/mL)
e. 1:3125 (1:55; 3.2 pg/mL)
f. 1:15,625 (1:56; 0.6 pg/mL) - Pipette 200 μL of either MACSPlex Buffer or medium into each tube.
- Perform a 1:5 dilution by transferring 50 μL of the stock solution into the tube labeled 1:5 and mix thoroughly. Continue making 1:5 serial dilutions by transferring 50 μL from the tube labeled 1:5 to the tube labeled 1:25 and so on to the tube labeled 1:15,625. Mix each dilution before performing the next transfer.
- Keep 200 μL MACSPlex Buffer or medium as blank control (0 pg/mL).
 View details
The peripheral blood or buffy coat should not be older than 8 hours and supplemented with anticoagulants (e.g. heparin, EDTA, citrate, ACDA, or citrate phosphate dextrose (CPD)). PBMCs should be isolated by density gradient centrifugation, e.g., using Ficoll-Paque™. Resuspend cell pellet in an appropriate amount of PBS-EDTA and proceed to magnetic labeling.
▲ Note: PBMCs may be stored in the refrigerator overnight in PBS containing 0.5% BSA or autologous serum. Do not store cells longer than one day in the refrigerator. Wash at least once before proceeding with magnetic labeling and resuspend cells in an appropriate buffer. For details see MACS Cell Separation Reagents data sheets.
- For optimal performance it is important to obtain a single-cell suspension before magnetic labeling. Pass cells through Pre-Separation Filters (30 µm) to remove cell clumps which may clog the column. Wet filter with buffer before use.
- Work fast, keep the cells cold, and use pre-cooled solutions. This will prevent capping of antibodies on the cell surface and non-specific cell labeling.
- Volumes for magnetic labeling given below are for up to 107 total cells. When working with fewer than 107 cells, use the same volumes as indicated. When working with higher cell numbers, scale up all reagent volumes and total volumes accordingly (e.g. for 2×10⁷ total cells, use twice the volume of all indicated reagent volumes and total volumes).
Magnetic labeling
- Determine cell number.
- Centrifuge cell suspension at 300×g for 10 minutes. Aspirate supernatant completely.
- Resuspend cell pellet in 80 μL of buffer per 107 total cells.
▲ Note: Magnetic separation with CD3 MicroBeads can be fully automated including autolabeling and separation with the autoMACS Pro Separator. Please follow instructions in the respective data sheet.
▲ Note: (Optional) To compare purity before and after depletion, remove a small aliquot (e.g. 50–100 μL) from the fraction and keep it on ice. - Add 20 μL of CD3 MicroBeads per 107 total cells.
- Mix well and incubate for 15 minutes at 2−8 °C.
▲ Note: Higher temperatures and/or longer incubation times may lead to non-specific cell labeling. Working on ice requires increased incubation times. - Wash cells by adding 1−2 mL of buffer per 107 cells and centrifuge at 300×g for 10 minutes. Aspirate supernatant completely.
- Resuspend up to 1.25×10⁸ cells in 500 μL of buffer.
▲ Note: For higher cell numbers, scale up buffer volume accordingly.
Depletion with LD Columns
- Place a LD Column in the magnetic field of a suitable MACS Separator (see LD Column data sheet).
- Prepare column by rinsing with 2 mL of buffer.
- Apply cell suspension onto the column. Collect flow-through containing unlabeled cells.
- Wash column with 2×1 mL of buffer. Collect unlabeled cells that pass through and combine with the flow-through from step 3. This is the unlabeled cell fraction.
- Additional antibodies can be included in the analysis according to the respective needs. For more information about antibodies refer to www.miltenyibiotec.com/antibodies.
- Combine with optional chapter 6. Analysis of purity before and after CD56 enrichment.
- Remove a small aliquot from the fraction representing the target cells with depleted CD3+ T cells (e.g. 50–100 μL).
▲ Note: For comparative analysis of NK cells before and after CD3 depletion the aliquot from chapter 3, step 3 can be used. - Store aliquot at 4 °C and proceed with enrichment of CD56+ NK cells.
- Follow the flow analysis protocol at chapter 6, step 2.
- For optimal performance it is important to obtain a single-cell suspension before magnetic labeling. Pass cells through Pre-Separation Filters (30 µm) to remove cell clumps which may clog the column. Wet filter with buffer before use.
- Work fast, keep the cells cold, and use pre-cooled solutions. This will prevent capping of antibodies on the cell surface and non-specific cell labeling.
- Volumes for magnetic labeling given below are for up to 107 total cells. When working with fewer than 107 cells, use the same volumes as indicated. When working with higher cell numbers, scale up all reagent volumes and total volumes accordingly (e.g. for 2×10⁷ total cells, use twice the volume of all indicated reagent volumes and total volumes).
- Determine cell number.
- Centrifuge cell suspension at 300×g for 10 minutes. Aspirate supernatant completely.
- Resuspend cell pellet in 80 μL of buffer per 107 total cells.
▲ Note: Magnetic separation with CD56 MicroBeads can be fully automated including autolabeling and separation with the autoMACS Pro Separator. Please follow instructions in the respective data sheet.
▲ Note: (Optional) To compare purity before and after depletion, remove a small aliquot (e.g. 50–100 μL) from the fraction and keep it on ice. - Add 20 μL of CD56 MicroBeads per 107 total cells.
- Mix well and incubate for 15 minutes in the refrigerator (2−8 °C).
- Wash cells by adding 1−2 mL of buffer per 107 cells and centrifuge at 300×g for 10 minutes. Aspirate supernatant completely.
- Resuspend up to 108 cells in 500 μL of buffer.
▲ Note: For higher cell numbers, scale up buffer volume accordingly.
Magnetic separation with MS or LS Columns
- Place column in the magnetic field of a suitable MACS Separator. For details refer to the respective MACS Column data sheet.
- Prepare column by rinsing with the appropriate amount of buffer:
MS: 500 μL
LS: 3 mL - Apply cell suspension onto the column. Collect flow-through containing unlabeled cells.
- Wash column with the appropriate amount of buffer. Collect unlabeled cells that pass through and combine with the flow-through from step 3.
MS: 3×500 μL
LS: 3×3 mL
▲ Note: Perform washing steps by adding buffer aliquots as soon as the column reservoir is empty. - Remove column from the separator and place it on a suitable collection tube.
- Pipette the appropriate amount of buffer onto the column. Immediately flush out the magnetically labeled cells by firmly pushing the plunger into the column.
MS: 1 mL
LS: 5 mL
- Additional antibodies can be included in the analysis according to the respective needs. For more information about antibodies refer to www.miltenyibiotec.com/antibodies.
- Remove a small aliquot from the fraction representing CD3− CD56+ NK cells (e.g. 50–100 μL).
▲ Note: For comparative analysis of NK cells before and after CD3 depletion and after additional CD56 enrichment the aliquots from chapter 3, step 3 and chapter 4, step 2 can be used. - Determine cell number.
- Centrifuge cell suspension at 300×g for 10 minutes. Aspirate supernatant completely.
- For each sample resuspend up to 106 nucleated cells in 100 μL NK cell composition staining cocktail (chapter 1, table 2).
- Mix well and incubate for 10 minutes in the dark in the refrigerator (2−8 °C).
▲ Note: Higher temperatures and/or longer incubation times may lead to non-specific cell labeling. Working on ice requires increased incubation times. - Wash cells by adding 1−2 mL of buffer and centrifuge at 300×g for 10 minutes. Aspirate supernatant completely.
- Resuspend cell pellet in a suitable amount of buffer (e.g. 500 μL) for analysis by flow cytometry.
▲ Note: Cells must be acquired within 1 hour after staining.
- Additional antibodies can be included in the analysis according to the respective needs. For more information about antibodies refer to www.miltenyibiotec.com/antibodies.
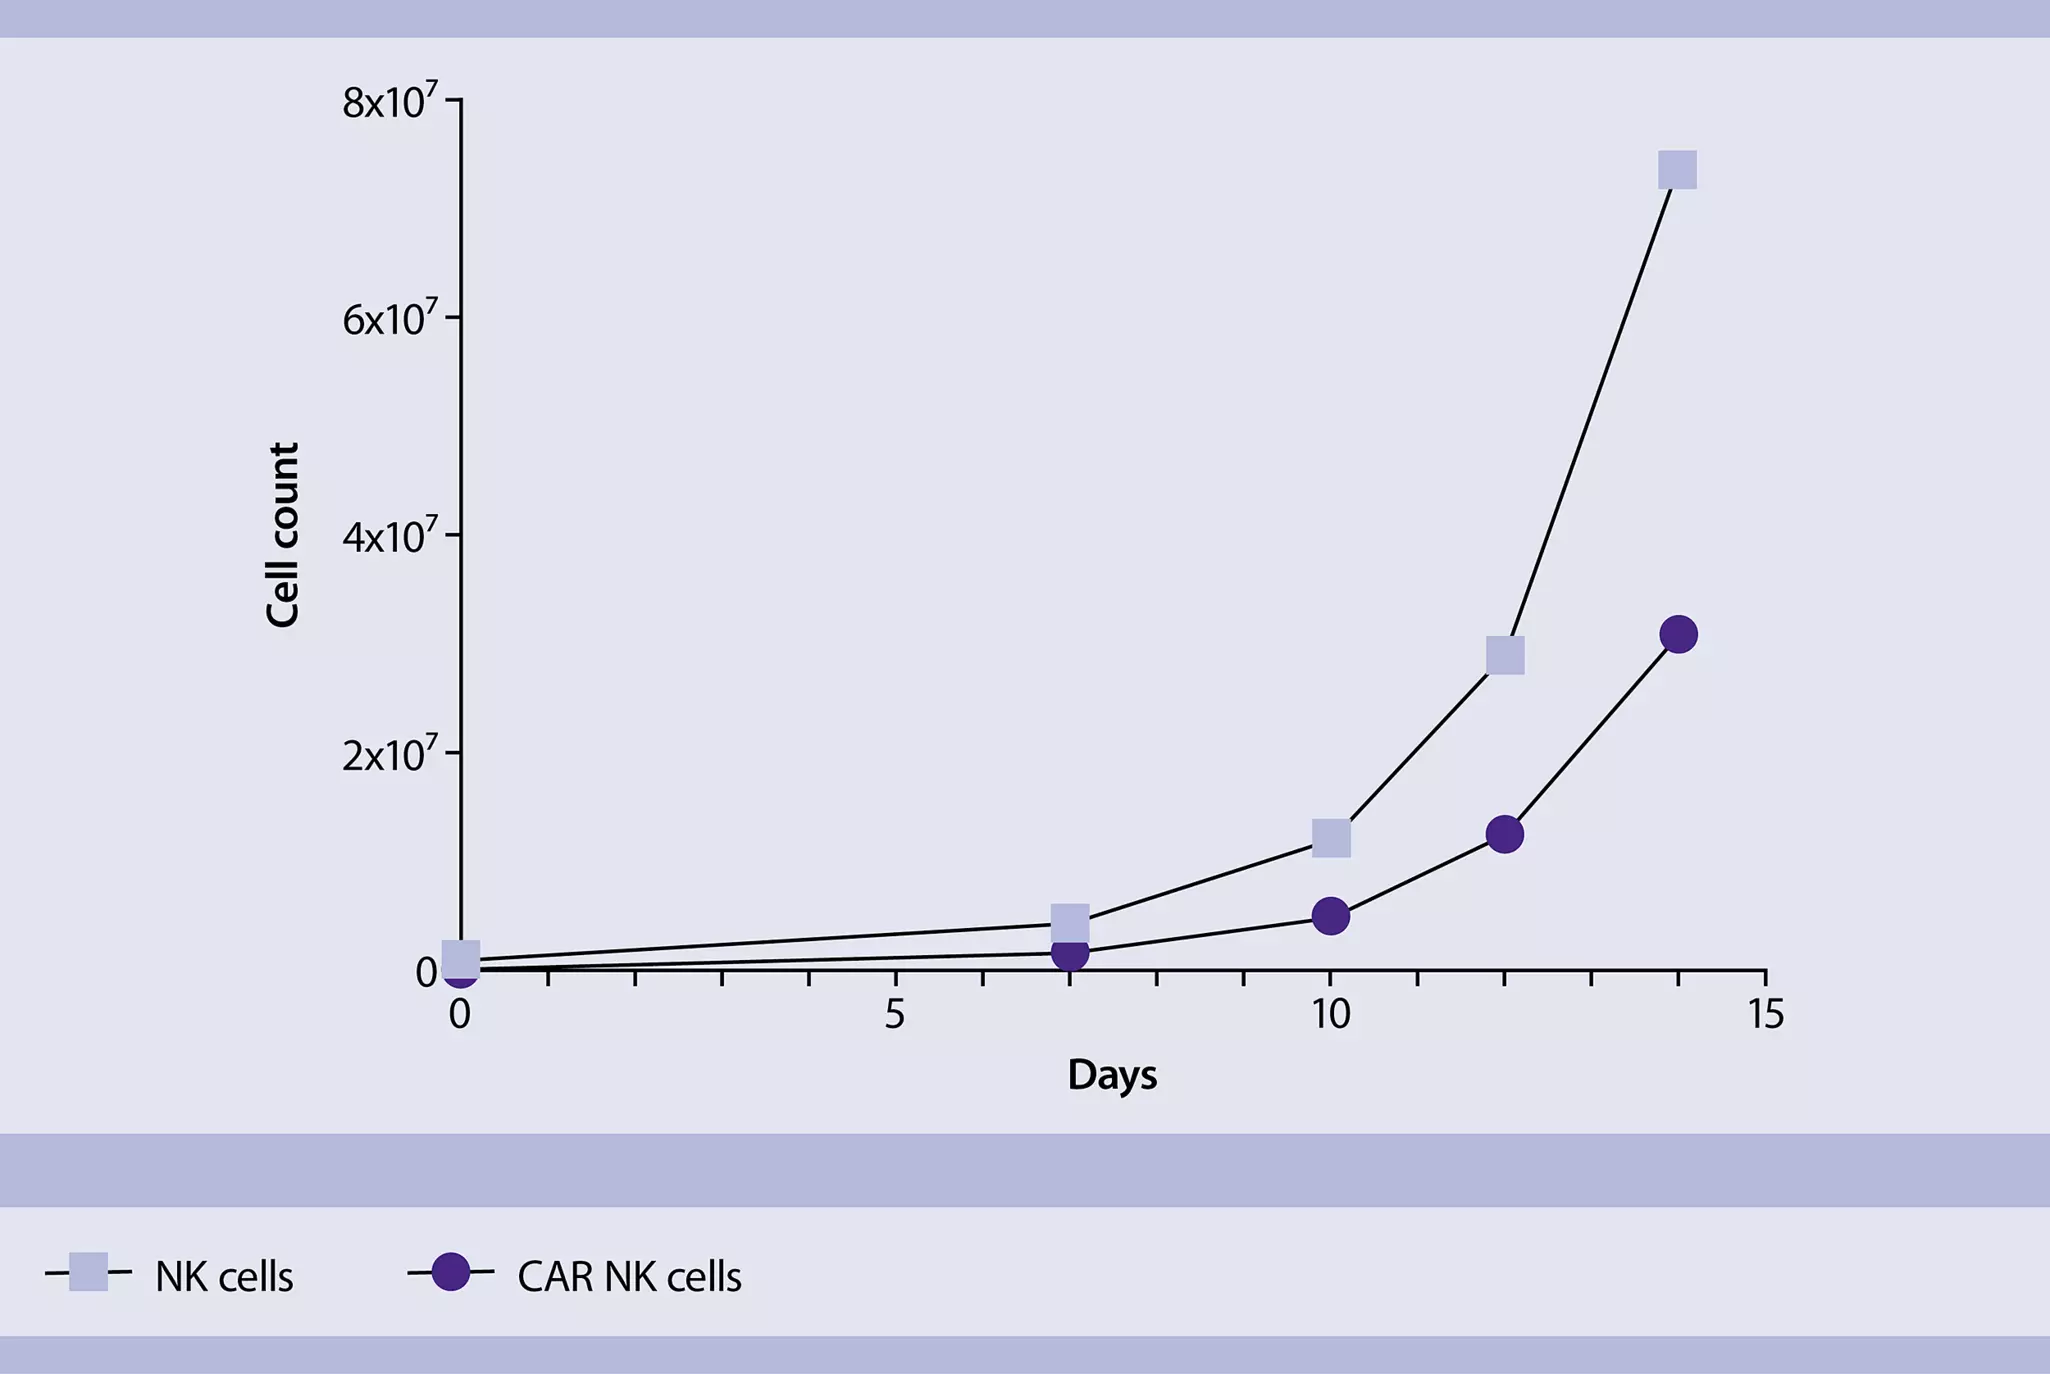
To detect the CAR NK cell rates, 20-50 µL aliquots were taken from the samples at several time points (day 1, 7, 10, 12, and 15) and stained with the NK cell count antibody panel (chapter 1, table 1).
- Determine cell number.
- Centrifuge cell suspension at 300×g for 10 minutes. Aspirate supernatant completely.
▲ Note: For optimal NK cell stimulation EDTA must be removed. Ensure removal of EDTA (e.g. over 200-fold reduction). - Wash cells twice with NK MACS Medium (without supplements) by filling the tube to the
maximum volume and centrifuge at 300×g for 10 minutes. Aspirate supernatant completely. - Resuspend NK cells in NK MACS Medium supplemented with Human IL-2, premium grade (500 U/mL) and Human IL-15, premium grade (140 U/mL) to a final density of 1×10⁶ cells per mL per cm2. Add the cell suspension into a suitable cell culture vessel (e.g. 1×10⁶ cells in 1 mL/well of a 24-well plate).
- (Optional) Initial IL-1 family cytokine boost (e.g. IL-18) to improve transduction: Add IL-1 family cytokine to a final concentration of 2,000 U/mL and resuspend carefully.
- Incubate for 2 days at 37 °C, 5% CO2.
▲ Note: Inspect culture daily and add fresh medium if required. - Proceed with chapter 9.
- When transducing NK cells with a lentiviral vector (i.e. baboon envelope pseudotyped lentiviral vector (BaEV-LV)) the multiplicity of infection (MOI) should be calculated.
- In general, conditions for the viral transduction must be defined for each virus independently. The given step-by-step instruction is an example and must be adapted to the experimental conditions.
- Include mock-transduced NK cells as negative control.
- On day three (48 hours after setup of NK cell culture), thaw lentiviral vector on ice following manufacturer’s recommendations and mix gently by pipetting up and down.
- Calculate the volume of lentiviral vector for transduction with a known NK cell number and MOI. Please refer to example below:
- Number of NK cells to be transduced: 106 cells
- Viral titer: 2×10⁸ transduction units (TU) per mL
- MOI: 2
Example:
(Number of cells/viral titer) × MOI = Volume of viral vector
(1×10⁶ cells/2×108 TU/mL) × 2 = 10 μL - Thaw an aliquot of Vectofusin®-1 at room temperature (one vial dissolved in 1 mL sterile water as recommended in the respective data sheet). Vortex thoroughly before use.
- The required final concentration of Vectofusin®-1 for transduction is 2.5 μg/mL in the total culture volume.
- Dilute lentiviral vector or lentiviral supernatant and Vectofusin®-1 separately by adding plain culture medium. Both diluted solutions shall have identical final volumes.
- Mix diluted lentiviral vector or lentiviral supernatant and diluted Vectofusin®-1 solutions and vortex or flick the mixture.
- Add the mixture of lentiviral vector or lentiviral supernatant and Vectofusin®-1 to the cell suspension from chapter 8 and pipette up and down.
▲ Note: Duration between mixing the viral vector and Vectofusin®-1 and addition of the mixture to the target cells should not exceed 10 minutes. - Centrifuge cell samples at 400×g for 2 hours at 32 °C.
- Incubate cells at 37 °C, 5–10% CO2. Wash cells once 24 hours after transduction with culture medium.
- Proceed with chapter 10.
- Inspect culture daily. Depending on the expansion rate, it might be necessary to split the culture more frequently than every 2−3 days.
- A 12 day expansion period should be adequate to obtain sufficient numbers of expanded lentiviral-transduced cells.
- On day 4, remove as much supernatant (containing IL-1 family cytokine and the lentiviral
vector) as possible from NK cell culture, taking care not to disturb the cells. - Adjust NK cell culture medium to the previous volume by adding pre-warmed NK MACS
Medium supplemented with 5% AB serum, Human IL-2, premium grade, and Human IL-15, premium grade. Incubate at 37 °C, 5–10% CO2. - When medium is exhausted, dilute cell suspension to a cell concentration of 0.5−1×10⁶ cells/mL with NK MACS Medium supplemented with 5% AB serum, Human IL-2, premium grade and Human IL-15, premium grade. Incubate at 37 °C, 5–10% CO2.
- Repeat step 3 when medium is exhausted (e.g. every 2–3 days) or when cells reach 80% confluency.
- Incubate for 12 days (until day 15).
▲ Note: The ideal cell density for NK cell expansion until next splitting is 1–2×10⁶ NK cells/mL.
On day 15, remove a small aliquot from the fraction representing the transduced CAR-expressing NK cells (e.g. 100–200 μL) for the three NK cell panels (chapter 1, tables 1–3).
▲ Note: Cell count, composition, and transduction efficiency can also be determined before and within the CAR NK cell expansion period.
For NK cell count panel:
- Take an aliquot of 20 µL sample and add 80 µL of the prepared NK cell count staining cocktail (chapter 1, table 1).
- Mix well and incubate for 10 minutes in the dark in the refrigerator (2−8 °C).
▲ Note: Higher temperatures and/or longer incubation times may lead to non-specific cell labeling. Working on ice requires increased incubation times. - Add 700 µL of buffer for flow cytometry analysis.
▲ Note: Cells must be acquired within 1 hour after staining.
For NK cell composition panel:
- Determine cell number.
- Centrifuge cell suspension at 300×g for 10 minutes. Aspirate supernatant completely.
- Resuspend 2x10⁶ cells in 100 μL NK cell composition staining cocktail (chapter 1, table 2).
- Mix well and incubate for 10 minutes in the dark in the refrigerator (2−8 °C).
▲ Note: Higher temperatures and/or longer incubation times may lead to non-specific cell labeling. Working on ice requires increased incubation times. - Wash cells by adding 1−2 mL of buffer and centrifuge at 300×g for 10 minutes. Aspirate supernatant completely.
- Resuspend cell pellet in 500 µL of buffer for flow cytometric analysis and acquire 450 µL for appropriate rare cell analysis (remaining CD3+ cells).
▲ Note: Cells must be acquired within 1 hour after staining.
For NK cell transduction panel:
- Determine cell number.
- Centrifuge cell suspension at 300×g for 10 minutes. Aspirate supernatant completely.
- Resuspend 2x10⁶ cells in 80 μL buffer, 10 µL FcR Blocking, and 10 µL biotinylated CAR Detection Reagent (CAR DR).
- Mix well and incubate for 10 minutes in the dark in the refrigerator (2−8 °C).
▲ Note: Higher temperatures and/or longer incubation times may lead to non-specific cell labeling. Working on ice requires increased incubation times. - Wash cells by adding 1−2 mL of buffer and centrifuge at 300×g for 10 minutes. Aspirate supernatant completely.
- Repeat washing step.
- Resuspend in 100 μL NK cell transduction staining cocktail (chapter 1, table 3).
- Mix well and incubate for 10 minutes in the dark in the refrigerator (2−8 °C).
▲ Note: Higher temperatures and/or longer incubation times may lead to non-specific cell labeling. Working on ice requires increased incubation times. - Wash cells by adding 1−2 mL of buffer and centrifuge at 300×g for 10 minutes. Aspirate supernatant completely.
- Resuspend cell pellet in 500 µL of buffer for flow cytometry analysis.
▲ Note: Cells must be acquired within 1 hour after staining.
Analysis of expansion rates
For determination of NK cell expansion rates samples of 20–50 µL are taken at appropriate time points (e.g. days 1, 7, 10, 12 and 15) and the count of viable cells is measured on the MACSQuant Analyzer 10. For dead cell exclusion propidium iodide is added prior to flow cytometric acquisition. The expansion rate is calculated afterwards.
For questions regarding flow cytometric analysis and phenotyping of CAR NK cells, contact macstec@miltenyi.com.
Quantification of CAR NK cell-mediated cytotoxicity (tumor cell killing rate)
- As many cell lines are easily killed by NK cells, in this protocol a more robust cell line was chosen, mostly resistant to natural killing. This cell line was stably transduced to express the target antigen and used as target cells.
- If not working with GFP+ target cells: Target cell labeling can be performed using the CellTrace™ Violet Cell Proliferation Kit. For detailed information refer to the end of this chapter at "(Optional) Target cell labeling for killing assay".
- From day 4 on: Perform regular medium exchange with NK MACS Medium supplemented with NK MACS Supplement, 5% AB serum, and IL-2/IL-15.
- Setup co-cultures on day 15.
▲ Note: From day 15 on: For all co-cultures for functional assays, use NK MACS Medium without NK MACS Supplement, 5% AB serum, and IL-2/IL-15 (in the following: NK MACS Medium (without supplements)).
Sample wells:
Plate 100 µL of target cells (tumor cell line expressing antigen of interest, T) containing 3×10⁵ cells/mL NK MACS Medium (without supplements) in the respective wells of a 96 U-bottom well plate.
Control wells:
Plate 100 µL of target cells (tumor cell line control, T) containing 3×10⁵ cells/mL NK MACS Medium (without supplements) in the respective wells of a 96 U-bottom well plate. - Adjust effector cell (CAR NK cells, E) density to 1.5×10⁶ cells/mL NK MACS Medium (without supplements). To reach an E:T ratio of 5:1, add 100 µL of effector cells to wells containing both types of target cells. The final total volume per well is 200 µL.
▲ Note: It is recommended to prepare a serial dilution of a culture of CAR NK cells with CAR-expressing target cells and a culture of CAR NK cells with non-CAR-expressing target cells. - Use following controls as triplicates:
a. Culture of target cells (tumor cell line expressing antigen of interest) without CAR NK cells
b. Culture of target cells (tumor cell line control) without CAR NK cells
c. (Optional) Culture of CAR NK cells without target cells
Fill up the control wells with 100 µL NK MACS Medium (without supplements ) to reach final volume of 200 µL. - Incubate at 37 °C, 5–10% CO₂ for 4 hours.
- Incubate the 96-well plate for 20 minutes at 2−8 °C in the refrigerator.
Start the acquisition of all samples per flow cytometry. For results refer to chapter 14, figure 7.
(Optional) Target cell labeling for killing assay
- If not working with GFP+ target cells: Target cell labeling can be performed using the CellTrace Violet Cell Proliferation Kit.
- Dilute CellTrace Violet dye stock solution to 1 μM using sterile 1× PBS.
- Determine cell number.
- Calculate the volume of CellTrace Violet dye needed to adjust the cells to a final concentration of 5×10⁶ cells/mL.
- Centrifuge cells at 300×g for 10 minutes.
- Discard supernatant and resuspend the cell pellet in the calculated volume of 1 µM CellTrace Violet dye, mix well, and incubate for 5 minutes at 37 °C, 5% CO2.
- After incubation add 5 mL of FCS and 5 mL of NK MACS Medium (without supplements).
▲ Note: From day 15 on: For all co-cultures for functional assays, use NK MACS Medium (without supplements). - Centrifuge the cells at 300×g for 10 minutes.
- Discard supernatant and resuspend the cell pellet in 5 mL NK MACS Medium.
- Determine cell number.
- Calculate the volume of NK MACS Medium needed to adjust the cells to a concentration of 1×10⁵ cells/mL.
- Centrifuge the cells at 300×g for 10 minutes.
- Discard supernatant and resuspend the cell pellet in the calculated volume of NK MACS Medium.
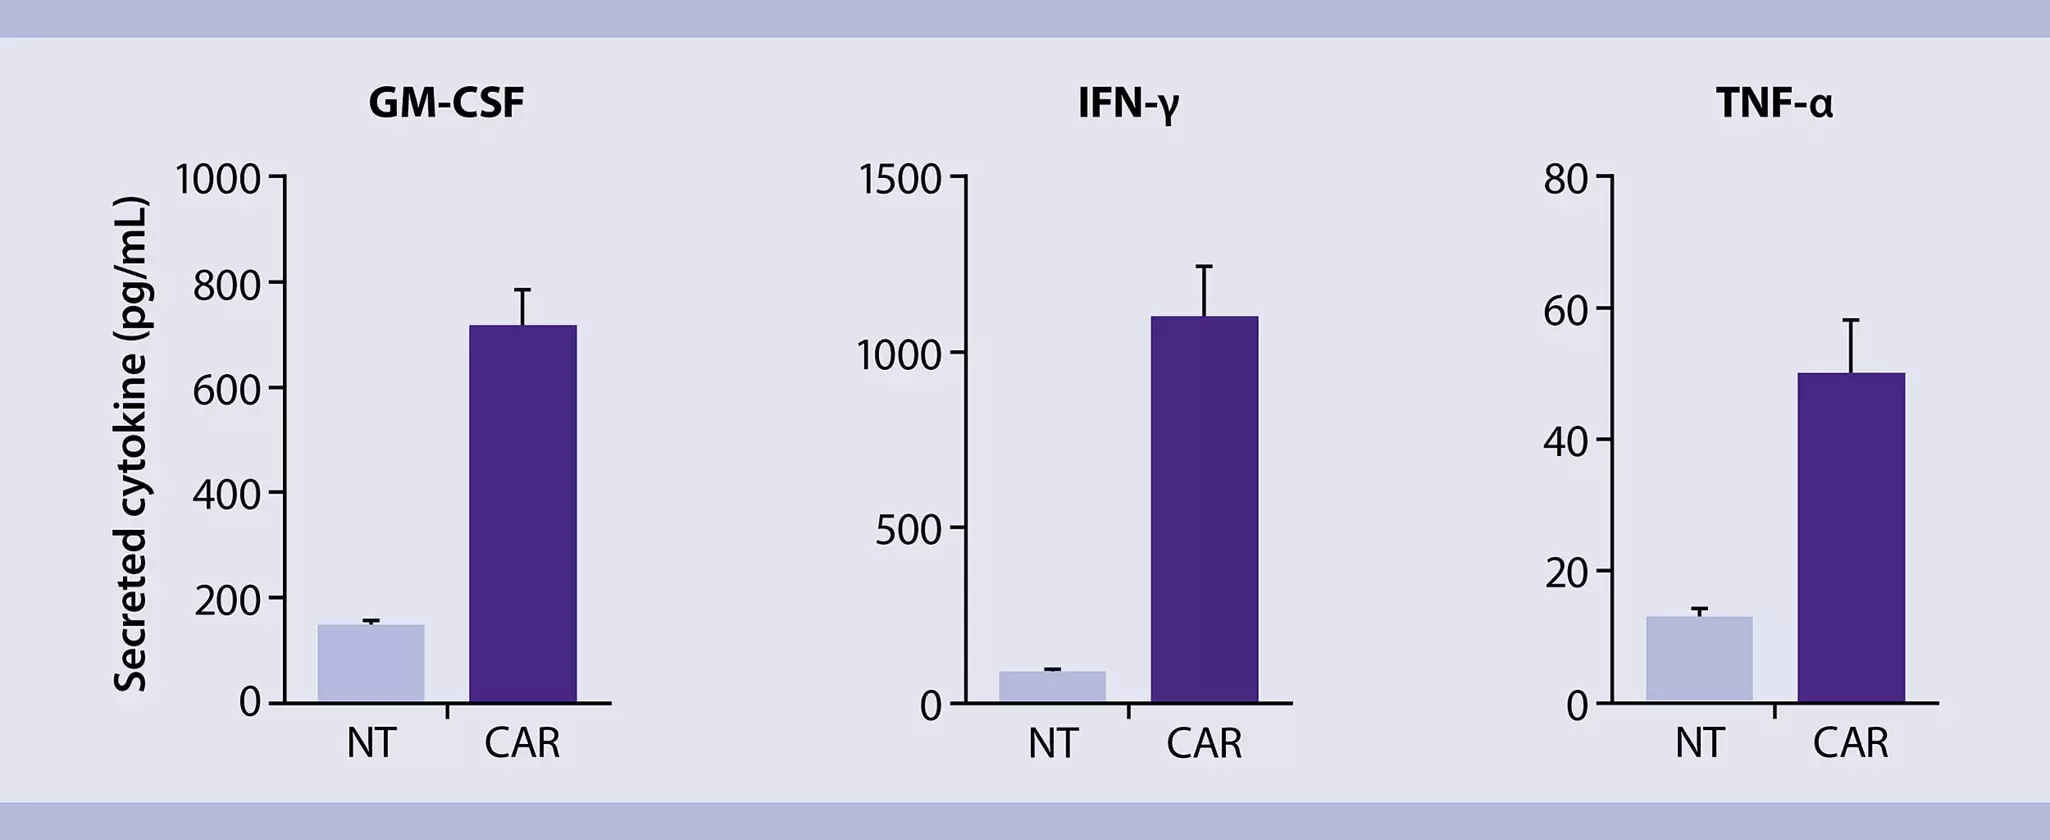
MACSPlex Assay for determining cytokine concentrations in co-culture supernatant
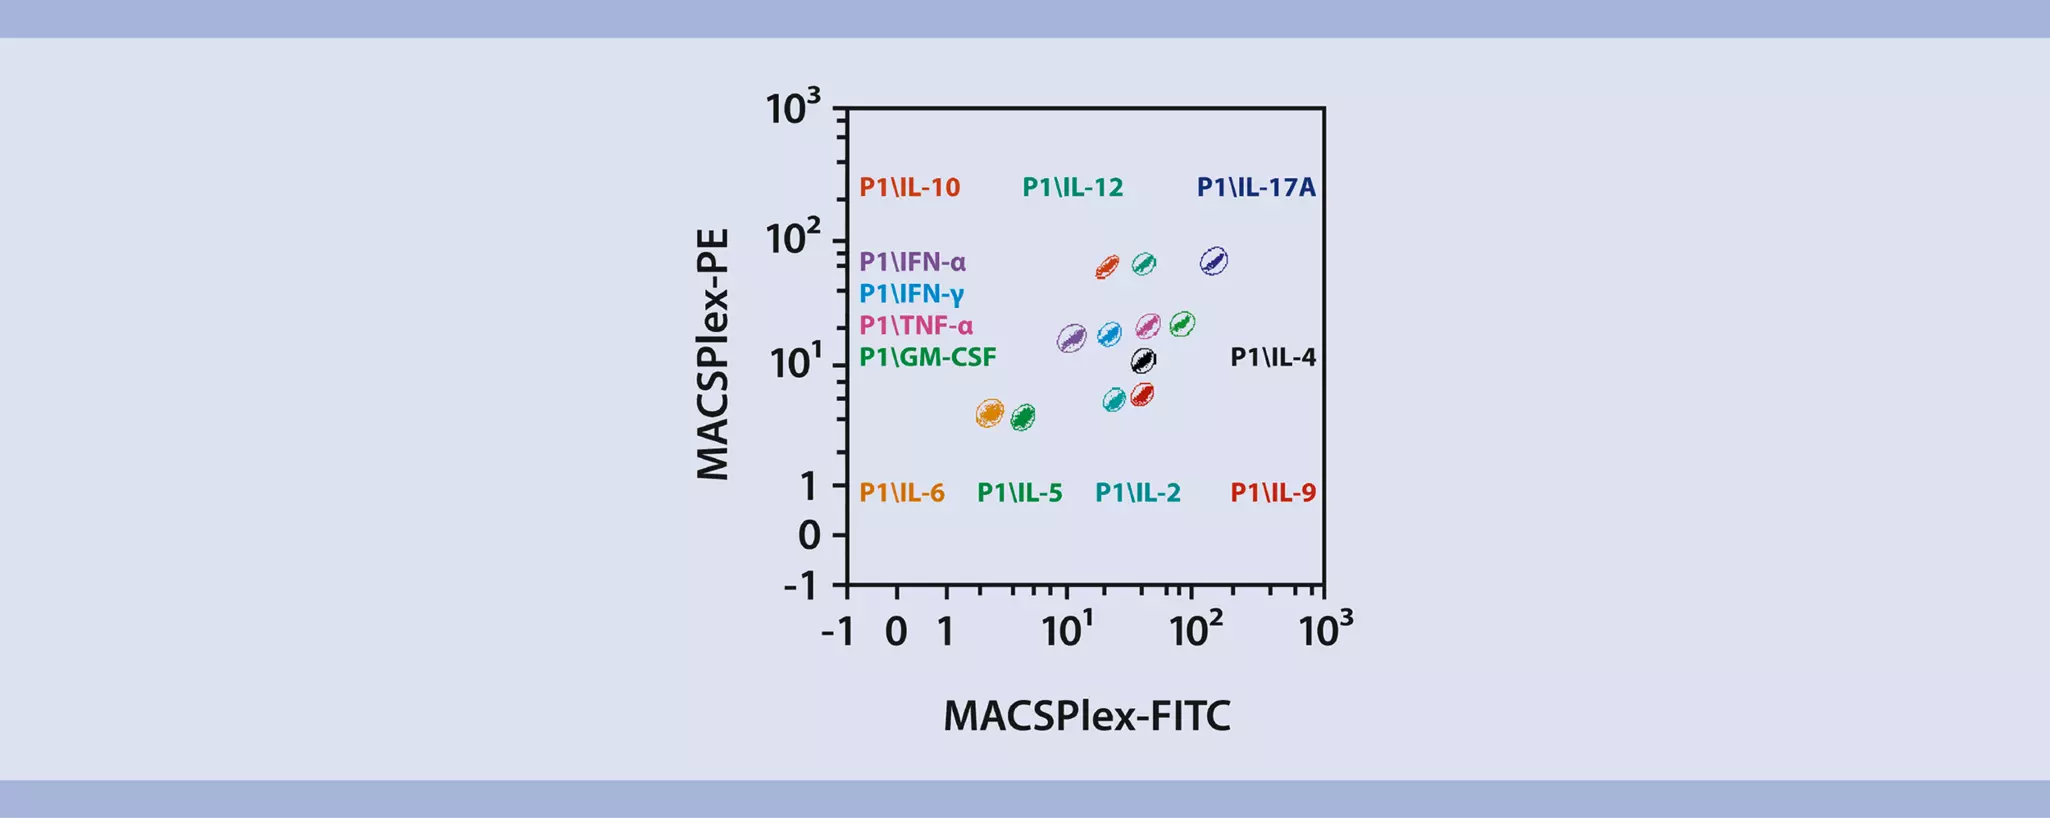
MACSPlex Assays are designed for determining concentrations of soluble analytes in a single sample. The analysis is based on MACSPlex Capture Beads, which display defined fluorescence properties and can be identified using standard flow cytometry techniques (figure 3).
The MACSPlex Cytokine 12 Kit, human is used to detect GM-CSF, IFN-α, IFN-γ, IL-2, IL-4, IL-5, IL-6, IL-9, IL-10, IL-12p70, IL-17A, and TNF-α.
- Run the assay at room temperature. Work fast and keep samples protected from light, for example, cover plate or tubes with aluminum foil, especially during incubation steps.
- Unknown samples should be run in replicates, for example, in duplicates or triplicates and in different dilutions to make sure the fluorescence values are within the dynamic range of the standard curve.
- Additional cytokines can be included in the analysis according to the respective needs. For more information about cytokines refer to www.miltenyibiotec.com/cytokines.
Setup of the co-cultures
- Plate 100 µL target cell suspension containing 2.5×10⁶ cells/mL NK MACS Medium (without supplements) in the respective wells of a 96 U-bottom well plate.
▲ Note: From day 15 on: For all co-cultures for functional assays, use NK MACS Medium without NK MACS Supplement, 5% AB serum and IL-2/IL-15 (in the following: NK MACS Medium (without supplements)). - Adjust effector cell (CAR NK cells) density to 2.5×10⁶ cells/mL NK MACS Medium (without supplements) and add 100 µL effector cell suspension to the respective wells for co-culture. The final total volume per well is 200 µL.
- Use following controls:
a. Culture of CAR NK cells without target cells
b. Culture of non-transduced NK cells without target cells
c. (Optional): Culture of target cells (tumor cell line expressing antigen of interest) without CAR NK cells
d. (Optional): Culture of target cells (tumor cell line control) without CAR NK cells - Incubate at 37 °C, 5–10% CO₂.
- After 24 h, remove 150 µL supernatant and use for the MACSPlex assay.
▲ Note: The supernatant can be stored at −20°C until further processing.
Setup of the MACSPlex assay in a 96-well plate
Design the assay using two columns of the MACSPlex Filter Plate for the standards. Add each of the seven standard samples in duplicates next to each other. Standards should be run in order from the lowest concentration (blank control: 0 pg/mL) to the highest concentration (stock solution: 10,000 pg/mL). Start with the unknown sample in the next column of the plate. For more details, refer to the respective data sheet, section ”Protocol for the assay using the MACSPlex Filter Plate”.
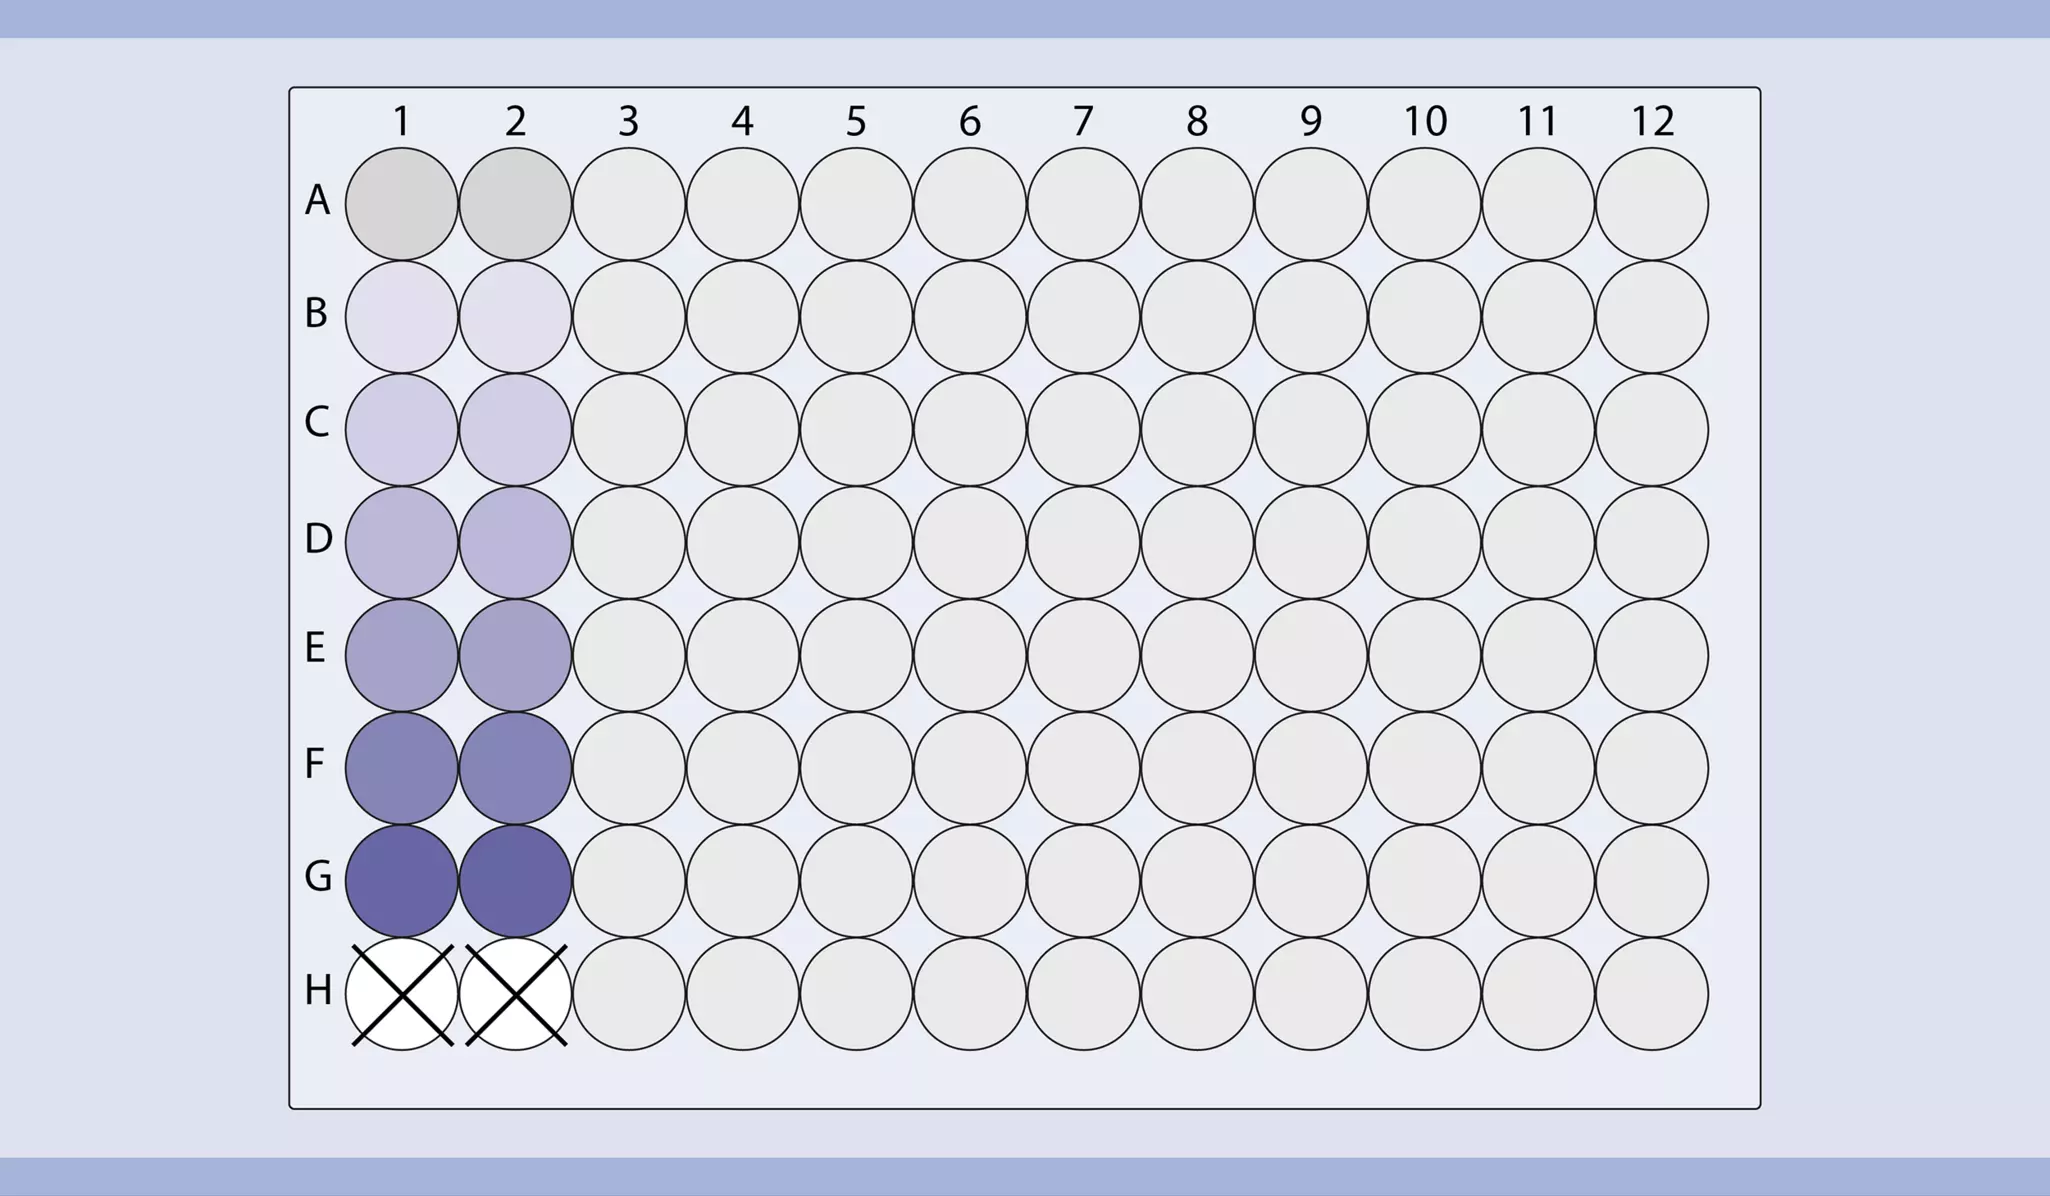
Table 4: Setup of the assay using a 96-well plate.
| Well position | Sample | Dilution |
| A1/A2 | Blank control | |
| B1/B2 | MACSPlex Cytokine 12 Standard (3.2 pg/mL) | 1:3125 (Dilution5; 1:55) |
| C1/C2 | MACSPlex Cytokine 12 Standard (16 pg/mL) | 1:625 (Dilution4; 1:54) |
| D1/D2 | MACSPlex Cytokine 12 Standard (80 pg/mL) | 1:125 (Dilution3; 1:53) |
| E1/E2 | MACSPlex Cytokine 12 Standard (400 pg/mL) | 1:25 (Dilution2; 1:52) |
| F1/F2 | MACSPlex Cytokine 12 Standard (2 ng/mL) | 1:5 (Dilution1; 1:51) |
| G1/G2 | MACSPlex Cytokine 12 Standard (10 ng/mL) | Stock solution (Dilution0; 1:50) |
| H1/H2 | Leave empty | |
| A3–H12 | Add unknown samples |
- Pre-wet required wells of the MACSPlex Filter Plate with 200 μL of MACSPlex Buffer per well and aspirate off using a vacuum manifold designed to accommodate the filter plate (max. −300 mbar) until the wells are drained. Alternatively centrifuge the filter plate stacked on a round-bottom 96-well plate at 300×g for 3 minutes.
- Place the filter plate briefly on a tissue to remove any residual liquid.
- Add 50 μL of MACSPlex Buffer or medium as a blank control, 50 μL of each dilution, and the stock solution of the MACSPlex Cytokine 12 Standard to the corresponding wells of the filter plate.
- Centrifuge cell culture supernatant at 4,000×g for 10 minutes at 4 °C to remove particulates.
- Add 50 μL of each unknown sample per well.
- Resuspend MACSPlex Cytokine 12 Capture Beads by vortexing for at least 30 seconds and transfer 20 μL of MACSPlex Capture Beads to each well.
- Incubate filter plate for 2 hours protected from light on an orbital shaker (450 rpm).
- Apply the filter plate to the vacuum manifold and aspirate until wells are drained. Place the filter plate briefly on a tissue to remove any residual liquid. Alternatively centrifuge the filter plate stacked on a round-bottom 96-well plate at 300×g for 3 minutes.
- Add 200 μL MACSPlex Buffer to each well and apply the filter plate to the vacuum manifold. Aspirate off until wells are drained. Place the filter plate briefly on a tissue to remove residual liquid. Alternatively centrifuge the filter plate stacked on a round-bottom 96-well plate at 300×g for 3 minutes.
- Repeat step 9.
- Add 80 μL of MACSPlex Buffer to each well.
- Add 20 μL of MACSPlex Cytokine 12 Detection Reagent to each well.
- Incubate filter plate for 1 hour protected from light on an orbital shaker (450 rpm).
- Repeat wash steps 8 and 9.
- Add 200 μL of MACSPlex Buffer to each well.
- For sample acquisition using MACSQuant Instruments and Express Modes place the filter plate onto the Chill 96 Rack. To prevent liquid transfer from the wells, ensure that residual drops under the plate are completely removed by placing the plate briefly on a tissue.
▲ Note: Perform the flow cytometric acquisition on the same day, as prolonged storage of samples can result in increased background and reduced sensitivity.
▲ Note: Keep samples protected from light by using the protection lid during the flow cytometric acquisition with the MACSQuant Instrument.
Flow cytometer setup
The kit includes MACSPlex Setup Beads for flow cytometer setup. MACSPlex Setup Beads are not required when using the MACSQuant Analyzer or MACSQuant Analyzer 10 but for all other flow instruments that can detect FITC, PE, and APC.
▲ Note: The kits are not suitable for use with the MACSQuant VYB.
Setup of the MACSQuant® Instrument
Calibrate the MACSQuant Instrument using MACSQuant Calibration Beads. For details, refer to the data sheet of the MACSQuant Calibration Beads. After successfully completing the calibration, the MACSQuant Instrument is ready for measurement. No further steps are required as all necessary setup steps are performed automatically during calibration.
Setup of other flow cytometers
The analysis of MACSPlex Cytokine 12 Kit, human requires a flow cytometer with a blue (e.g. 488 nm) and a red (e.g. 635 nm) laser, which can detect FITC, PE, and APC. For setting up these cytometers use MACSPlex Setup Beads (included in the kit). For instructions on the setup procedures of other flow cytometers, please refer to the application note " General instructions for MACSPlex Cytokine Kits: Data acquisition and analysis without the MACSQuant® Analyzer" available on the product page at www.miltenyibiotec.com/130-099-169 in the "Resources" section.
Flow cytometric acquisition and data analysis using the MACSQuant Express Mode
To perform the acquisition and data analysis of the MACSPlex Cytokine 12 Kit, human with the MACSQuant Instrument it is recommended to use the Express Modes MACSPlex_Standard and MACSPlex_Sample to achieve automated measurement and data analysis. For details refer to the special protocol “Data acquisition and analysis of the MACSPlex Cytokine Kits using the MACSQuant® Analyzer Express Modes in MACSQuantify™ Software version 2.13.1” available at www.miltenyibiotec.com/130-099-169 in the "Resources" section. The minimum version number of the Express Mode package needed to run the assay on the MACSQuant Instrument can be found there as well. To check the version number of the Express Mode package available on the MACSQuant Instrument in use please select Help> Info> expressModes within the MACSQuantify™ Software. The version number of the Express Mode package is increasing with each Express Mode update. Make sure the MACSQuant Instrument contains an Express Mode package with at least the same or a higher version number than the special protocol is marked with.
For results refer to figure 9 in section “Results”.
Analysis of purity after CD3 depletion and subsequent CD56 enrichment

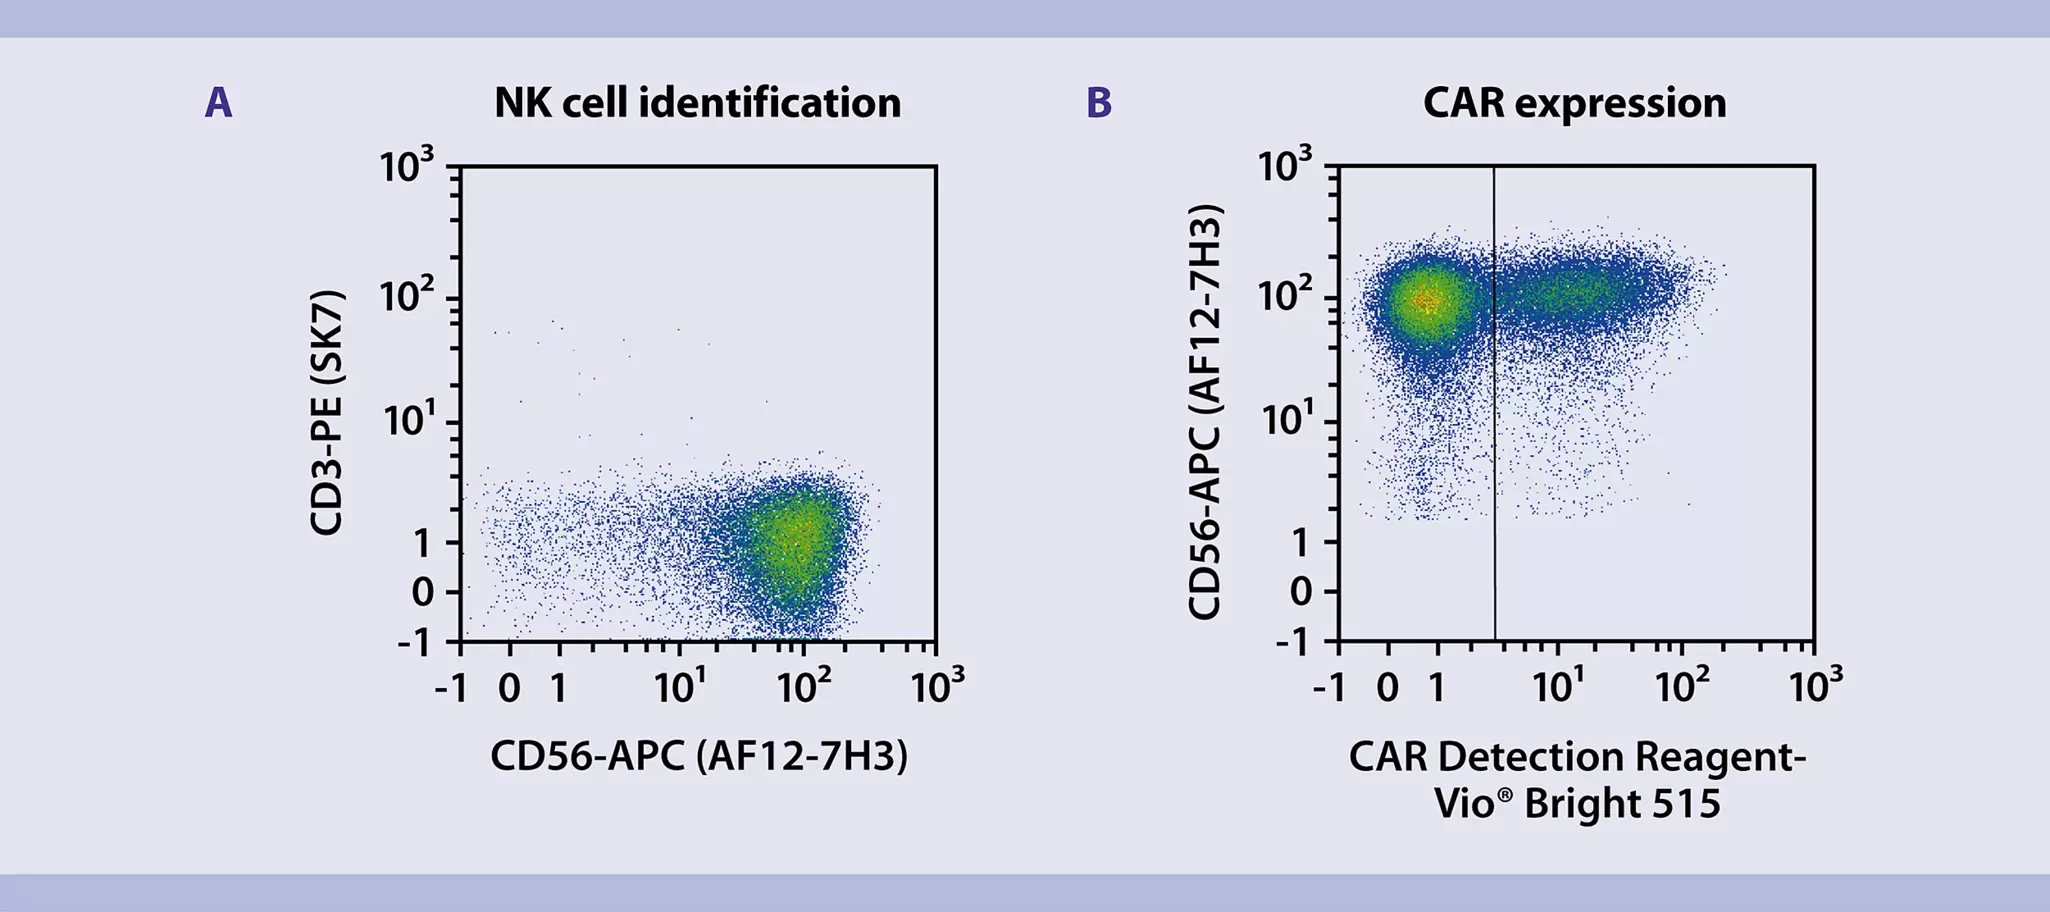
Flow cytometric analysis of transduction efficiency
Quantification of CAR NK cell-mediated cytotoxicity (tumor cell killing rate)

You have previously chosen International as your location.
What do you want to do?