In vitro expansion of human pan T cells
Isolation, cultivation, and expansion of pan T cells from human PBMCs
In this application protocol, pan T cells are isolated directly from human PBMCs by magnetic enrichment using the Pan T Cell Isolation Kit, human. They are subsequently activated and expanded with the T cell Activation and Expansion Kit, human. T cell purity, proliferation, and expression of activation markers are assessed by flow cytometry at different time points.
Protocol
In vitro expansion of human pan T cells
90 min
Isolation of PBMCs
18 min
Isolation of human pan T cells
30 min
(Optional) Analysis of purity after cell separation
45 min
CFSE labeling for analysis of cell proliferation
14 d
Activation and expansion of human pan T cells
Flow cytometric analysis of activation markers (e.g. on day 2)
Analysis of cell proliferation and expansion rates (e.g. on days 3, 6, 8, 10, 13, 14)
8 min
(Optional) Removal of MACSiBead™ Particles
Protocol

This protocol includes detailed instructions for preparing necessary reagents and materials and then carrying out each step.
PBS-EDTA: Phosphate-buffered saline (PBS), pH 7.2, with 2 mM EDTA.
▲ Note: EDTA can be replaced by other supplements such as anticoagulant citrate dextrose formula-A (ACD-A) or citrate phosphate dextrose (CPD).
Isolation of human PBMCs using FicollPaque™
- Peripheral blood or buffy coat should not be older than 8 hours and supplemented with anticoagulants (e.g. heparin, EDTA, citrate, ACD-A, or citrate phosphate dextrose (CPD)).
- Dilute cells with 2–4× the volume of PBS-EDTA buffer.
▲ Note: The more diluted the blood sample, the better the purity of the mononuclear cells. - Carefully layer 35 mL of diluted cell suspension over 15 mL of Ficoll-Paque™ in a 50 mL conical tube.
- Centrifuge at 400×g for 30–40 minutes at 20 °C in a swinging-bucket rotor without brake.
- Aspirate the upper layer leaving the mononuclear cell layer (lymphocytes, monocytes, and thrombocytes) undisturbed at the interphase.
- Carefully transfer the mononuclear cell layer to a new 50 mL conical tube.
- Fill the conical tube with PBS-EDTA, mix, and centrifuge at 300×g for 10 minutes at 20 °C. Carefully remove supernatant completely.
- For removal of platelets, resuspend the cell pellet in 50 mL of PBS-EDTA and centrifuge at 200×g for 10–15 minutes at 20 °C. Carefully remove the supernatant completely.
▲ Note: This step will increase the purity of the target cells in the subsequent MACS® Cell Separation. - Repeat step 7. Most of the platelets will remain in the supernatant upon centrifugation at 200×g.
- Resuspend cell pellet in an appropriate amount of PBS-EDTA and proceed to "Isolation of human pan T cells".
▲ Note: PBMCs may be stored in the refrigerator overnight in PBS containing 0.5% BSA or autologous serum. Do not store cells longer than one day in the refrigerator. Wash at least once before proceeding to magnetic labeling and resuspend cells in an appropriate buffer. For details see MACS Cell Separation Reagents data sheets.
Things to prepare in advance
Buffer (standard wash and dilution buffer): Prepare a solution of PBS, pH 7.2, 0.5% BSA, and 2 mM EDTA by diluting MACS® BSA Stock Solution 1:20 with autoMACS® Rinsing Solution.
Magnetic labeling
- Work fast, keep cells cold, and use precooled solutions (2–8 °C).
- Volumes for magnetic labeling given below are for up to 1×10⁷ total cells. When working with fewer cells, use the same volumes as indicated. When working with higher cell numbers, scale up all reagent volumes and total volumes accordingly.
- For optimal performance it is important to obtain a single-cell suspension before magnetic labeling.
- Determine cell number of PBMCs.
- Resuspend cell pellet in 40 µL of buffer per 1×10⁷ total cells.
- Add 10 µL of Pan T Cell Biotin-Antibody Cocktail (contained in the Pan T Cell Isolation Kit, human) per 1×10⁷ total cells.
- Mix well and incubate for 5 minutes in the refrigerator (2–8 °C).
- Add 30 µL of buffer per 1×10⁷ total cells.
- Add 20 µL of Pan T Cell MicroBead Cocktail per 1×10⁷ total cells.
- Mix well and incubate for 10 minutes in the refrigerator (2–8 °C).
- Proceed to "Magnetic separation".
▲ Note: A minimum of 500 µL is required for magnetic separation. If necessary, add buffer to the cell suspension.
Magnetic separation
- Always wait until the column reservoir is empty before proceeding to the next step.
- Choose an LS Column and a suitable MACS Separator.
- Place LS Column in the magnetic field of a suitable MACS Separator. For details refer to the respective MACS Column data sheet.
- Prepare column by rinsing with 3 mL of buffer.
- Apply cell suspension onto the column. Collect flow-through containing unlabeled cells, representing the enriched T cells.
- Wash column with 3 mL of buffer. Collect unlabeled cells that pass through, representing the enriched T cells, and combine with the effluent from step 3.
- (Optional) Remove column from the separator and place it on a suitable collection tube. Pipette 5 mL of buffer onto the column. Immediately flush out the magnetically labeled non-T cells by firmly pushing the plunger into the column.
Things to prepare in advance
Antibody panel for phenotyping
Freshly prepare the following staining cocktail for each sample:
- 80 µL buffer
- 10 µL of each antibody:
CD3 Antibody, anti-human, FITC
CD2 Antibody, anti-human, PE
Store the staining cocktail in the dark in the refrigerator (2–8 °C) until use. Do not store for extended periods.
Analysis of purity after cell separation
- This step is optional. Additional antibodies can be included in the analysis according to the respective needs. Learn more about our antibodies and dyes.
- Remove a small aliquot from the fraction representing the enriched T cells (e.g. 50 µL).
- Determine cell number.
- Centrifuge cell suspension at 300×g for 10 minutes. Aspirate supernatant completely.
- For each sample, resuspend up to 1×10⁶ nucleated cells in 100 µL phenotyping staining cocktail (see antibody panel for phenotyping in "Things to prepare in advance").
- Mix well and incubate for 10 minutes in the dark in the refrigerator (2–8 °C).
▲ Note: Higher temperatures and/or longer incubation times may lead to non-specific cell labeling. Working on ice requires increased incubation times. - Wash cells by adding 1–2 mL of buffer and centrifuge at 300×g for 10 minutes. Aspirate supernatant completely.
- Resuspend cell pellet in a suitable amount of buffer (e.g. 500 µL) for analysis by flow cytometry.
▲ Note: Add propidium iodide according to the manufacturer’s instructions before flow analysis.

 View details
Things to prepare in advance
CFSE stock solution for cell labeling
- Prepare the 10 mM CFSE stock solution by dissolving, e.g., 5.57 mg of CFSE (MW 557.46) in 1 mL of DMSO.
- Use CFSE at a final concentration of 1 µM by diluting the stock solution 1:10,000 (e.g. 1 µL CFSE stock solution per 10 mL cell suspension in PBS).
Aliquots of the stock solution should be stored at –20 °C or below. Avoid repeated freeze-thaw cycles.
Supplemented TexMACS™ Medium
Prepare TexMACS Medium supplemented with human IL-2 (50 IU/mL).
▲ Note: Make sure to add IL-2 freshly to the T cell medium for cell expansion.
▲ Note: Instead of TexMACS Medium, RPMI supplemented with FBS (10 % final concentration), 100× L-glutamine stock solution (1% final concentration), 2-mercaptoethanol (0.01 mM final concentration), and human IL-2 (50 IU/mL) can be used for T cell cultivation and expansion.
▲ Note: Addition of penicillin/streptomycin to the T cell medium is optional (e.g. 100× penicillin/streptomycin stock solution to a final concentration of 1%).
CFSE labeling for analysis of cell proliferation
- CFSE is added to the freshly isolated Pan T cell suspension to assess cell proliferation at any given time point and for every condition tested. Therefore, do not use antibodies for flow cytometric analysis conjugated to fluorochromes that exhibit the same spectrum as CFSE (λex 492 nm; λem 517 nm). Alternatively, a separate well in the cell culture dish can be used for CFSE labeling. Make sure to prepare at least one additional well per condition (e.g. stimulated and non-stimulated control).
- Cell proliferation is usually analyzed on days 6, 8, and 10. However, feel free to choose time points that are appropriate for the respective experimental needs (see "Flow cytometric analysis of cell proliferation and expansion rates").
- To assess expansion rates, determine cell numbers, e.g., on days 3, 6, 8, 10, 13, and 14 using, e.g., a Neubauer Chamber or the counting function of the MACSQuant® Analyzer 10 see "Flow cytometric analysis of cell proliferation and expansion rates".
- Determine cell number.
- Centrifuge cell suspension at 300×g for 10 minutes. Aspirate supernatant completely.
- Resuspend cells to a final concentration of 2×10⁷ cells/mL in PBS.
- Add the CFSE stock solution to a final concentration of 1 µM to the cell suspension (e.g. add 1 µL 10 mM CFSE stock solution to 10 mL cell suspension).
- Mix well and incubate for 10 minutes at 37 °C.
- Add one volume of human AB serum, mix well, and incubate for 5 minutes at room temperature (e.g. add 10 mL human AB serum to 10 mL cell suspension).
- Centrifuge cell suspension at 300×g for 10 minutes. Aspirate supernatant completely.
- Resuspend cells to a final concentration of 2×10⁷ cells/mL in TexMACS™ Medium without supplements.
- Repeat steps 7 and 8 to wash cells twice.
▲ Note: After the last wash resuspend cells in fresh TexMACS Medium supplemented with IL-2. - Cells are now ready for activation and expansion. Proceed to "Activation and expansion of human pan T cells".
Things to prepare in advance
T cell medium
Prepare TexMACS Medium supplemented with human IL-2 (50 IU/mL).
▲ Note: Make sure to add IL-2 freshly to the T cell medium for cell expansion.
▲ Note: Instead of TexMACS Medium, RPMI supplemented with FBS (10% final concentration), 100× L-glutamine stock solution (1% final concentration), 2-mercaptoethanol (0.01 mM final concentration), and human IL-2 (50 IU/mL) can be used for T cell cultivation and expansion.
▲ Note: Addition of penicillin/streptomycin to the T cell medium is optional (e.g. 100× penicillin/streptomycin stock solution to a final concentration of 1%).
Reconstitution of Human IL-2 IS, premium grade
It is recommended to reconstitute lyophilized Human IL-2 IS, premium grade with deionized sterile-filtered water to a final concentration of 0.1–1.0 mg/mL in a volume of at least 100 µL.
▲ Note: Further dilutions should be prepared with 0.1% BSA or human serum albumin (HSA) in PBS.
The ED50 is ≤0.2 ng/mL corresponding to a specific activity of ≥5.0×10⁶ IU/mg (calibrated with NIBSC 86/504) or ≥1×10⁷ IU/mg (calibrated with Proleukin®).
Recommended stock concentration: 0.1 mg/mL by reconstituting a 10 µg vial of Human IL-2 IS, premium grade with 100 µL deionized sterile-filtered water. This results in a final activity of 500 IU/µL.
Upon reconstitution, aliquots should be stored at –20 °C or below. Avoid repeated freeze-thaw cycles.
To obtain a cell culture medium supplemented with 50 IU/mL, add 1.0 µL of reconstituted Human IL-2 IS, premium grade freshly to 10 mL cell culture medium.
Loading of Anti-Biotin MACSiBead™ Particles
- Resuspend Anti-Biotin MACSiBead Particles (contained in the T Cell Activation/Expansion Kit) thoroughly by vortexing before use to obtain a homogenous suspension.
- Anti-Biotin MACSiBead Particles are supplied without preservative. Remove aliquots under aseptic conditions.
- It is recommended to load Anti-Biotin MACSiBead Particles in batches of 1×10⁸ particles. Loaded AntiBiotin MACSiBead Particles are stable for up to 4 months when stored at 2–8 °C.
- Pipette 100 µL of CD2-Biotin, 100 µL of CD3-Biotin, and 100 µL of CD28-Biotin into a sealable 2 mL tube and mix well.
▲ Note: This antibody cocktail, with a final antibody concentration of 10 µg per antibody per 1 mL of loaded Anti-Biotin MACSiBead Particles, is optimized for achieving maximal T cell activation. - Resuspend Anti-Biotin MACSiBead Particles thoroughly by vortexing.
- Remove 500 µL Anti-Biotin MACSiBead Particles (1×10⁸ AntiBiotin MACSiBead Particles) and add to antibody cocktail.
- Add 200 µL buffer to adjust to a total volume of 1 mL.
▲ Note: Anti-Biotin MACSiBead Particles can be loaded in a flexible manner with biotinylated antibodies or ligands other than those supplied in the T Cell Activation/Expansion Kit, human. If desired, add other biotinylated antibodies or ligands at appropriate concentrations and adjust with buffer to a total volume of 1 mL, accordingly. - Incubate for 2 hours at 2–8 °C under constant, gentle rotation by using the MACSmix™ Tube Rotator at approximately 4 rpm (slowest permanent run program).
- The loaded Anti-Biotin MACSiBead Particles (1×10⁸ particles/mL) are now ready to use. Do not remove the loaded Anti-Biotin MACSiBead Particles from the antibody cocktail. Store at 2–8 °C for up to 4 months.
T cell cultivation, activation, and expansion with MACSiBead Particles
- Resuspend loaded Anti-Biotin MACSiBead Particles thoroughly and transfer 10 μL (1×10⁶ loaded Anti-Biotin MACSiBead Particles) per 2×10⁶ cells into a suitable tube.
▲ Note: If unloaded MACSiBead™Particles will be used for negative control experiments, replace the loaded Anti-Biotin MACSiBead Particles with 10 μL (1×10⁶ beads) of unloaded Anti-Biotin MACSiBead Particles per 2×10⁶ cells. - Add 100–200 µL of TexMACS Medium without supplements to the loaded Anti-Biotin MACSiBead Particles and centrifuge at 300×g for 5 minutes.
- Aspirate supernatant and resuspend loaded Anti-Biotin MACSiBead Particles in 100 µL of fresh TexMACS Medium supplemented with IL-2.
- Resuspend cells at a density of 2×10⁶ cells per 900 µL of TexMACS Medium supplemented with IL-2.
- Add the prepared Anti-Biotin MACSiBead Particles from step 3 to the 900 µL of cell suspension and mix well.
- Dilute cells with TexMACS Medium supplemented with IL-2 to a final density of 1×10⁶ cells per mL per cm2 and add the mixture to a suitable cell culture vessel (e.g. 2×10⁶ cells in 2 mL per well of a 24-well plate).
- Incubate at 37 °C and 5–10% CO2 for up to 3 days.
▲ Note: Inspect cultures daily. Add fresh TexMACS Medium supplemented with IL-2 if required. - At day 3, gently pipette cell suspension up and down to break up clumps.
- Split cell suspension into two equal parts and add TexMACS Medium supplemented with IL-2. Incubate at 37 °C and 5–10% CO2.
- Split cell suspension again whenever necessary (e.g. every 2–3 days or when cells reach 80% confluency) into two equal parts and add TexMACS Medium supplemented with IL-2. Incubate at 37 °C, 5–10% CO2.
▲ Note: The ideal starting cell density for T cell expansion is 1–2×10⁶ T cells per mL. Inspect the cell culture daily. Depending on the expansion rate, it might be necessary to split the culture more frequently than every 2–3 days.
▲ Note: If IL-2 interferes with downstream experiments, it can be omitted. However, omission will lower the cell viability. - At day 14, resuspend T cells at 2.5×10⁶ cells per mL in fresh TexMACS Medium supplemented with IL-2.
- For longer expansion periods, restimulate the cells by adding one loaded Anti-Biotin MACSiBead Particle per two cells. To this end, count the cells and add 12.5 μL loaded AntiBiotin MACSiBead Particles per 2.5×10⁶ T cells.
- Further cultivate cells and repeat steps 8 and 9 every 2–3 days.
▲ Note: Inspect the cultures daily. Depending on the expansion rate, it might be necessary to split cultures more frequently than every 2–3 days. - Proceed to downstream application, e.g., analysis of cells.
▲ Note: Removal of Anti-Biotin MACSiBead Particles is not required for immunofluorescent staining. For assays where T cells are required to return to a fully resting state prior to further stimulation, Anti-Biotin MACSiBead Particles should be removed at least 24 hours before restimulation (see "Removal of MACSiBead Particles").
Things to prepare in advance
Antibody panel for activation markers
Freshly prepare the following staining cocktail for each sample:
- 70 µL buffer
- 10 µL of each antibody:
CD69 Antibody, anti-human, APC
CD3 Antibody, anti-human, APC-Vio® 770
CD25 Antibody, anti-human, PE
Store the staining cocktail in the dark in the refrigerator (2–8 °C) until use. Do not store for extended periods.
▲ Note: Highly activated T cells might down-regulate CD3 to some extent. Alternatively, CD4 and CD8 stainings (e.g. with CD4-VioBlue® and CD8-VioGreen™) can be used to properly gate on T cell subpopulations.
Flow cytometric analysis of activation markers
- For analysis of T cell activation, samples are taken 48 hours after stimulation and stained for the early activation markers CD25 and CD69 to determine the proportion of activated cells among viable CD3+ T cells.
- Highly activated T cells might down-regulate CD3 to some extent. Alternatively, CD4 and CD8 stainings (e.g. with CD4-VioBlue and CD8-VioGreen) can be used to properly gate on T cell subpopulations.
- Additional antibodies can be included in the analysis according to the respective needs. Learn more about our antibodies and dyes. This specific panel is compatible with CFSE labeling. When modifying the antibody panel, make sure to use fluorochrome-conjugated antibodies that do not interfere with CFSE analysis (see "CFSE labeling for analysis of cell proliferation") or use separate wells for CFSE labeling.
- Remove a small aliquot from samples (e.g. stimulated sample and unstimulated control).
- Determine cell number.
- Centrifuge cell suspension at 300×g for 10 minutes. Aspirate supernatant completely.
- For each sample, resuspend up to 1×10⁶ nucleated cells in 100 µL activation marker staining cocktail (see antibody panel for activation markers in "Things to prepare in advance").
- Mix well and incubate for 10 minutes in the dark in the refrigerator (2–8 °C).
▲ Note: Higher temperatures and/or longer incubation times may lead to non-specific cell labeling. Working on ice requires increased incubation times. - Wash cells by adding 1–2 mL of buffer and centrifuge at 300×g for 10 minutes. Aspirate supernatant completely.
- Resuspend cells in a suitable amount of buffer (e.g. 500 µL) for analysis by flow cytometry.
▲ Note: Add propidium iodide according to the manufacturer’s instructions before flow cytometric analysis.
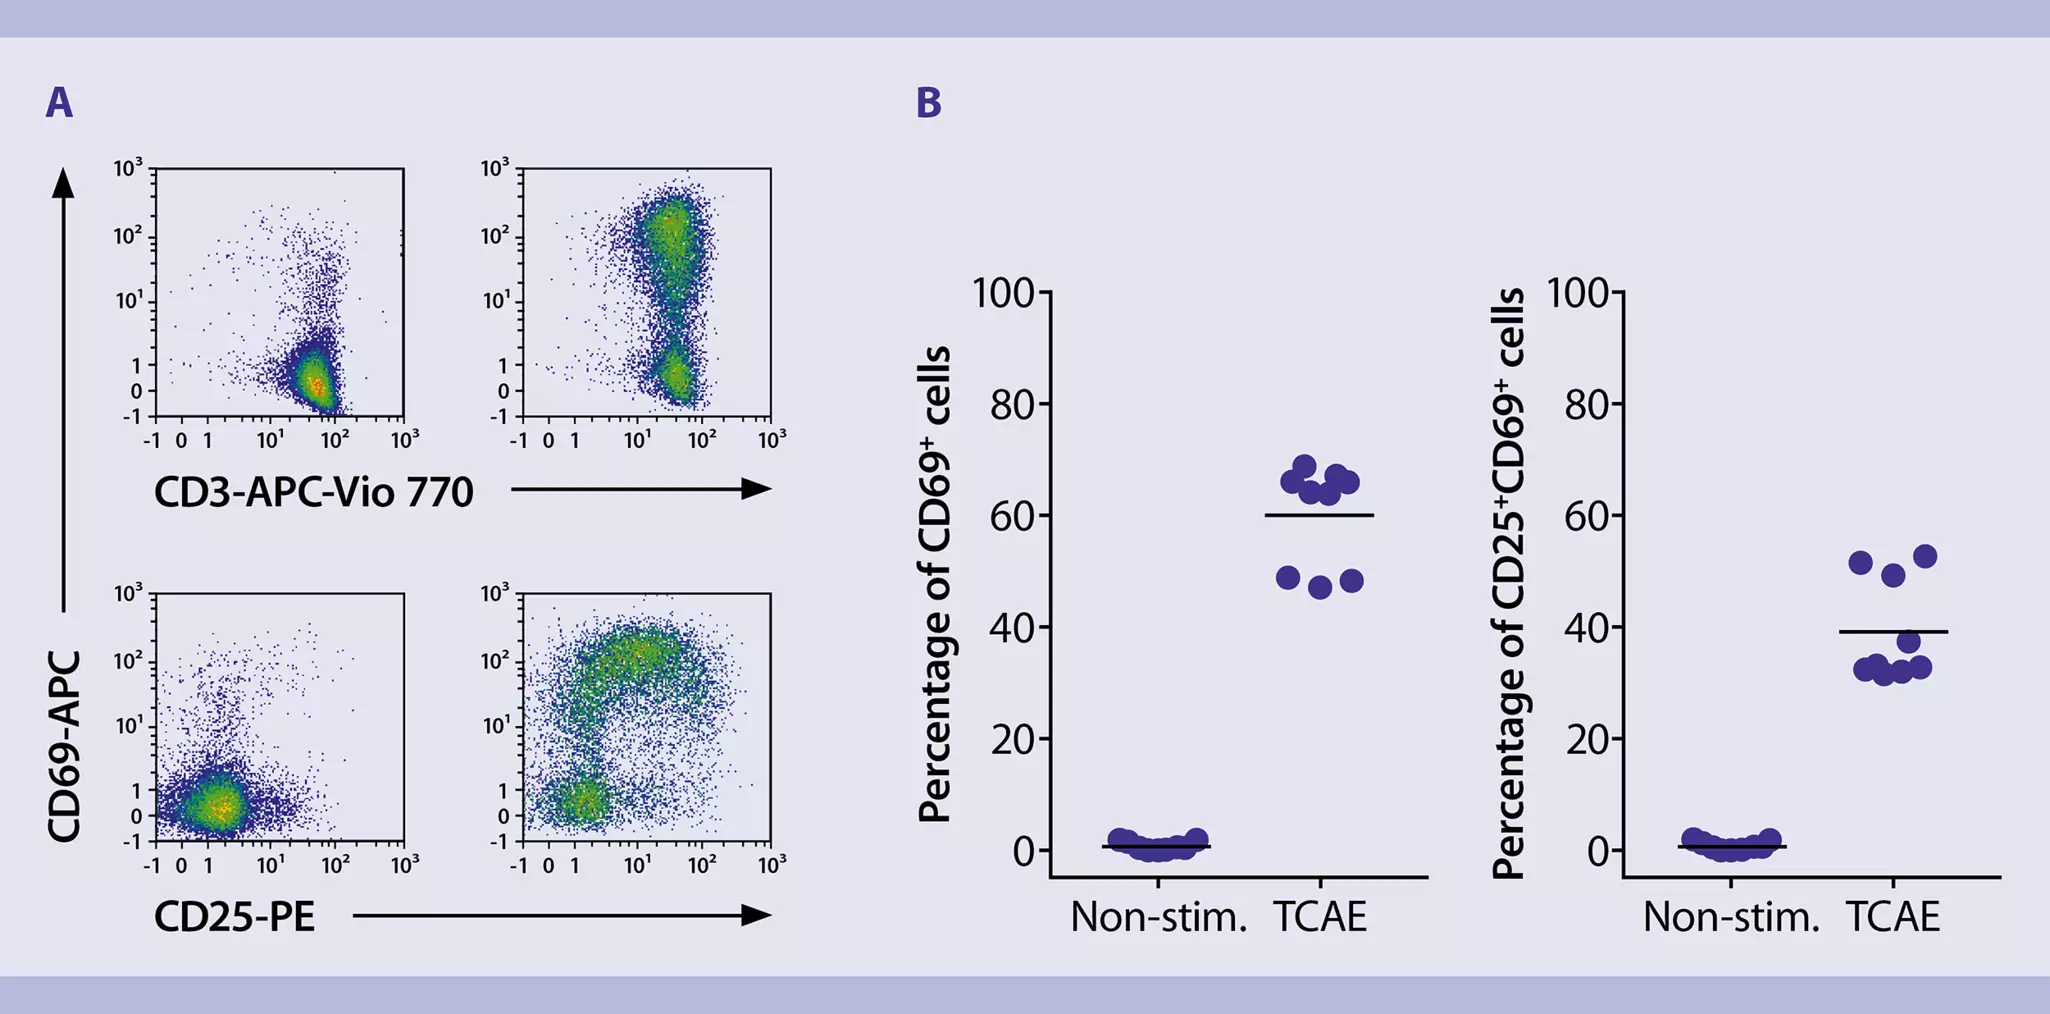
Analysis of cell proliferation and expansion rates
- For monitoring cell proliferation, samples of 25–50 µL are taken at appropriate time points (e.g. days 6, 8, and 10), diluted 1:2 with buffer, and CFSE dilution is measured on the MACSQuant® Analyzer 10. At least 20,000 events are recorded.
▲ Note: Time points can be modified to meet experimental needs. - For determination of the cell expansion rate, samples are taken at appropriate time points (e.g. days 3, 6, 8, 10, 13, 14) and the count of viable cells is measured on the MACSQuant Analyzer 10. For dead cell exclusion, PI is added prior to flow cytometric acquisition. Expansion rate is calculated afterwards.
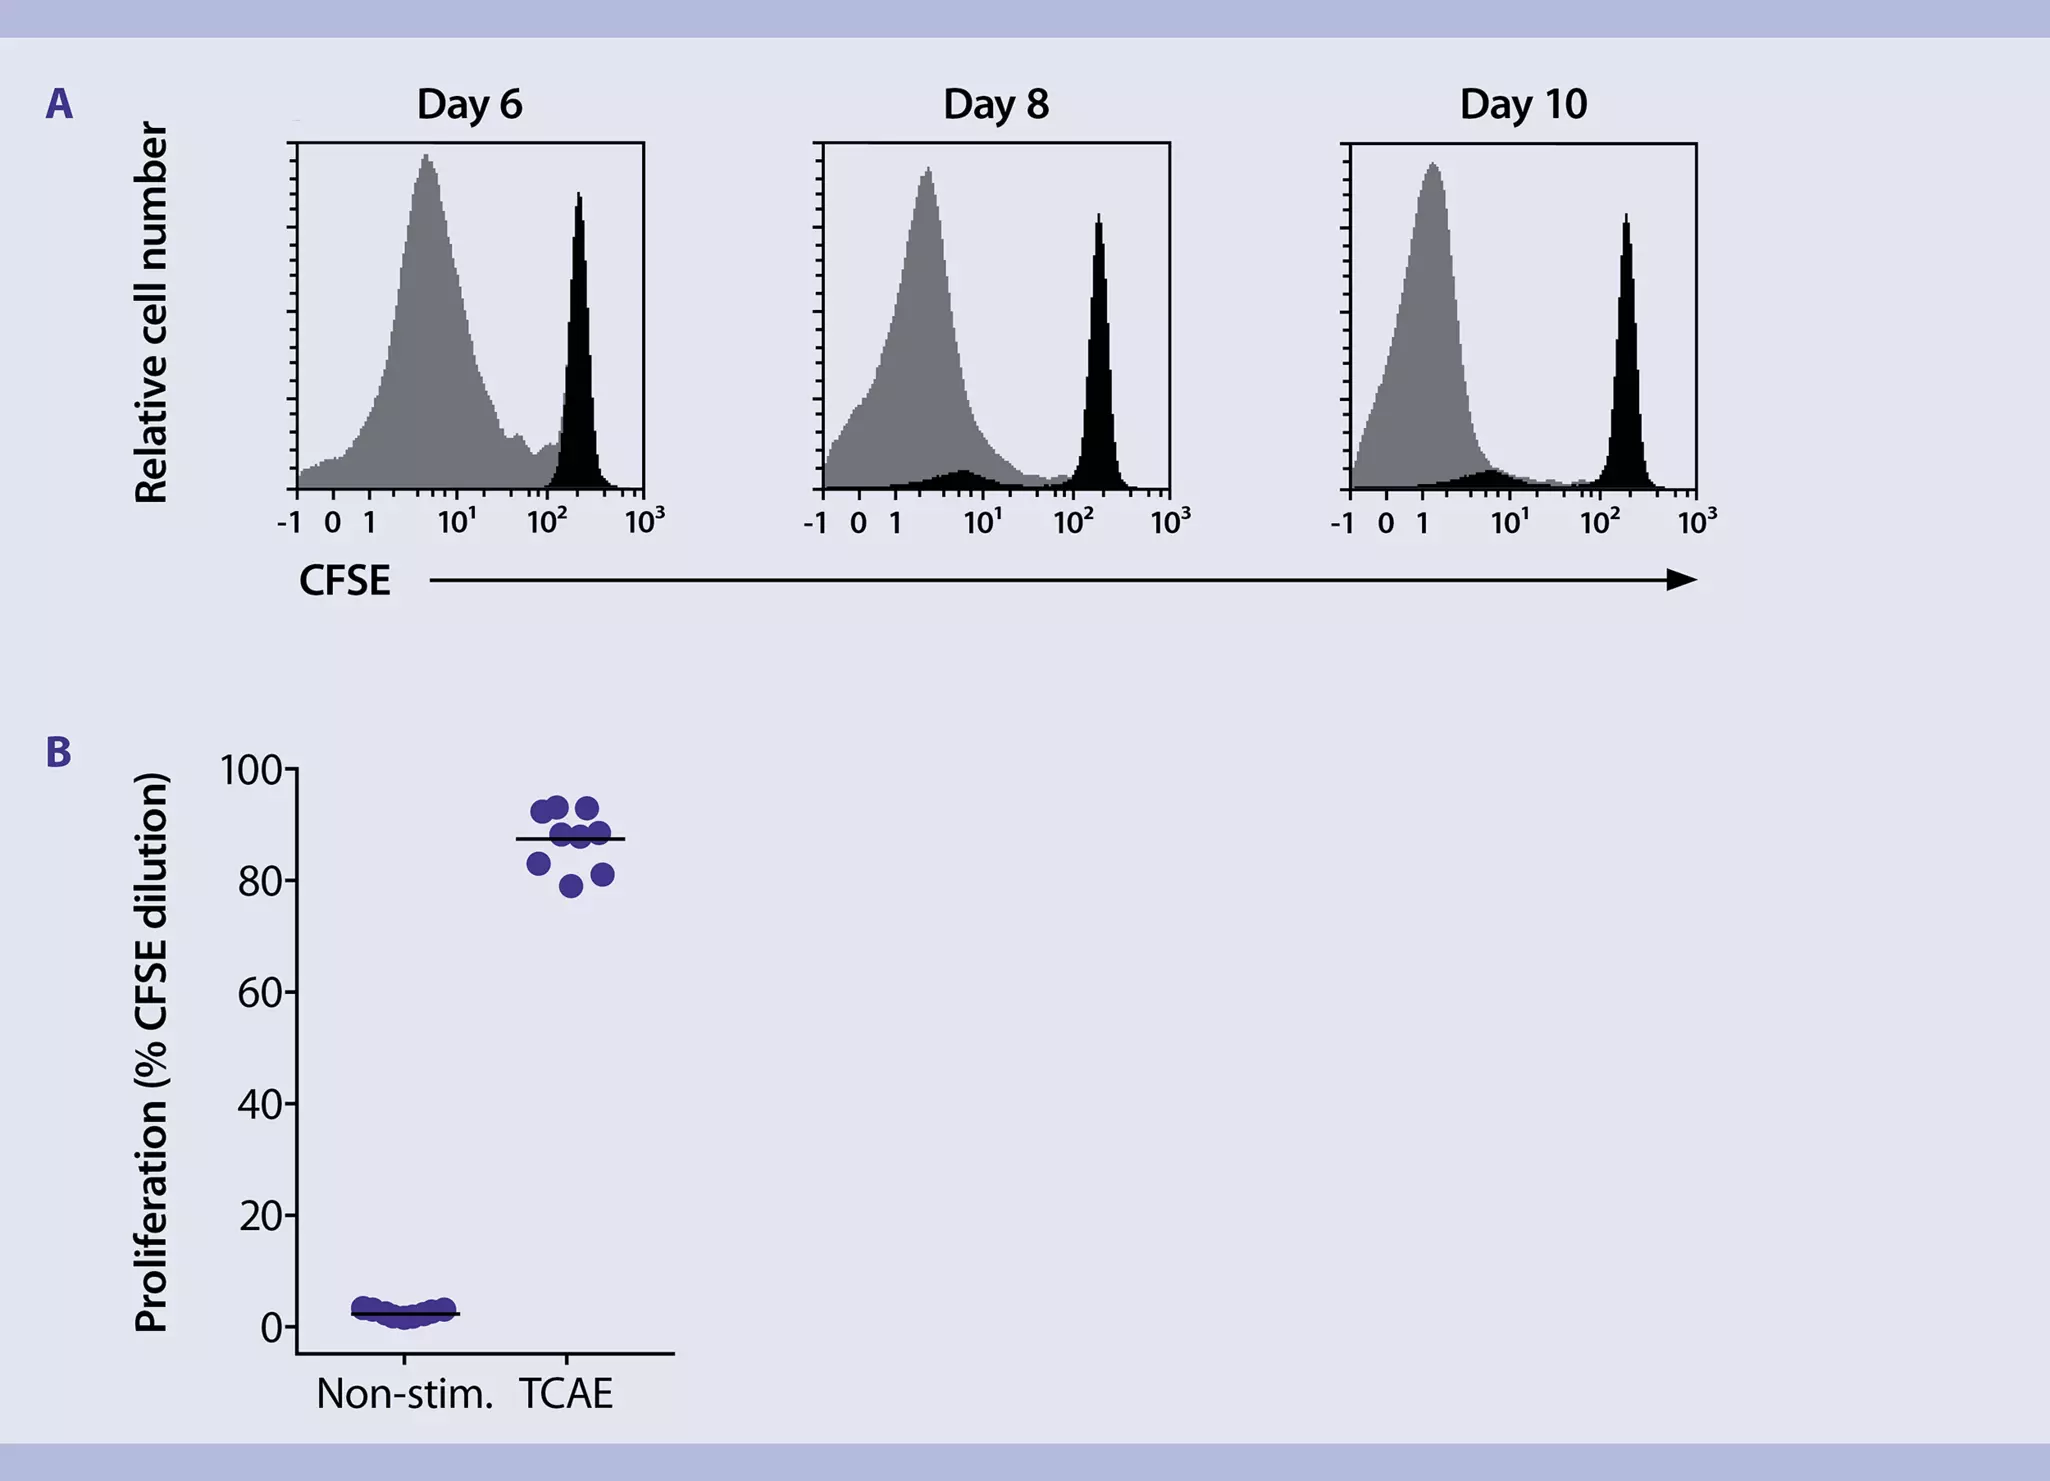
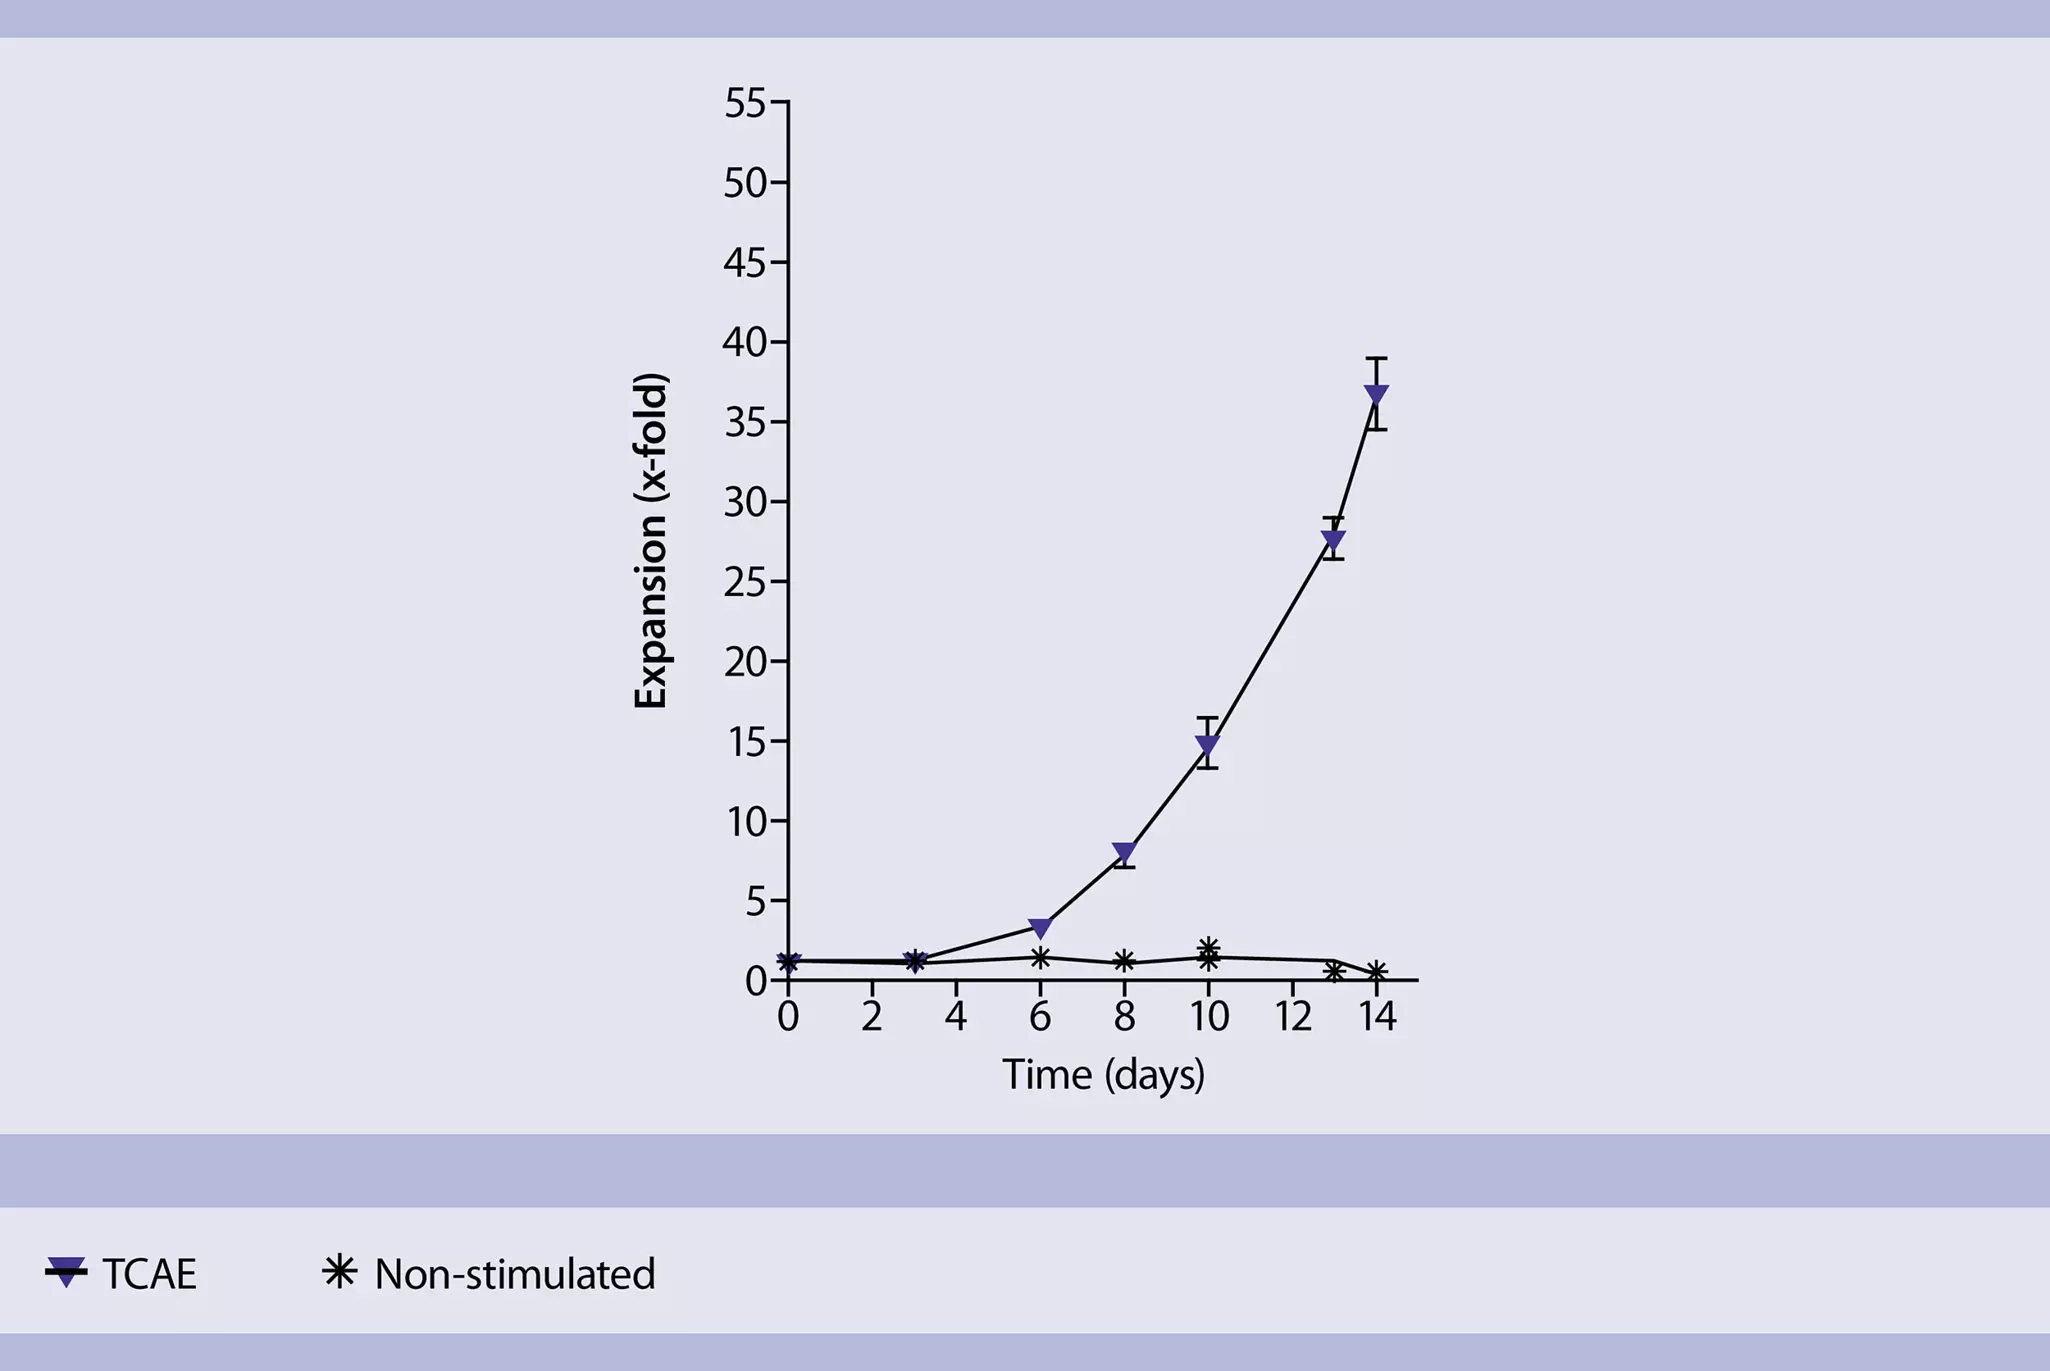
Removal of MACSiBead Particles
- For some experiments (e.g. restimulation of T cells), it is recommended to remove the MACSiBead Particles from the cell suspension.
- Harvest cells. Pool cells from wells that were treated under the same conditions. Wash empty wells with cold buffer to rinse out the remaining cells on the plate.
- Determine cell number.
- Wash cells with cold buffer.
- Resuspend cells in buffer at a density of up to 2×10⁷/mL and vortex thoroughly.
- Place the tube in the magnetic field of the MACSiMAG™ Separator.
- Allow the MACSiBead Particles to adhere to the wall of the tube for 4 minutes.
- With the tube still placed in the MACSiMAG Separator, carefully remove the supernatant containing the cells depleted of MACSiBead Particles. Transfer cells to a new tube.
- Remove the tube from the separator and add the same volume of buffer as before.
- Vortex sample, place tube in the MACSiMAG Separator, and repeat steps 6–7.
- Collected cells can now be further processed as required.
You have previously chosen International as your location.
What do you want to do?